See Edit Paint in action
Version 2.2.2 · 23 October 2026
Native gizmo dragging in Edit Mode
Fixed an input conflict that could prevent Blender’s Move, Rotate and Scale gizmos from dragging in mesh Edit Mode while Edit Paint was enabled, including with selection X-Ray. Keep Active Gizmo set to Drag; switching it to Press is not required. Fixed X-Ray through-selection when using Box, Circle or Lasso as the drag selection method of the Move tool. Also fixed selection-display updates interrupting native gizmo activation while holding and dragging a handle.
User-supplied Blender recording · Japanese and English captions.
Version 2.2.1 · 20 October 2026
Cycles bake stability fix
Fixed a crash that could occur in Blender 5.2.2 while Cycles was baking and the Render Properties panel was redrawn. Update to 2.2.1 before baking with Edit Paint enabled.
Version 2.2 · 19 October 2026
Through-depth gradients and more reliable controls
Edit Paint 2.2 update
Update overview · Japanese and English captions · about 12 seconds
Ring Gradient
Actual Blender viewport sequence · simulated stroke · edited to 3 seconds
- Ring Gradient. Drag along a limb or finger to vary the weight along its axis while keeping the same value around each cross-section. Connected branches inside the dragged interval can receive the gradient too.
- Gradient coverage. Front and Back reaches through the mesh under the gradient. This Part Only retains shape-based section tracking; Front Surface Only limits painting to visible surfaces. Selection, hiding and locks still protect vertices.
- View navigation and loop shortcuts. Override View Navigation now controls camera gestures independently of brush shortcuts. Alt-W selects a loop, Shift-Alt-W adds and Ctrl-Alt-W toggles. Camera presets release held keys when the pointer leaves the viewport, and custom or disabled brush bindings remain editable.
- Infinite thickness reaches the back. Infinite Depth no longer stops at the local surface-distance boundary. The brush footprint and polygon-island filter still apply, along with masks and the 20,000-vertex limit per dab.
- Feasible normalization. Symmetry painting now keeps a valid normalized result when the painted bone is the only available recipient. A false normalization warning no longer appears in this case; genuine lock conflicts are still reported.
- Display follows the edited objects. Switching objects no longer leaves the previous object's bone weights on screen. Multi-object Edit Mode display and saved object settings are retained.
- Gradient tool icons. The gradient card now shows the icon for the selected gradient tool.
Version 2.1.1 · 18 October 2026
Faster display updates and small workflow improvements
- Faster subdivision display updates. Reduced repeated geometry preparation when refreshing weights on subdivision surfaces. Large meshes can still take time to update.
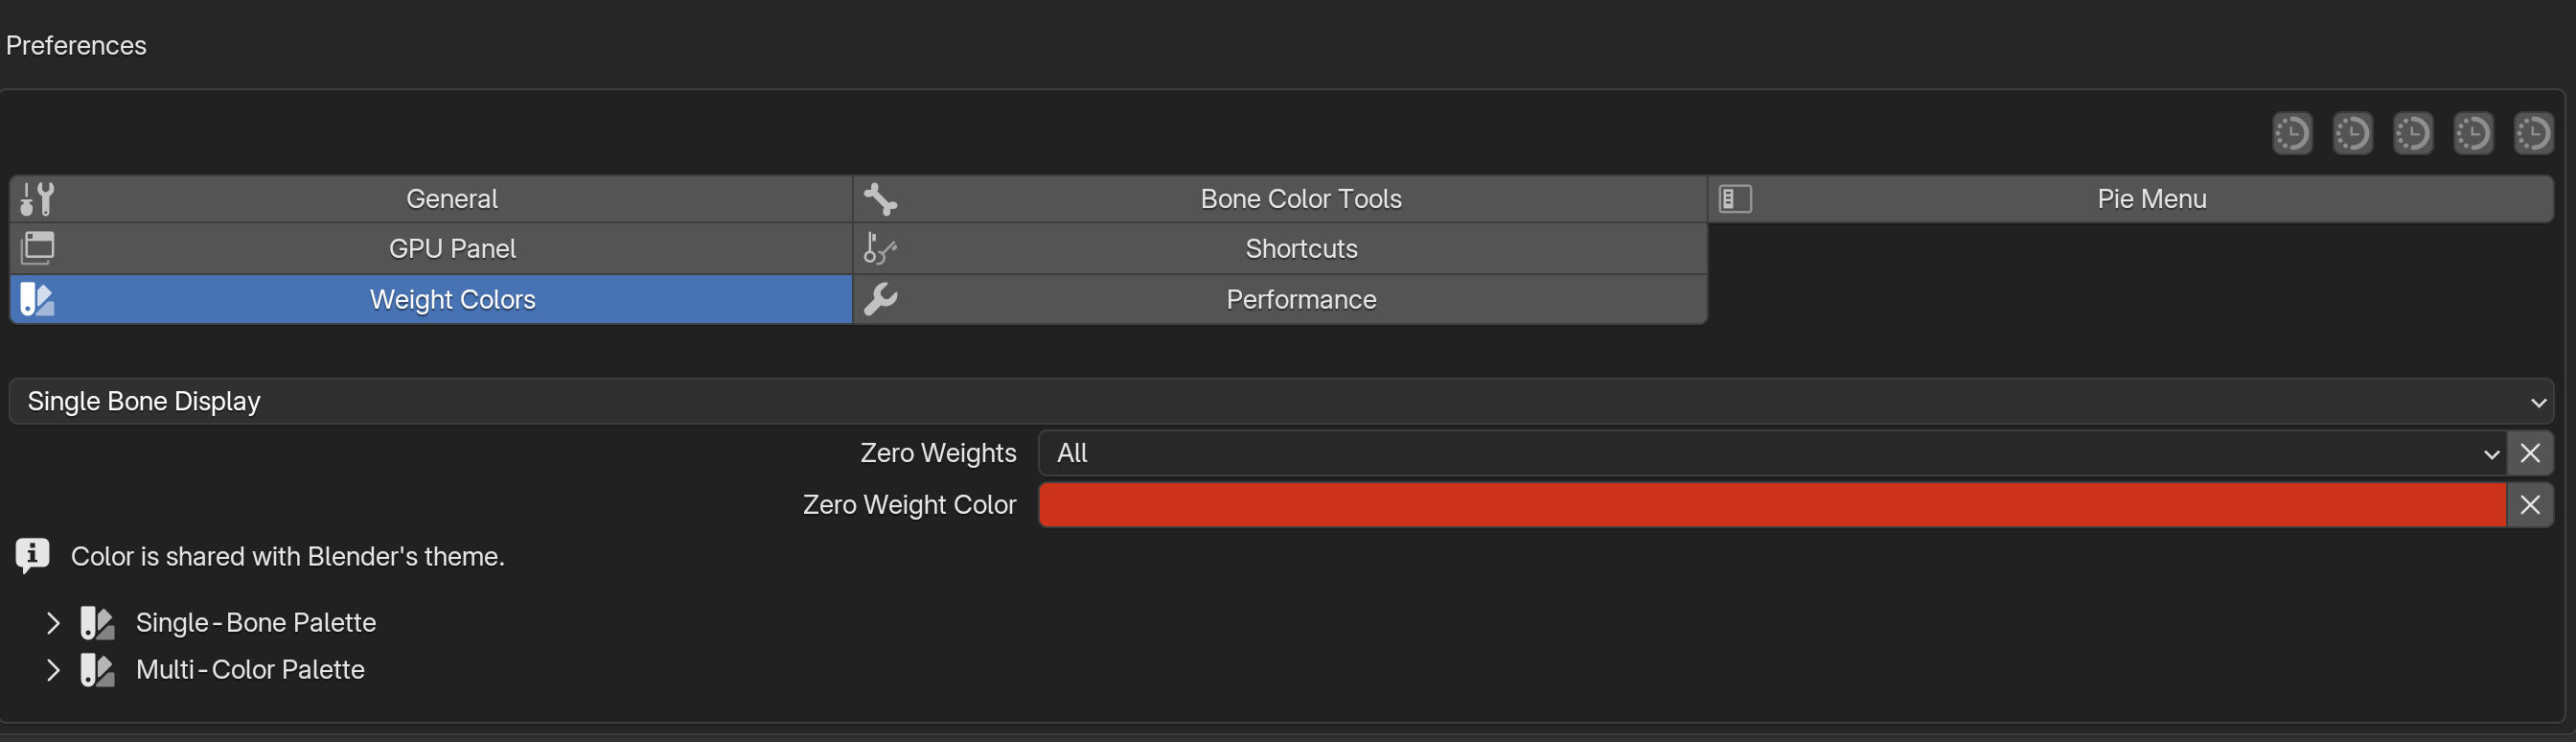
- Zero-weight warning settings. Preferences > Weight Colors now provides Zero Weights and Zero Weight Color. Native and custom displays share Blender’s theme color. Each field has its own reset.
- Quicker access to Preferences. Open Preferences directly from the dock context menu. The symmetry hover menu now focuses on X, Y, Z and Force Symmetric Paint.
Version 2.1 · 18 October 2026
Bug fixes and clearer controls
- Frame and pose updates. Bone display, hover candidates and evaluated weight surfaces now follow frame changes and playback, including distinct subframes.
- Zero Weights display. None, Active and All now distinguish zero-weight vertices consistently. The custom weight display also shows unreferenced vertices in black when the corresponding warning mode is enabled.
- Gradient preview and recovery. Fan Gradient reduces repeated preview work and updates affected weight rows. Cancel restores previous weights, and retaining a valid preview after a failed calculation also retains its repair diagnostics. Subdivision and large meshes can still require noticeable update time.
- Quick Pose and bone-pick guidance. Quick Pose reports missing transform-keymap entries with a recovery path and restores temporary shortcuts after failure. Bone picking explains hidden bones, Solo collections and missing matching groups. A first-use notice explains the EditPaint-only bone display.
- Reorder upper-row controls. Middle-drag an upper-row control or its row in Display Tools > Bar Items to change its order. Esc cancels the move; Reset Order restores the default order. The lower tool cards keep their order.
- Clearer dock and symmetry controls. Refined header icons, spacing and the selection strip. Selection Weights keeps its pink accent in icon-only mode. Hover over the symmetry button to open its choices while retaining direct X toggling.
- Temporary X-Ray for selection. X-Ray Mode temporarily enables through-selection during Box, Circle and Lasso gestures and restores the previous display when the gesture finishes or is cancelled.
- Overlapping panel input. Overlapping cvELD panels give input to the visible front panel, reducing clicks and toggle drags leaking into a covered panel.
- Shortcut presets. Added adapted Mudbox and Substance 3D Painter presets. Softimage reserves S for navigation and uses R / Shift-R for radius / strength. These are brush shortcuts, not complete DCC keymaps; applying a preset is an explicit action.
- Overlay settings explained. The manual explains native weight opacity, Show Weight, Zero Weights and the difference between selection X-Ray and a translucent weight surface.
Follow the animated pose
Bone display and the evaluated weight surface update as the frame changes.
See zero-weight warnings
Compare None, Active and All with the custom weight display.
Arrange upper-row controls
Middle-drag a control or its Bar Items row. Esc cancels; Reset Order restores the defaults.
Select through the mesh temporarily
X-Ray turns on during the selection gesture and returns to the previous display afterward.
Actual Blender viewport demonstrations, edited to three seconds. Captured with controlled scene changes and simulated input.
New in Edit Paint 2.0
Paint both sides.
Keep the pose.
Symmetry on asymmetric shapes
Paint corresponding sides even when the mesh is asymmetric. Use surface-based X symmetry to transfer the stroke and inspect the result on both sides.
Paint symmetrically in a pose
Rotate the bones and keep the pose while painting both sides. Work in a pose when the intended deformation is easier to understand than in the rest position.
Version 2.0 · Changes since 1.2.4
What changed in 2.0
- Three X-symmetry painting methods. Choose regular symmetry, Surface Weight Transfer for asymmetric shapes and different topology, or Mirror Brush Range to blend independently from each side’s starting weights. Mirror Brush Range uses Circle Draw/Erase; other tools use the applicable surface method.
- Symmetry while posed. Paint with bones rotated, including poses that cross the centerline. The opposite brush guide follows the deformed surface while the original shape determines the corresponding sides.
- Symmetric smoothing and smudging. Regular and surface symmetry now cover Smooth, temporary Shift Smooth, Smooth Gradient and Smudge. Repainting a source already at the target can also correct the opposite side; single-bone display shows the actual channel for each side.
- Directional weight symmetry. Use the − / + commands to copy existing weights to a chosen side. Select bone or vertex scope, local/world axes and approximate surface transfer. These one-shot commands are separate from live X-symmetry painting; optional UV transfer and Delete and Regenerate are explicit operations.
- Adjust Bone Set. Preview the combined strength and relative shares of several bones with Scale / Set Total and Preserve / Multiply / Custom Shares. Compare Original and Preview, then Apply as one Undo step or Cancel without writing weights.
- Simpler or more informative controls. Add direct X-symmetry access to the dock and choose icons alone or icons with labels for individual bar buttons or the whole bar. Ctrl-hover can list overlapping bone names.
- High-density mesh handling. Remove the fixed vertex and triangle count limits that could cancel painting or suppress weight colors. Reuse prepared display data across redraws and improve recovery after display allocation failures. Large meshes still require preparation time and memory.
- Selection and shortcut fixes. Isolate / Restore keeps bone selections made while isolated. Mode activation shortcuts remain independent. Preset application and All Unassigned handle inherited duplicate bindings while preserving independent user additions.
- Settings and release scope. Normal Blender Preferences saving remains available; settings JSON backup/restore is not an available 2.0 feature. Cross-object Weight Transfer is deferred to a future update and is not included as an available 2.0 tool.
Thickness Brush, Ribbon Brush / Gradient, Smooth Selected, Influence Cut, palettes, bone appearance presets and the pie menu were already available in 1.2.4.
Preview a bone set before applying
Compare the original weights and the proposed strength and proportions.
Choose the amount of interface detail
Keep frequently used controls close and choose simple icons or labels.
The half-circle advantage
Two ways.
One clean boundary.
Half-circle brush
Guide the flat edge along a boundary. Paint the intended side while keeping the opposite half untouched.
Half-circle gradient
Spread the transition in a chosen direction. The half-circle shape helps shape the weights around neighboring fingers.
New in v1.1
See clearly.
Focus your weights.
Fine-tune bone colors and display
Customize bone shapes, colors, outlines, glow and independent selection and hover highlights. Save your look in Preferences and manage named presets.
Select a bone region. Work in isolation.
Automatically select vertices around a bone, even without existing weights. Isolate the selected bones and geometry to concentrate on weight work in that area, then restore the full view.
Introduced in v1.2–1.2.4
Hair and ribbons.
One stroke.
Thickness Brush
Paint front and back weights on hair strands and ribbons in one stroke. Adjust depth relative to the brush radius to reach through the mesh.
Ribbon Brush
Select the target bones, click Use Selected Bones and paint. Weights are distributed automatically using bone distances and the connected mesh surface.
Ribbon Gradient
Bring the ribbon workflow to gradients. Drag an interval to shape a smooth transition across the selected bones.
Includes all features, improvements and fixes from v1.2 through v1.2.4.
Current interface · Retaken in Blender 5.2.1
Keep your tools close
Choose and arrange the buttons you need, keeping frequent actions close at hand. Switch between simple icons and a more informative display.
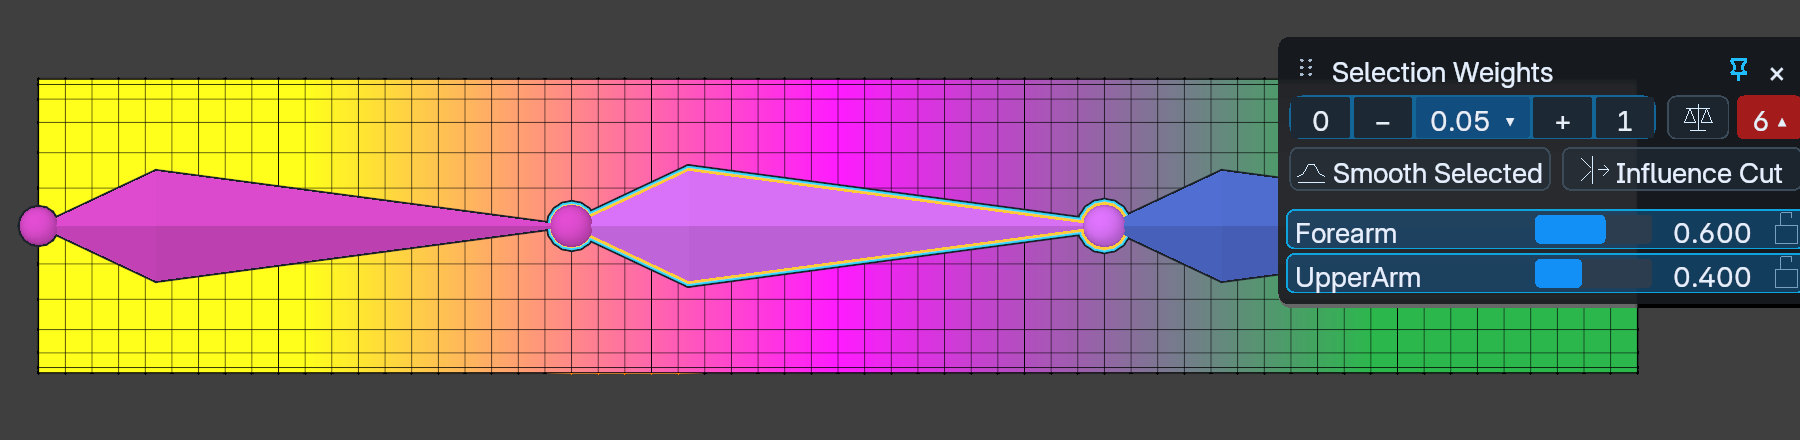
Refine selected weights
Keep the weight controls above the bone list. Pin the card while selecting or transforming, and return to it after changing modes.
Painting and workflow improvements
Paint the active bone.
Refine the selection.
Ordinary brushes and gradients paint the active bone, even with multiple bones selected. Choose Ribbon Brush or Ribbon Gradient explicitly for multiple targets. Ordinary Multi-Paint has been removed.
Smooth. Cut. Check the numbers.
Select bone rows in Selection Weights. Smooth Selected blends only those unlocked channels while preserving their total. Influence Cut removes other unlocked deform influences and redistributes their weight to the selected bones. Locks and non-deform groups are protected. Weight Tools commands now refresh the numbers automatically.
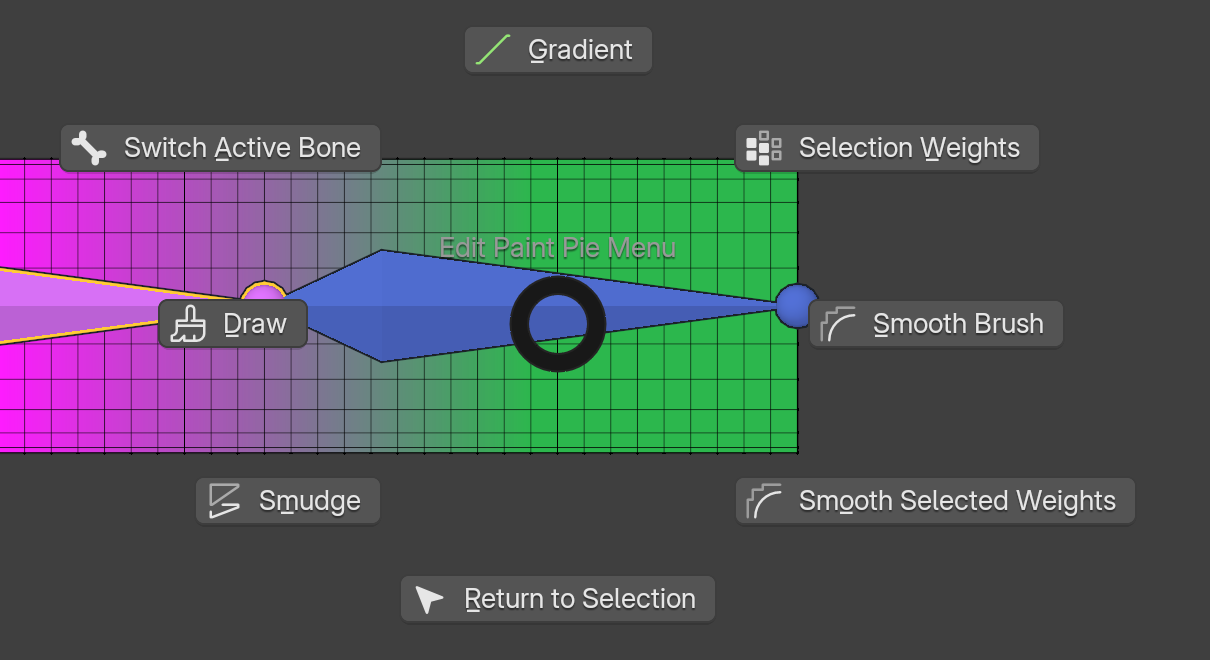
Your tools, eight directions
Press F12 with a mesh selected. Assign 25 commands to eight directions in Preferences, or hide entries with Empty Slot. This new capture shows the menu while editing a bound mesh.
Selection and stroke redraws do less repeated work. Thickness brushes also erase near-edge-on polygons correctly with Weight 0 while keeping separate surfaces outside the depth range excluded. Performance varies with the mesh and scene.
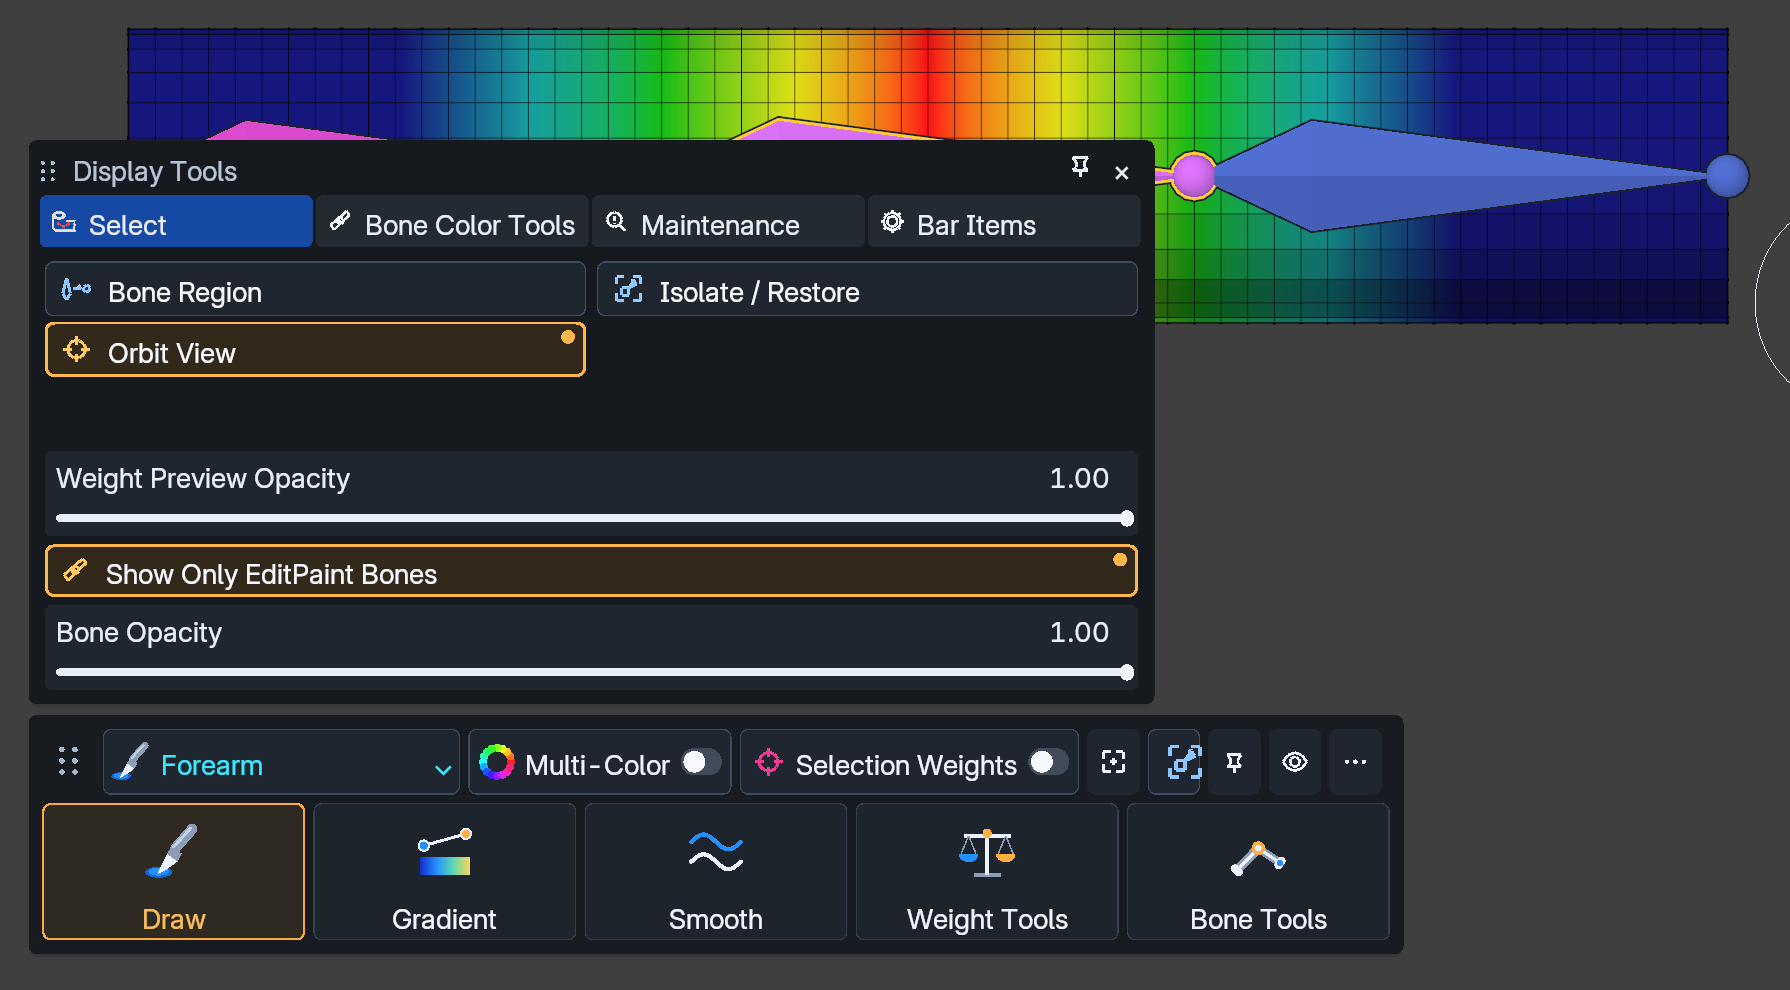
Clear bone visibility
Keep your bone display clear.
Show Only EditPaint Bones hides native bone drawing during weight editing. Find the default-on toggle in Display Tools → Select, above Bone Opacity. Turn it off or leave weight display to restore the previous visibility. Pose operations and wireframe shading keep the native display available. Native-bone hiding now recovers even when an Undo attempt does not reach its usual completion callback.
Mesh Edit Mode. A whole new rhythm.
More bones.
One stroke.
Paint the active bone, or choose Ribbon Brush to blend selected targets together. Shape your weights without leaving mesh Edit Mode.
Explore the workflow ↗Built from scratch. A dedicated brush, gradient and weight-processing engine—not a wrapper around Blender’s built-in weight-paint tools.
Normalization controls. Protected locks. Status for unmet constraints.
02 / Five ways to shape a transition
Find your flow.
Compare the five original gradients below; Ribbon Gradient is also available. Each small video shows a different way to shape your weights.
Surface
Create a gradient on connected mesh surfaces; use width and curve settings to shape the transition.
Bone axis
Align the gradient with the bone axis even when the drag is slightly off-axis.
Radial
Start at the center and drag outward to set the surface gradient reach.
Fan
Use Fan Gradient to restrict the transition to a direction; adjust its angle and orientation.
Screen
Drag from start to end and preview the gradient while staying in Edit Mode.
03 / The finishing touch
Feel the brush.
Own the numbers.
Paint broad changes, then select vertices and press W to refine the influence values. Keep your locked weights protected.
Paint exactly where needed
Choose Draw and drag toward the target weight.
Paint selected vertices only
Select the upper half and choose Selected Vertices. The lower half stays unchanged even when the circle crosses the boundary.
Smooth uneven weights
Drag Smooth over uneven weights to blend connected vertices.
Smudge: pull the existing distribution
Drag from an existing weighted area to pull the distribution across the surface.
Auto Blend: soften a hard boundary
Preview and adjust the boundary between target bones while preserving other bone allocations.
Clean Far: remove distant influence
Keep the protected area near the bone and reduce distant weights.
Smooth the selection in one operation
Smooth a selected region in one operation; only the upper half is selected here.
Check deformation in Bone Operation Mode
Bend the rig in Bone Operation Mode, return to Edit Paint and brush the deformed surface while keeping the pose.
Choose a readable weight palette
Switch the display palette without changing stored weight values.
Split bones and their weights together
Divide an existing bone into three segments and distribute its weights by position.
cvELD EDIT PAINT
Select. Paint.
Make it move.
Requirements and support
Before you begin.
Continuing from Version 1.2.4
Thickness Brush paints weights through hair and ribbon meshes. Choose Thickness Circle or Thickness Semicircle and adjust Depth / Radius (%). Ribbon Brush distributes weights using the selected deform bones and connected surface distances; prepare matching vertex groups and click Use Selected Bones to update the stored targets. Ribbon Gradient applies the same assignment along a dragged interval. Build Weights transfers unlocked deform weights to selected bones; Preserve Selected Total redistributes their existing total. Includes stability improvements and bug fixes.
Requirements and installation
Declared minimum: Blender 4.5.0. Demonstrations captured on Windows in Blender 5.2.1 LTS. Check suitability for your production rigs. Current exposed tools are weight painting.
Install the complete ZIP through Preferences → Add-ons → Install from Disk, then enable cvELD Edit Paint. Do not enable the Utility-integrated and standalone copies together.
Start painting
Select a bound mesh, choose the weight brush, Ctrl-click a bone and drag to paint. Use Selected Vertices to restrict edits. W opens Selection Weights. Ctrl-Z undoes committed edits.
Topology-changing modifiers do not provide supported paint correspondence. Disable their Edit Mode display when painting. Explicit locks are protected. Inspect reported normalization conflicts after symmetry painting.
Code licensed under GPL-3.0-or-later, without warranty. Contact the seller through your purchase page.