cvELD Quick UV Checker
操作マニュアル
User manual
表示を切り替え、UVの模様・歪み・切れ目・問題箇所を確認します。
Show a checker, read UV stretch and inspect seams and diagnostic results.
表示の問題をひと目で確認
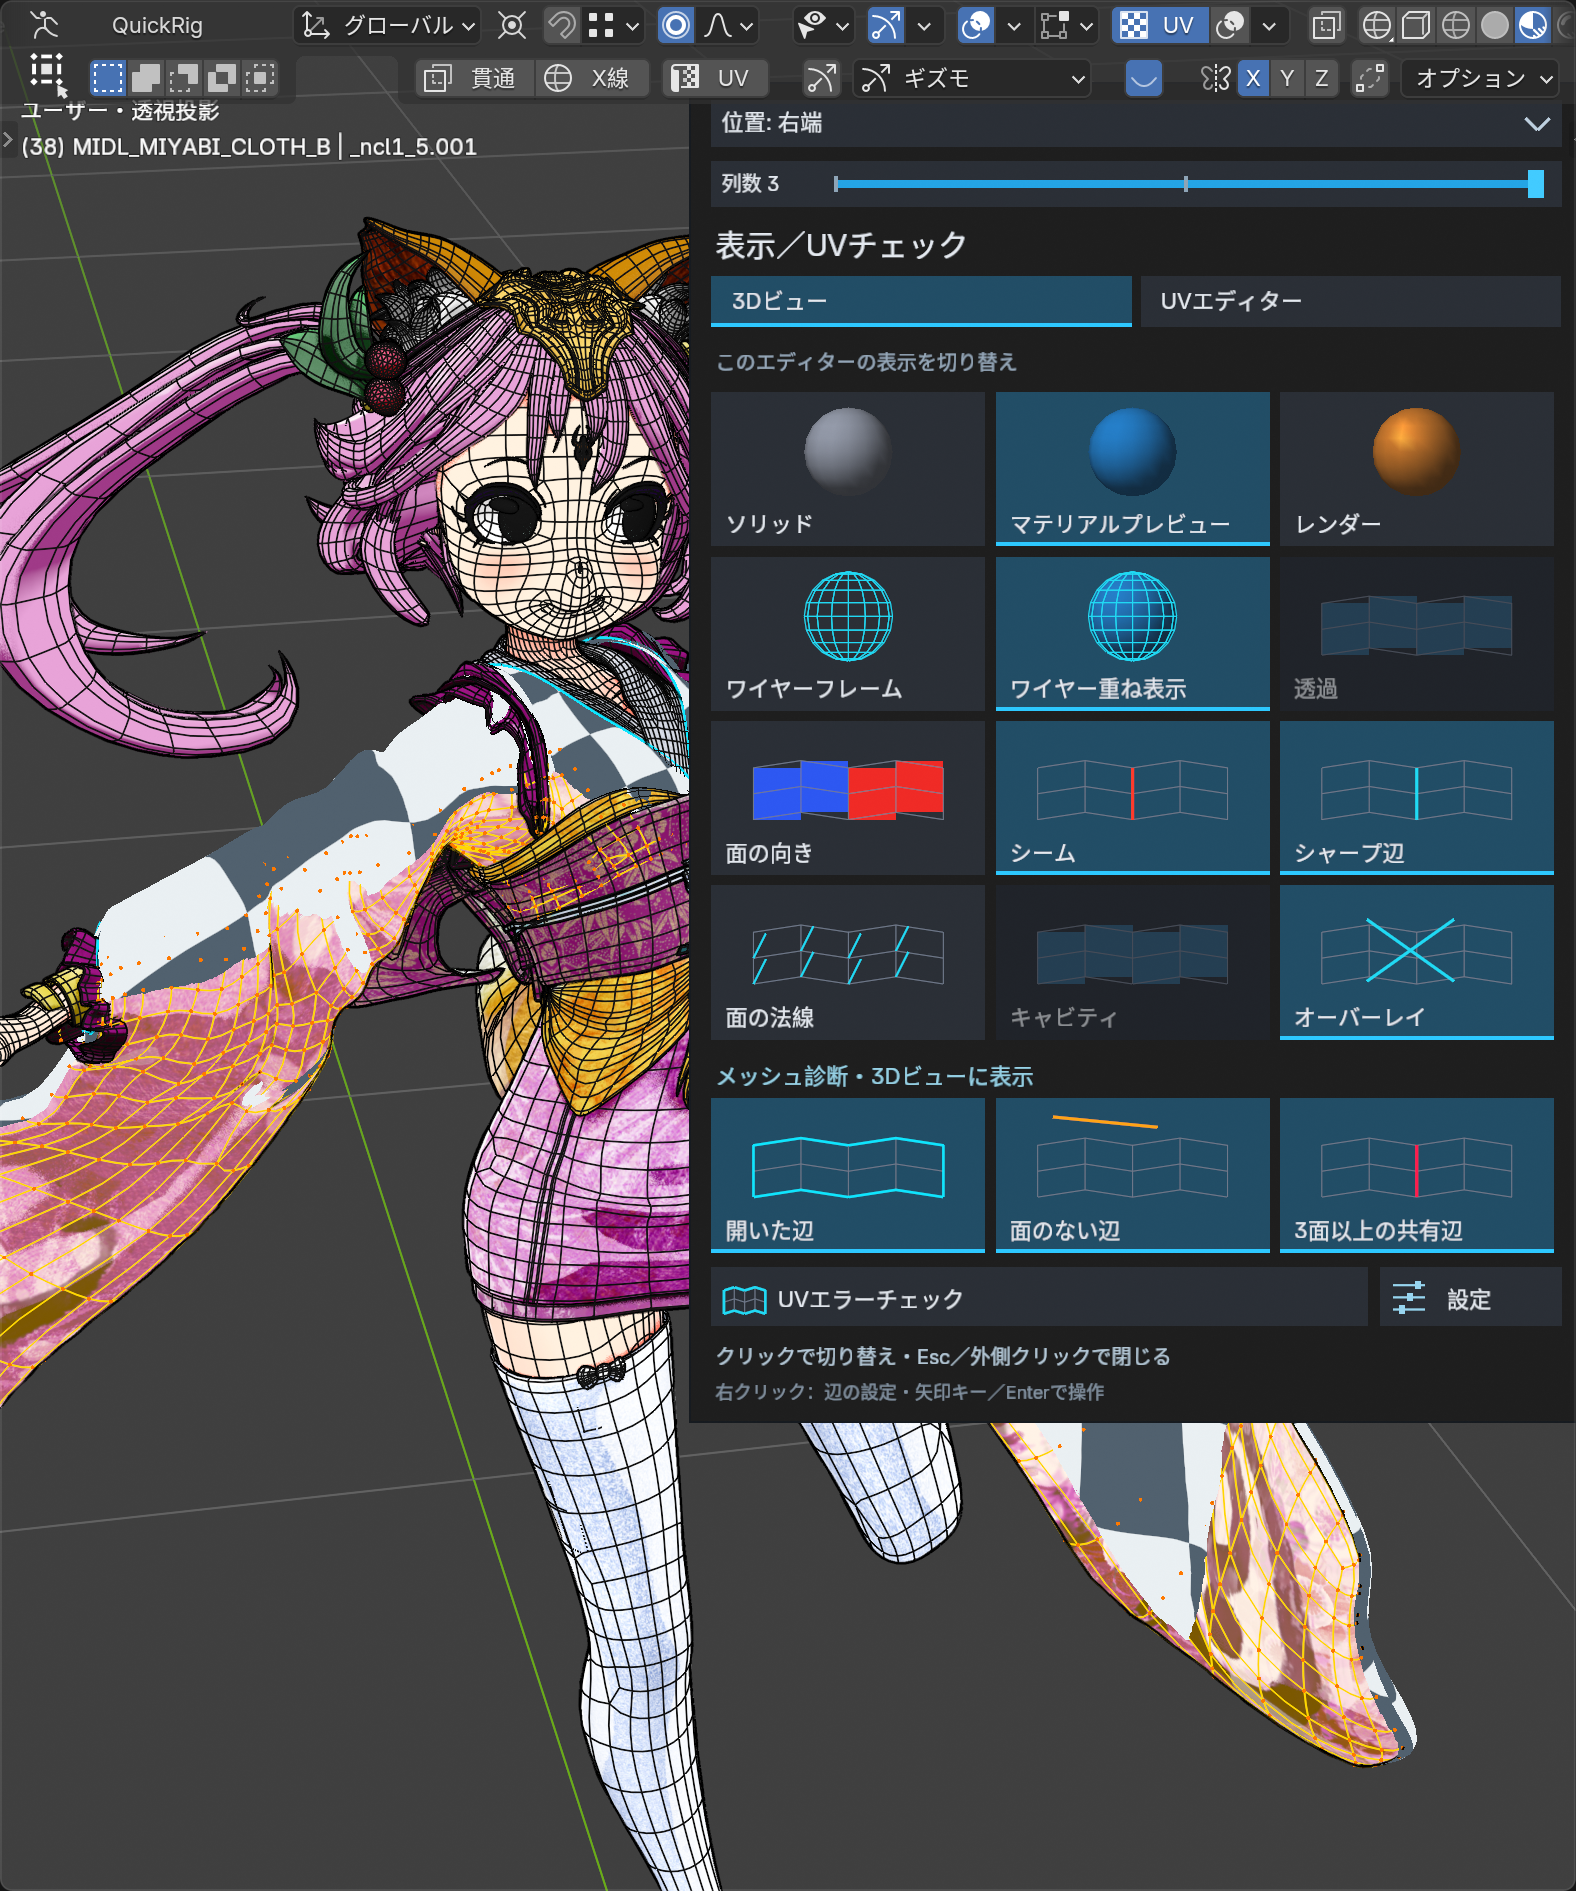
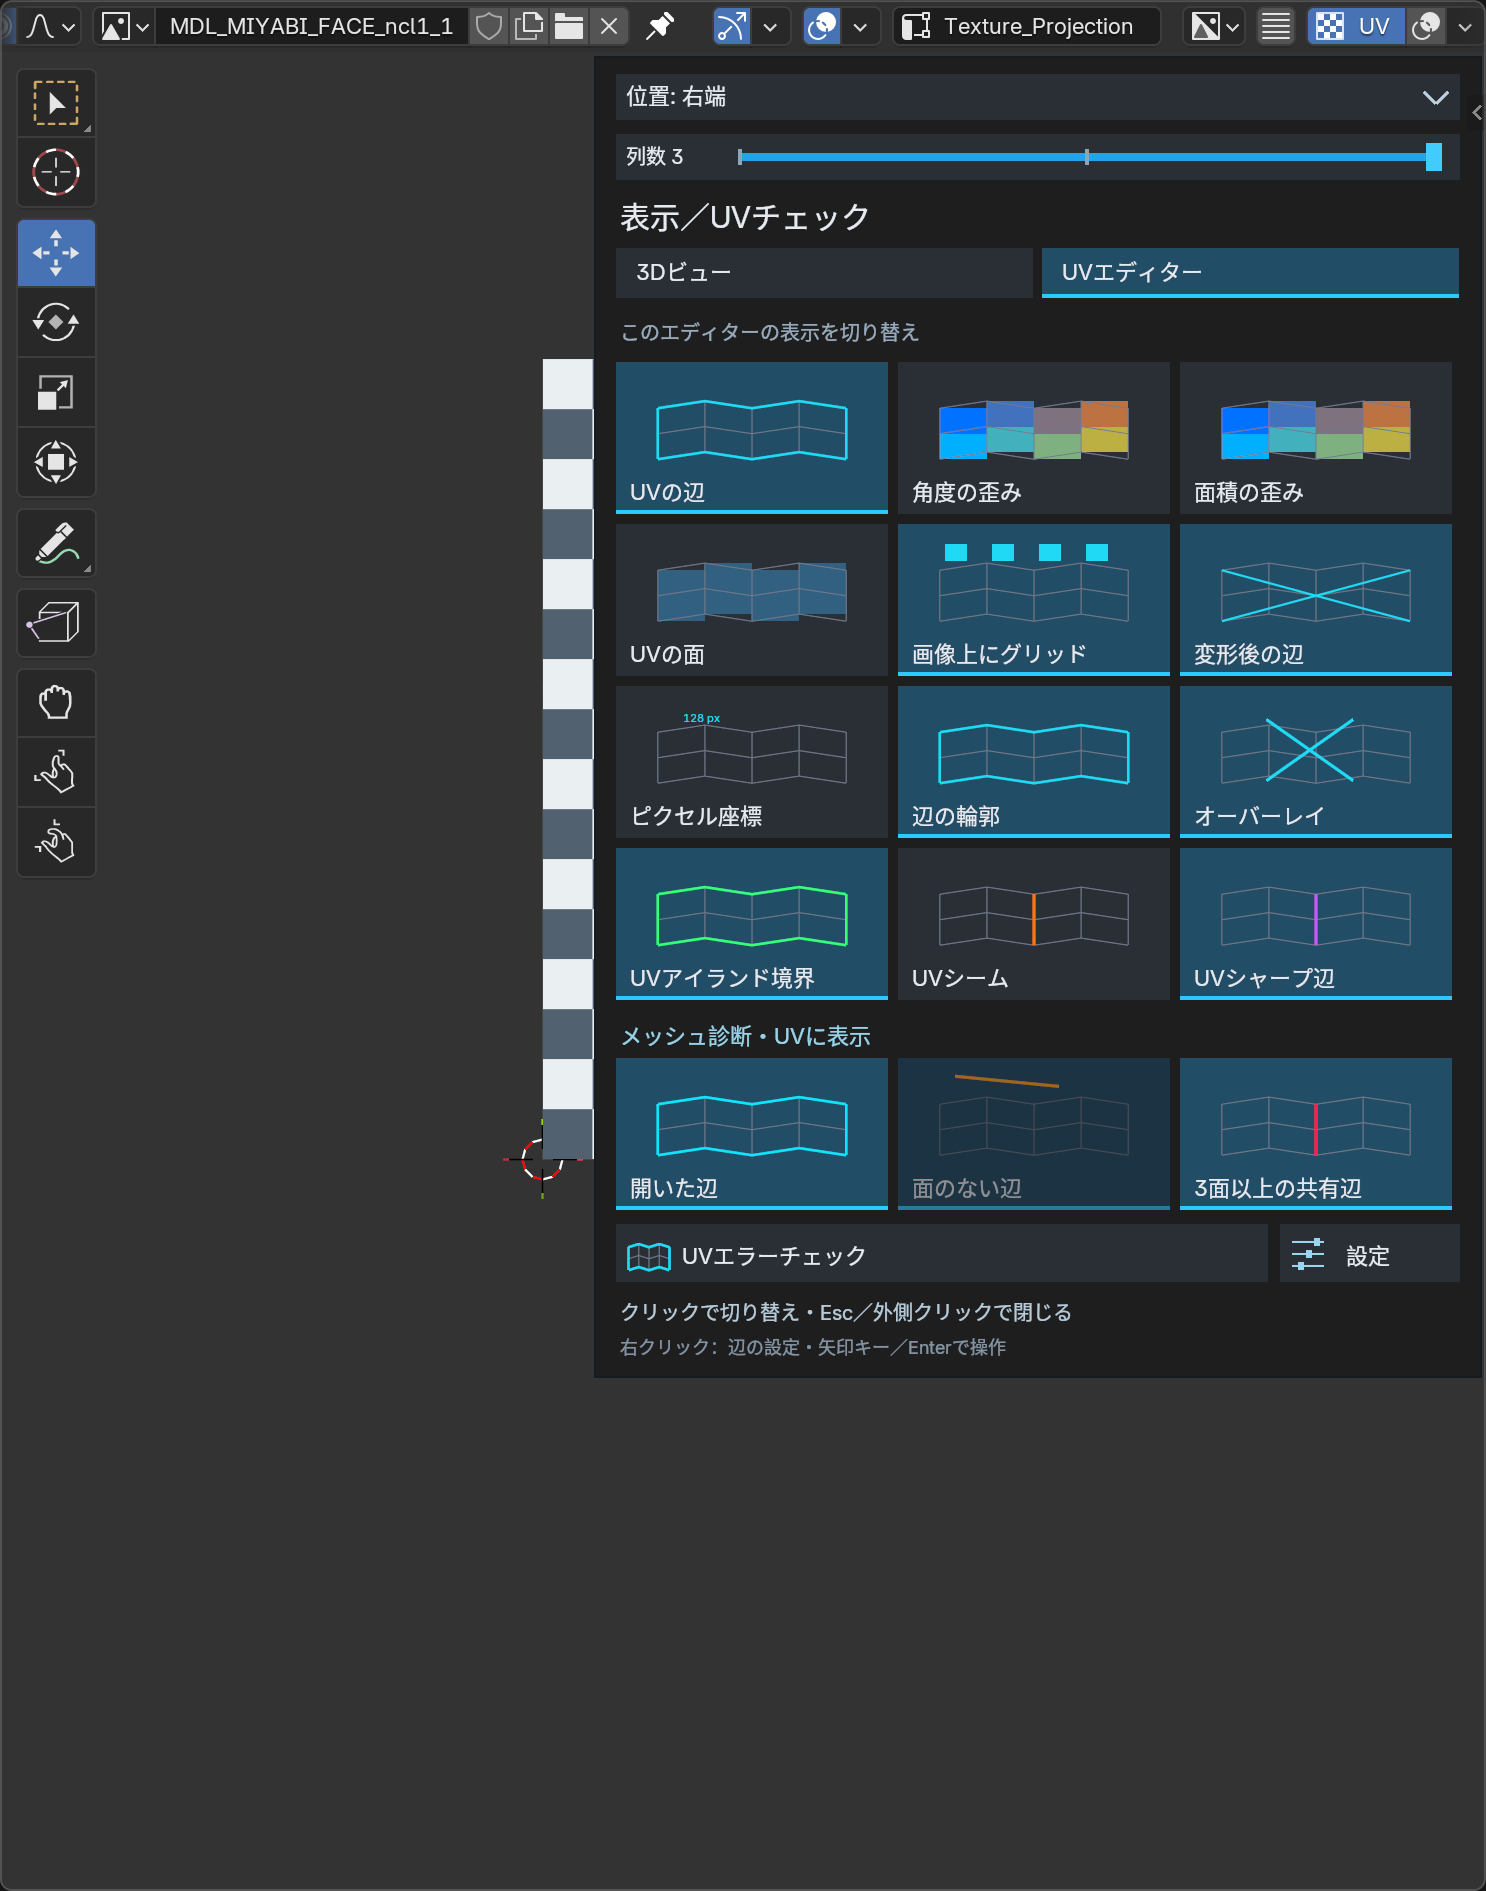
表示/UVチェックは、表示の切り替えをサムネイル付きカードにまとめたメニューです。3DビューとUVエディターのヘッダーにあるUVボタンのすぐ右のアイコンから開けます。
- 3DビューまたはUVエディターを選びます。
- カードを押して表示を切り替えます。青いカードはON、薄いカードは現在の条件で使えない項目です。
- UVエラーチェックで診断結果を確認します。辺の色・太さ・対象・裏側への表示は設定から調整できます。
3Dビューではシェーディング、ワイヤー重ね表示、面の向き、シーム、法線などを比較できます。UVエディターでは角度・面積の歪み、UVの辺と面、アイランド境界、シーム、シャープ辺などを切り替えられます。メッシュ診断は開いた辺を水色、面のない辺を橙、3面以上の共有辺をピンクで表示します。面のない辺にはUV座標がないため、UV上には表示しません。
診断線は表示中のモディファイアをすべて計算した後の形状に追従し、アニメーションのフレーム変更時にも更新します。編集モードではモディファイアの表示スイッチに従います。たとえばSolidifyで開口部が閉じた場合、その場所は「開いた辺」として表示しません。元メッシュやUVは変更しません。
配置は左・右・上・下、列数は1~3列で調整できます。Escまたは外側クリックで閉じ、右クリックで辺の設定を開きます。矢印キーとEnterでも操作できます。
Quick UV Checkerに内蔵されています。QuickBakerなど別のアドオンは不要です。Blender標準の表示項目にはモードやシェーディングの制限があります。評価後の面数が多いと再生が遅くなるため、確認対象や細分化の段数を減らしてください。
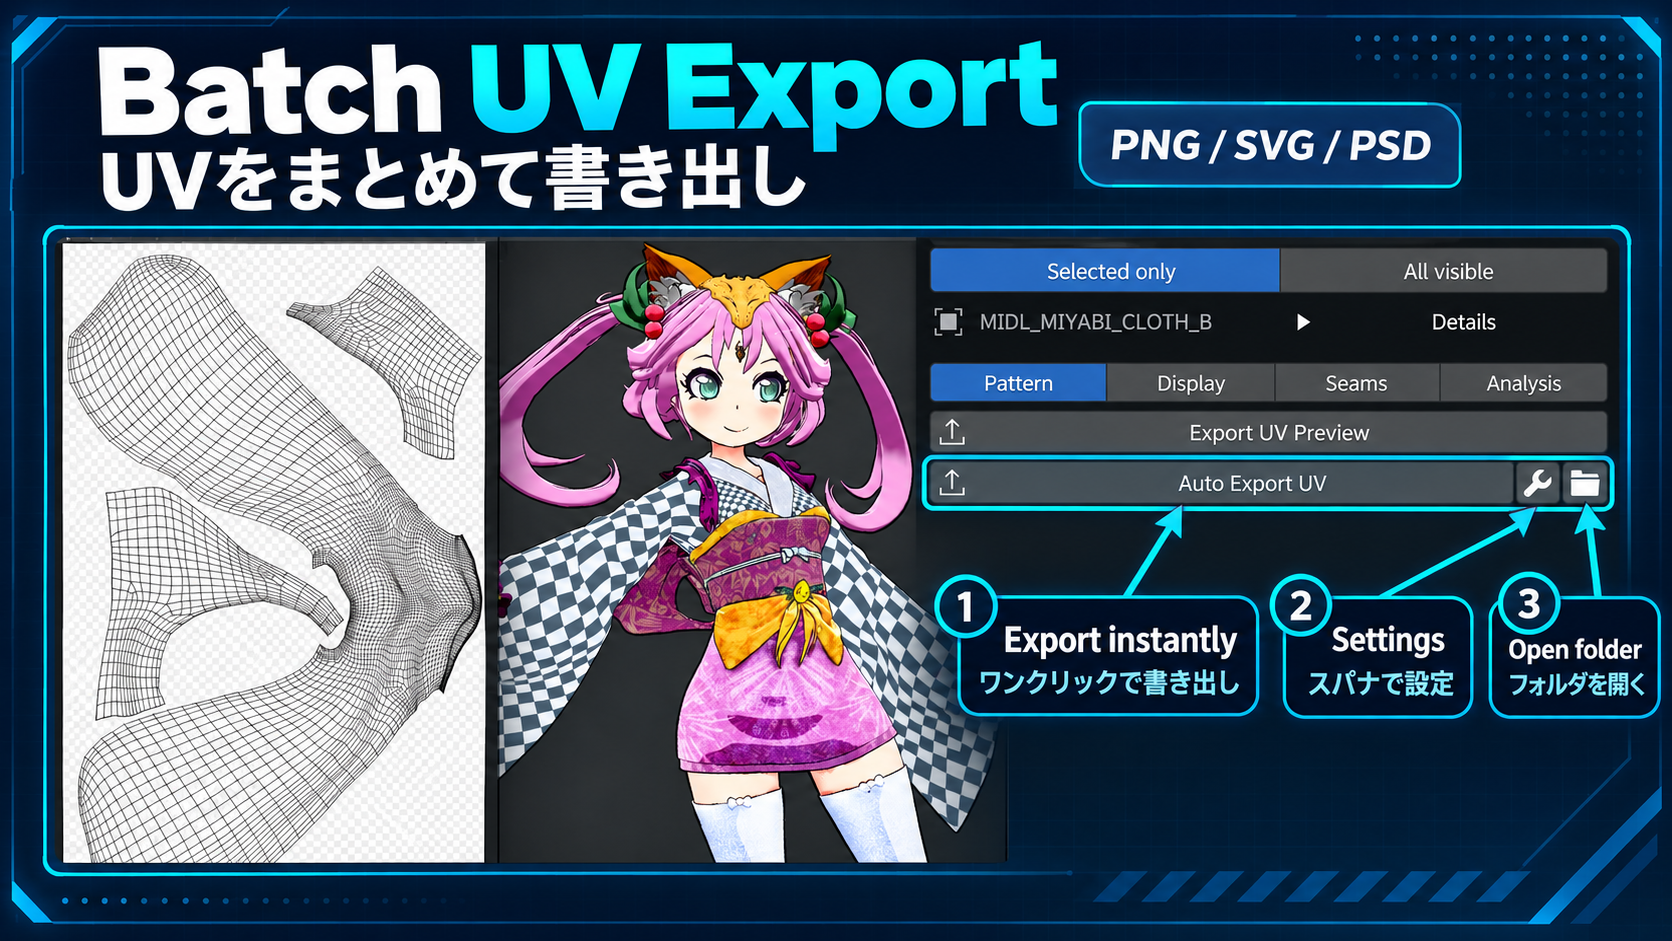
UVを一括書き出し — PNG・SVG・PSD
1.4.0の新機能:プレビューを透過PNG・ベクターSVG・レイヤー付きPSDで保存できます。「模様」タブを開きます。
- 書き出す、UVを持つオブジェクトを選択します。選択のみで未選択の場合は警告が出ます。
- UVを自動書き出しを押すと、保存済みの設定ですぐに書き出します。初期設定はUVの辺のみ・背景透過PNG・2048 × 2048 pxです。
- 右端の小さなフォルダアイコンで出力先を開きます。初期設定では、保存した.blendと同じディレクトリに「UV」フォルダを1つ作成し、すべてそこへ保存します。
設定を変更するときは、自動書き出しボタンの右にあるスパナを押して保存します。設定の保存だけでは書き出しません。出力フォルダを指定すると、シーンの場所よりそちらを優先します。未保存のシーンは、先に.blendを保存するか出力フォルダを指定してください。
形式と出力内容
| 形式 | 用途 |
|---|---|
| PNG(透過) | UVの辺、またはチェッカー柄をアルファ付き画像に保存。 |
| SVG | UVの辺・チェッカー柄・両方をベクターで保存。 |
| PSD(レイヤー) | チェッカーとUVの辺を別レイヤーに保存。可逆ZIP圧縮と透過に対応。PNGで「両方」を選んだ場合も、自動でPSDに切り替わります。 |
不透明度・柄・配色はプレビューと共通です。書き出し設定でUV線の色と太さ、画像サイズ、UVの範囲、アイランド外側の透過を調整できます。PSD対応のペイントソフトではレイヤーを個別に編集できます。読み込み対応はソフトによって異なります。
一括対象とファイル名
自動書き出しでは、保存されたテクスチャ参照に合わせてマテリアルの面をまとめ、同じUV配置の重複を省いて1つのフォルダへ出力します。同じUVを使う色違い・ノーマルマップが複数あっても、同一のUV配置は1つにまとまります。すべての柄を有効にすると14種類を一括出力できます。UVを書き出しでは現在の対象をまとめて保存するほか、オブジェクト別・全柄の一括保存も選べます。
プレフィックスは自動で付きます。プリファレンスで {object}・{material}・{texture}・{uv}を使って規則を変更できます。初期値は {object}_{material}_{texture}です。命名規則と自動書き出し設定は、プリファレンスのJSON保存・復元にも含まれます。既存ファイルの上書きは、その設定を有効にした場合に行います。
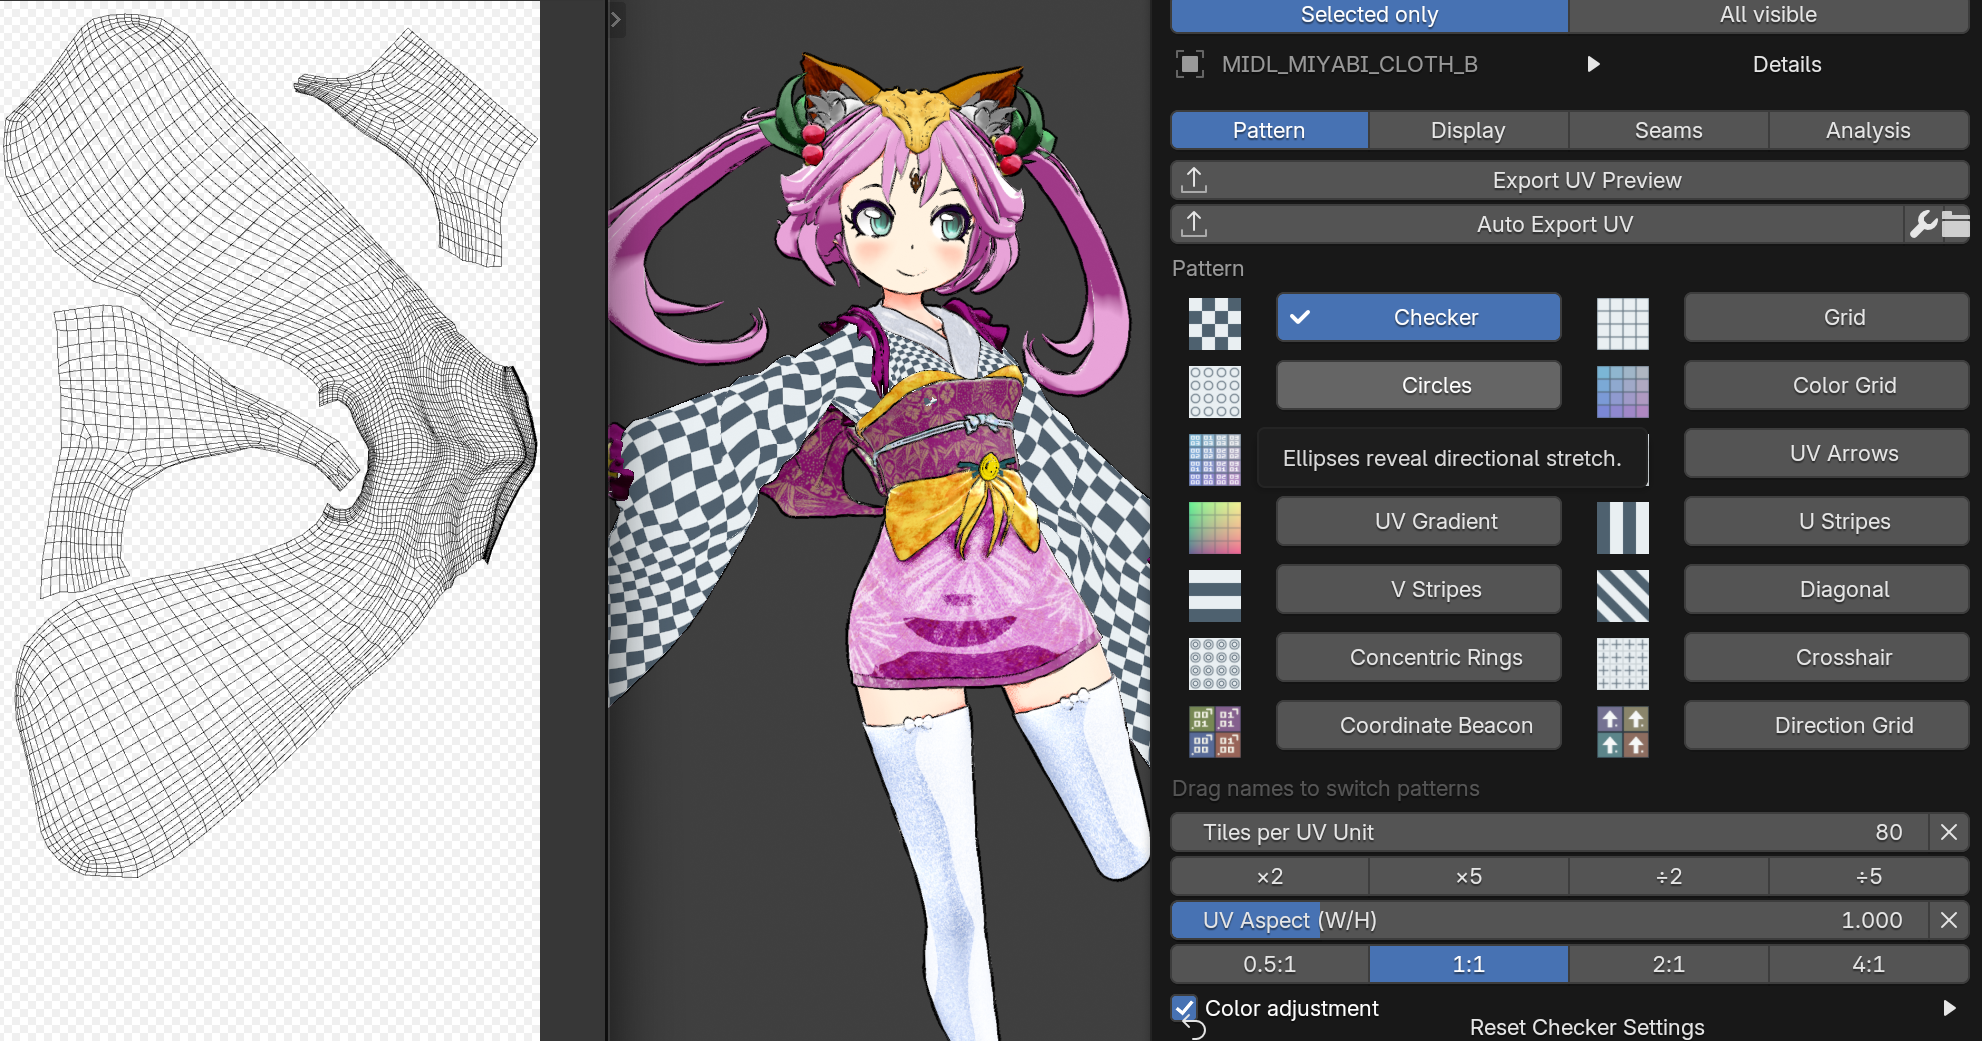
はじめに
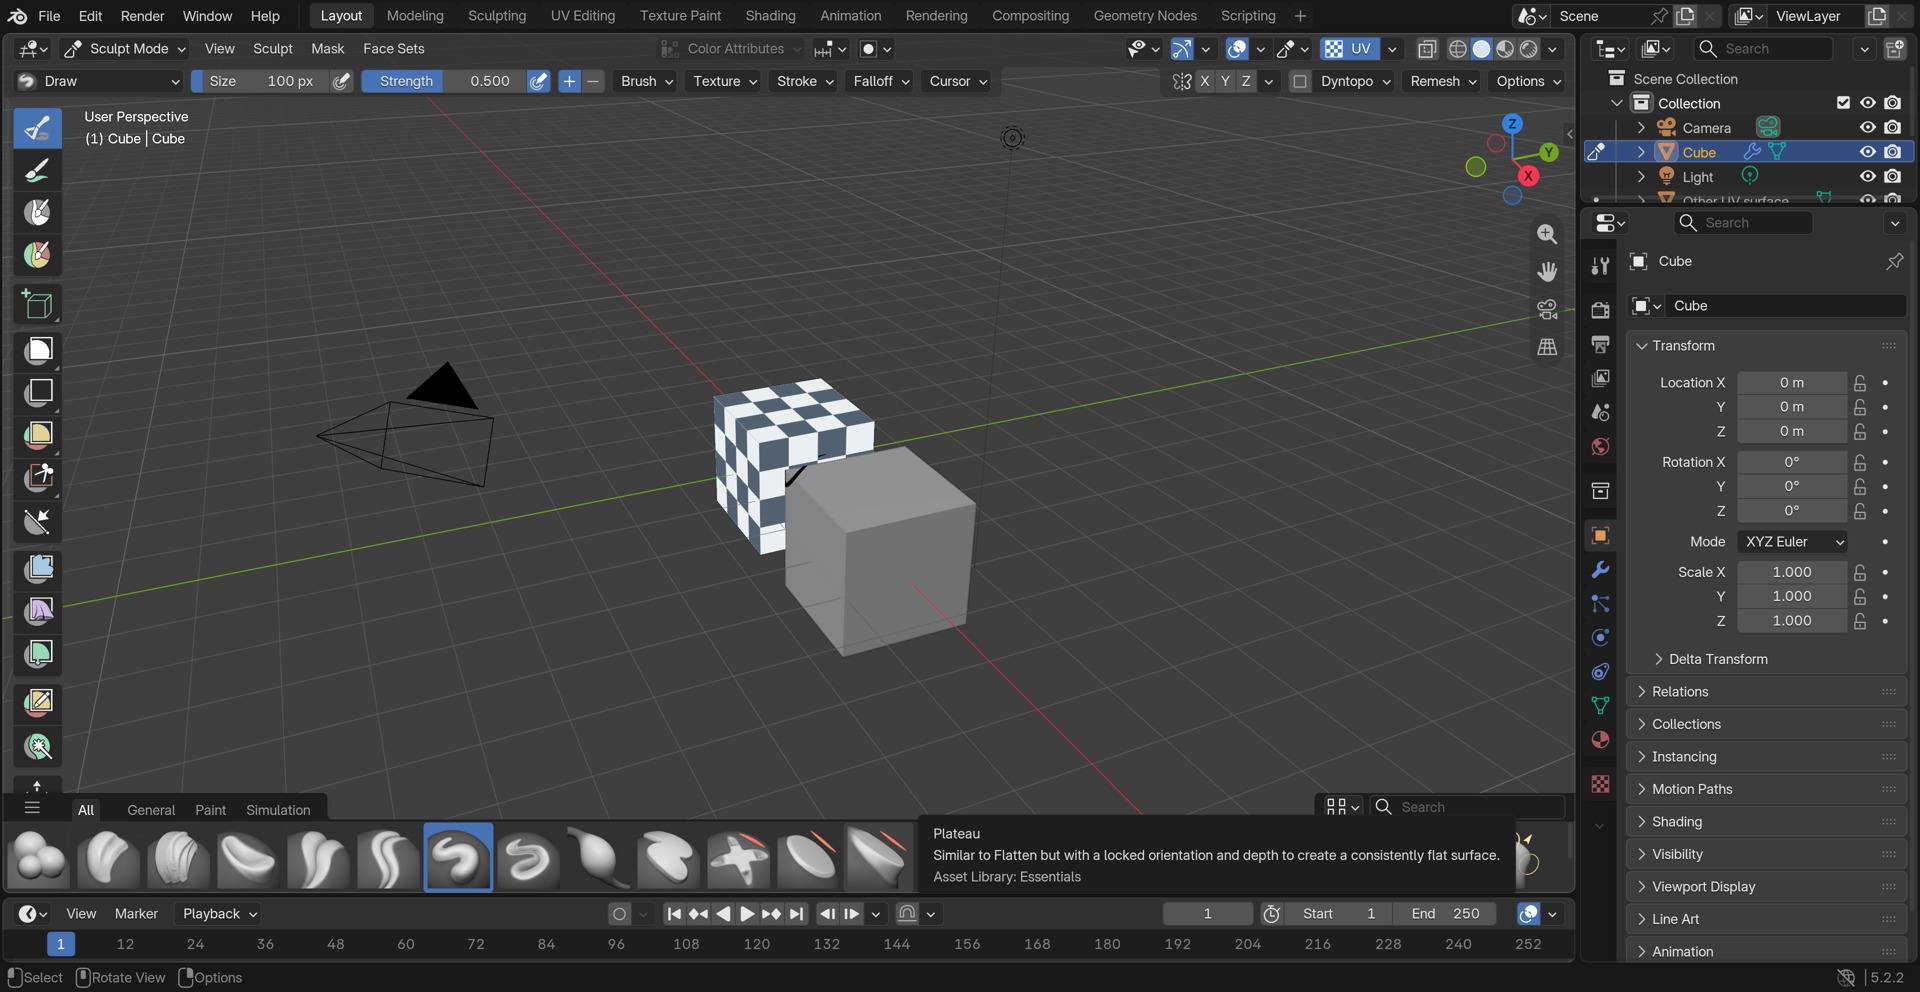
マテリアルとUV座標を保ったまま、模様・歪み・シーム・UVの問題を確認するツールです。3DビューまたはUVエディターで Nパネル → Quick UV Checker を開きます。3DビューではX-Rayの隣にある UV ボタンからも表示でき、隣の▼で同じ設定を開けます。
- UVを持つ表示中のオブジェクトを対象にします。スカルプト・頂点ペイント・ウェイトペイント・テクスチャペイント中も、モードを切り替えずに使えます。
- UVチェッカーを表示、またはヘッダーの UV を押します。
- 模様を選び、表面を確認します。UVチェッカーを終了でもとの表示に戻ります。
ビューポートだけの一時表示です。チェッカー用のマテリアルや画像は作らず、UV編集・展開・修復は行いません。最終レンダーにも入りません。
インストール・更新
Blender 4.5以降が必要です。WindowsのBlender 4.5.0 LTSと5.2.2 LTSで検証しています。macOS・Linux・別の描画バックエンドは未検証です。QuickBakerは不要です。
- 購入・配布された拡張機能ZIPを解凍せずBlenderへドラッグして確定するか、プリファレンス → アドオン → ディスクからインストールを使います。
- cvELD_QuickUVCheckerを有効にします。
- Quick UV CheckerのNパネルを開き、最初の手順で表示します。
更新時はチェッカー表示を終了し、Blenderから新しいZIPをインストールします。以前のコードが読み込まれたままならBlenderを再起動してください。旧 cvELD UV Inspector やQuickBakerの旧内蔵版は無効にしてから独立版を有効にします。アンインストール時も表示を終了し、プリファレンスから無効化・削除します。
対象と4つのタブ
表示対象はタブの上にあります。初期値の選択のみでは選択対象を、すべて(表示中)では現在のビューレイヤーで表示中の面を対象にします。編集モードに入っていないオブジェクトも含み、非表示のものは除きます。解析時は表示対象を1つのUV領域として比較します。
対象の横の詳細を開くと、UVマップ名や名前付きUV属性を指定できます。空欄なら自動で探します。指定してもアクティブUV・レンダーUV・ベイクUVは切り替わりません。指定UVがない対象は除外され、注意が表示されます。
| タブ | できること |
|---|---|
| 模様 | 模様カード、細かさ、表示の縦横比、チェッカーの色補正。 |
| 表示 | 不透明度、UVエディター表示、方向による歪み、UV表示補助。 |
| シーム | マークしたシーム、実際のUV切れ目、メッシュの切れ目。 |
| 解析 | UVの問題を解析し、項目を選び、結果を確認。 |
タブを変えても設定と実行中の解析は保持します。小さな三角を押すと詳細が開きます。対象の詳細・診断結果などは初期状態で畳まれています。模様タブでは模様カードを常に表示します。数値の横のXはその値だけを初期値に戻します。チェッカー設定をリセットは表示と解析項目の有効/無効を戻します。画像サイズ・基準密度・余白などの数値解析設定は保持します。色補正は専用のリセットを使います。誤ってリセットした場合は、隣のリセットを取り消すで直前の設定を復元できます。オブジェクトモードではBlenderのUndo/Redoも使えます。編集モードではこの取り消しボタンを使ってください。
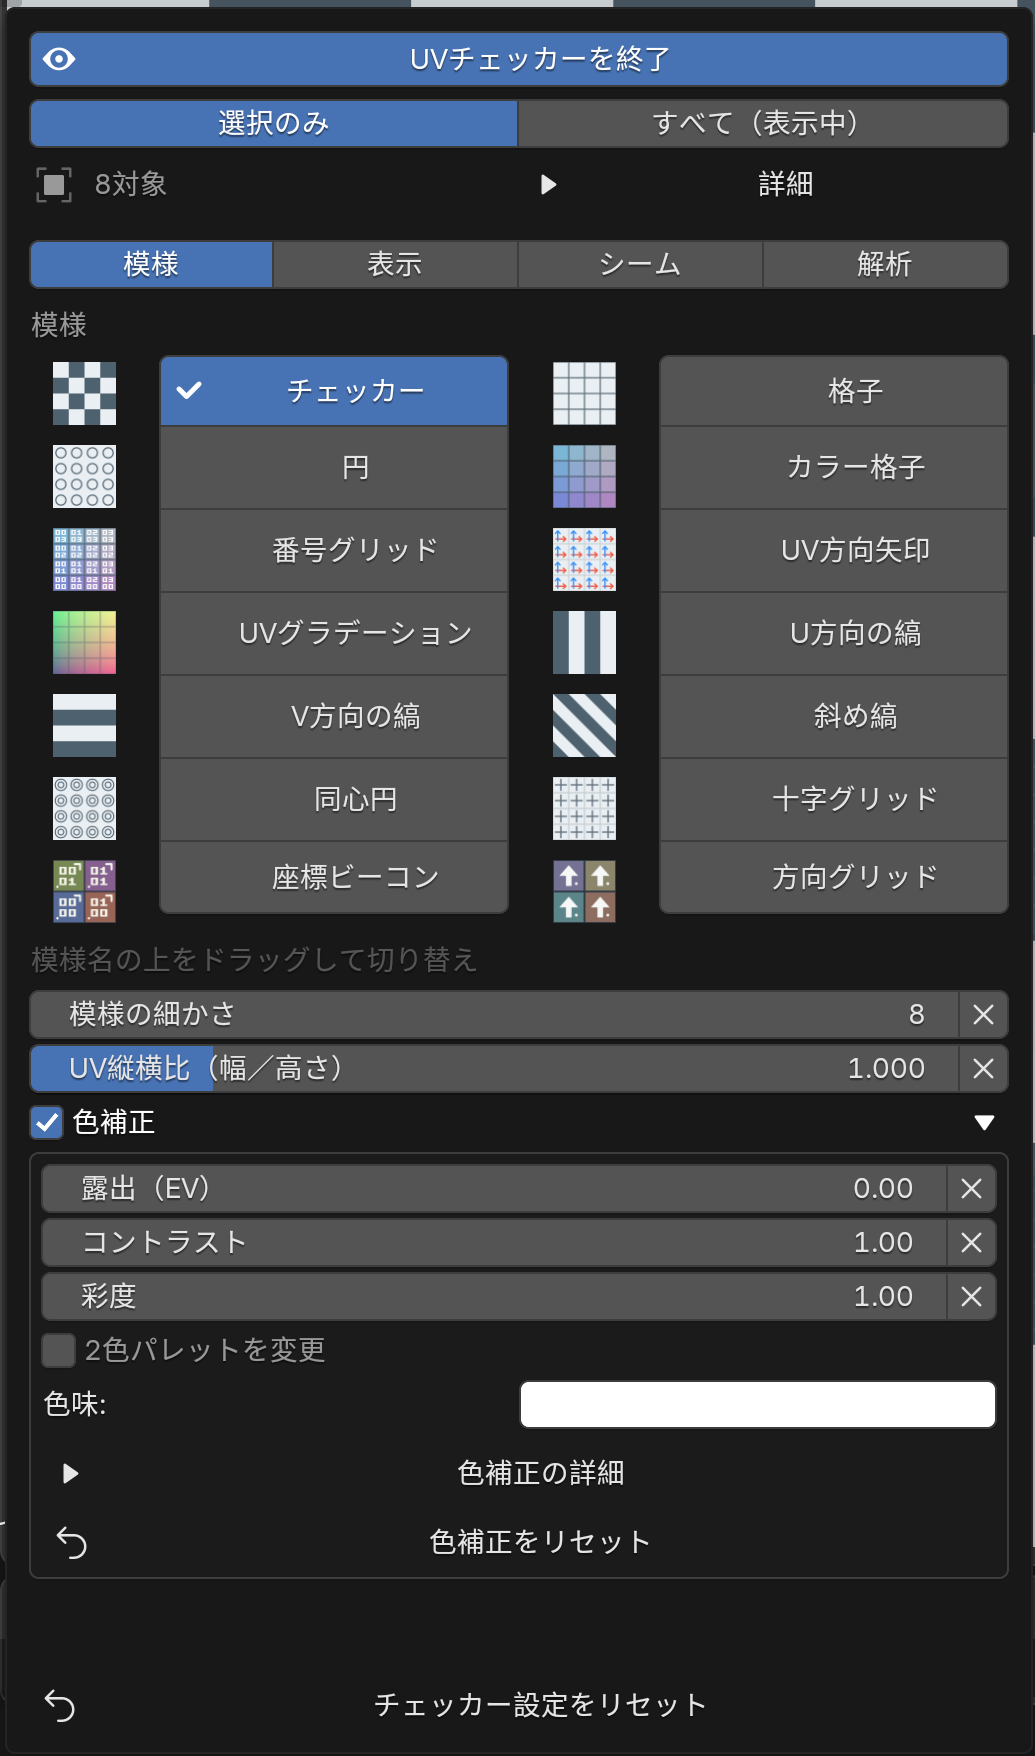
模様・細かさ・縦横比
- 模様タブを開くと、表示対象の模様カードが並びます。
- カードの名前をクリックします。名前の上を押したままドラッグして、すぐ切り替えることもできます。
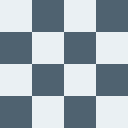
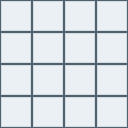
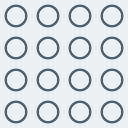
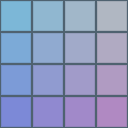
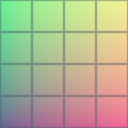
独自の模様を14種類用意しています。四角や円は伸び、グリッドや斜線は曲がりや傾き、矢印・グラデーション・数字は位置や向きの確認に向いています。
| 設定 | 見え方と使いどころ | 初期値 |
|---|---|---|
| 模様の細かさ | 増やすと細かくなります。遠くで模様が見づらいときは減らします。 | 16(1~512) |
| UV縦横比(幅/高さ) | 1は正方形、1より大きいと横長、小さいと縦長になります。両エディターの表示だけが変わります。 | 1(0.125~8) |
細かさの下にある×2・×5・÷2・÷5で倍率を変えます。端数は四捨五入し、1~512に収めます。縦横比のボタンでは幅:高さを0.5:1・1:1・2:1・4:1に設定できます。数値入力と各項目のXリセットも使えます。
回転と反転を読む
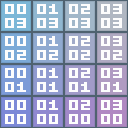
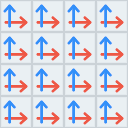
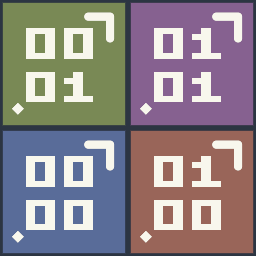
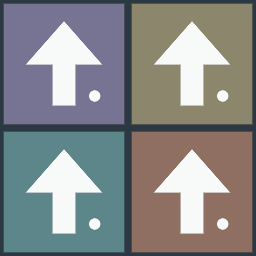
方向グリッドの矢印は+V、根元から離れた点は+U側です。U反転では点の側、V反転では矢印の向きが変わります。座標ビーコンは上段U・下段Vの数字と、非対称の角印で向きを確認できます。番号はUVタイルごとにリセットされ、100セルで繰り返します。方向グリッドは負UVとUDIMも含め、UV1単位ごとに繰り返します。


見やすくする色補正
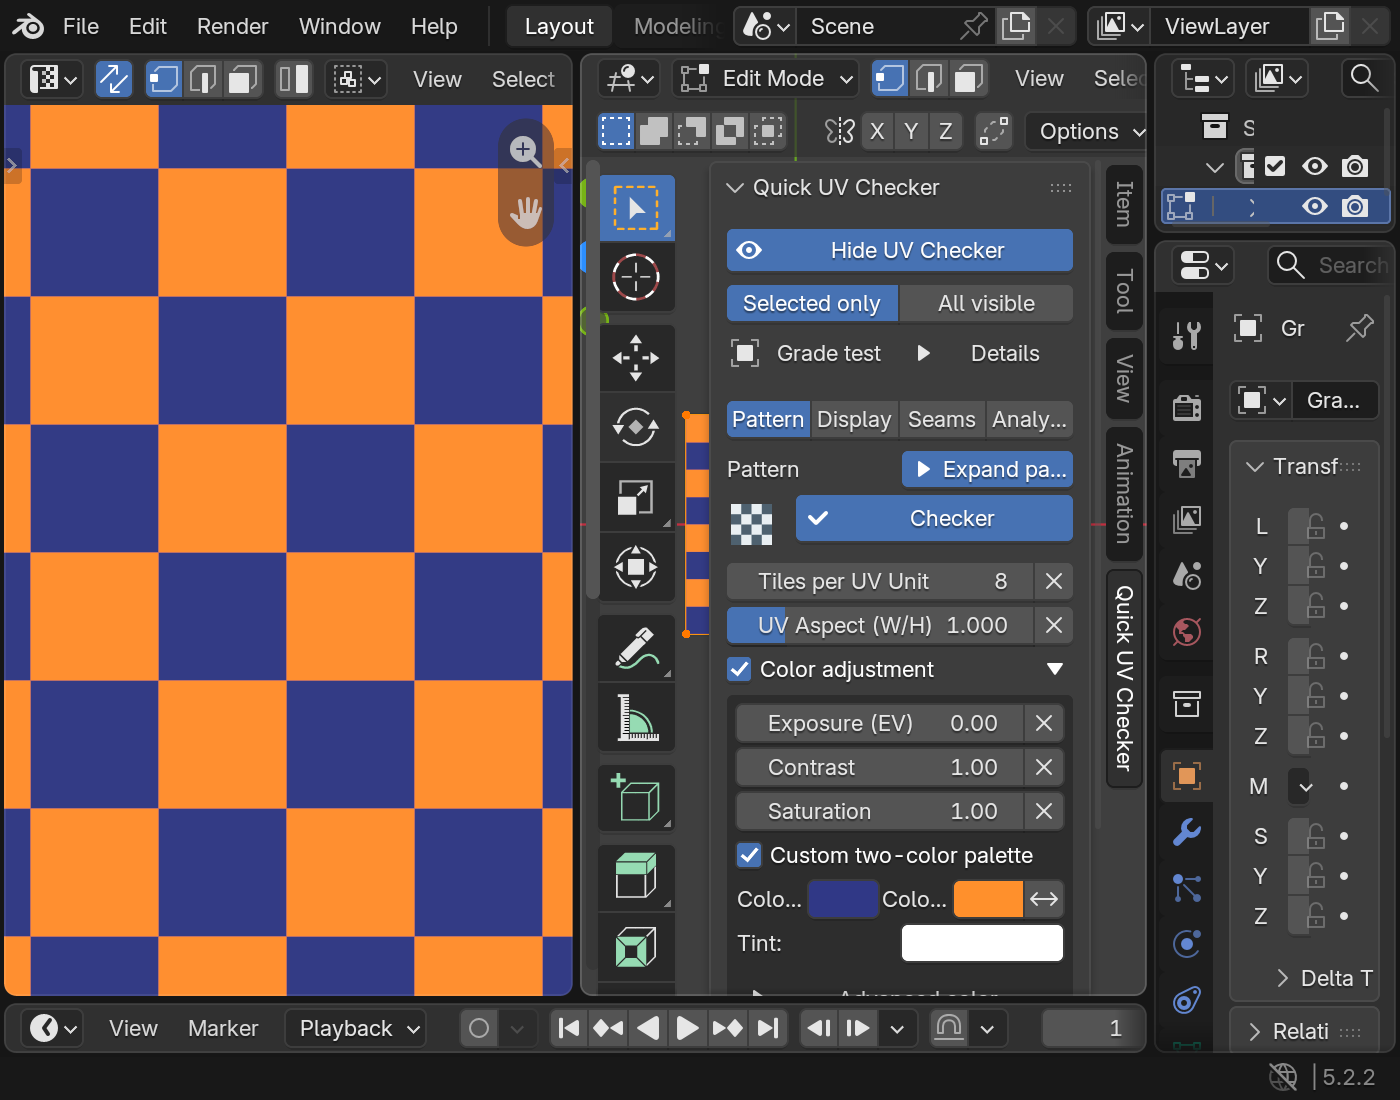
模様タブで色補正を展開します。まずは露出(EV)・コントラスト・彩度を調整し、色味で全体の色を変えます。対応する模様では2色パレットを変更を有効にしてA/Bを選べます。交換ボタンで2色を入れ替えます。この項目のない模様は元の配色を使います。
色補正の詳細には、色相・ガンマ・コントラストの基準・RGBゲイン/オフセット・反転・強さ・出力のクランプがあります。ガンマが1より大きいと明るくなり、強さで元の模様との混ざり具合を変えられます。両エディターのチェッカーだけに反映し、シーンのカラーマネジメント・マテリアル・画像の画素は変更しません。
診断と歪みの色は、問題を読み取れるように元の色を維持します。診断中も色補正の値は編集できます。模様表示に戻るを押すと調整した色を確認でき、解析の実行と結果は保持されます。
色補正のチェックを外すと、設定を残したまま効果だけをOFFにできます。数値横のXでその値を、色補正をリセットで補正とパレット全体を初期値へ戻します。
3DとUVエディターの表示
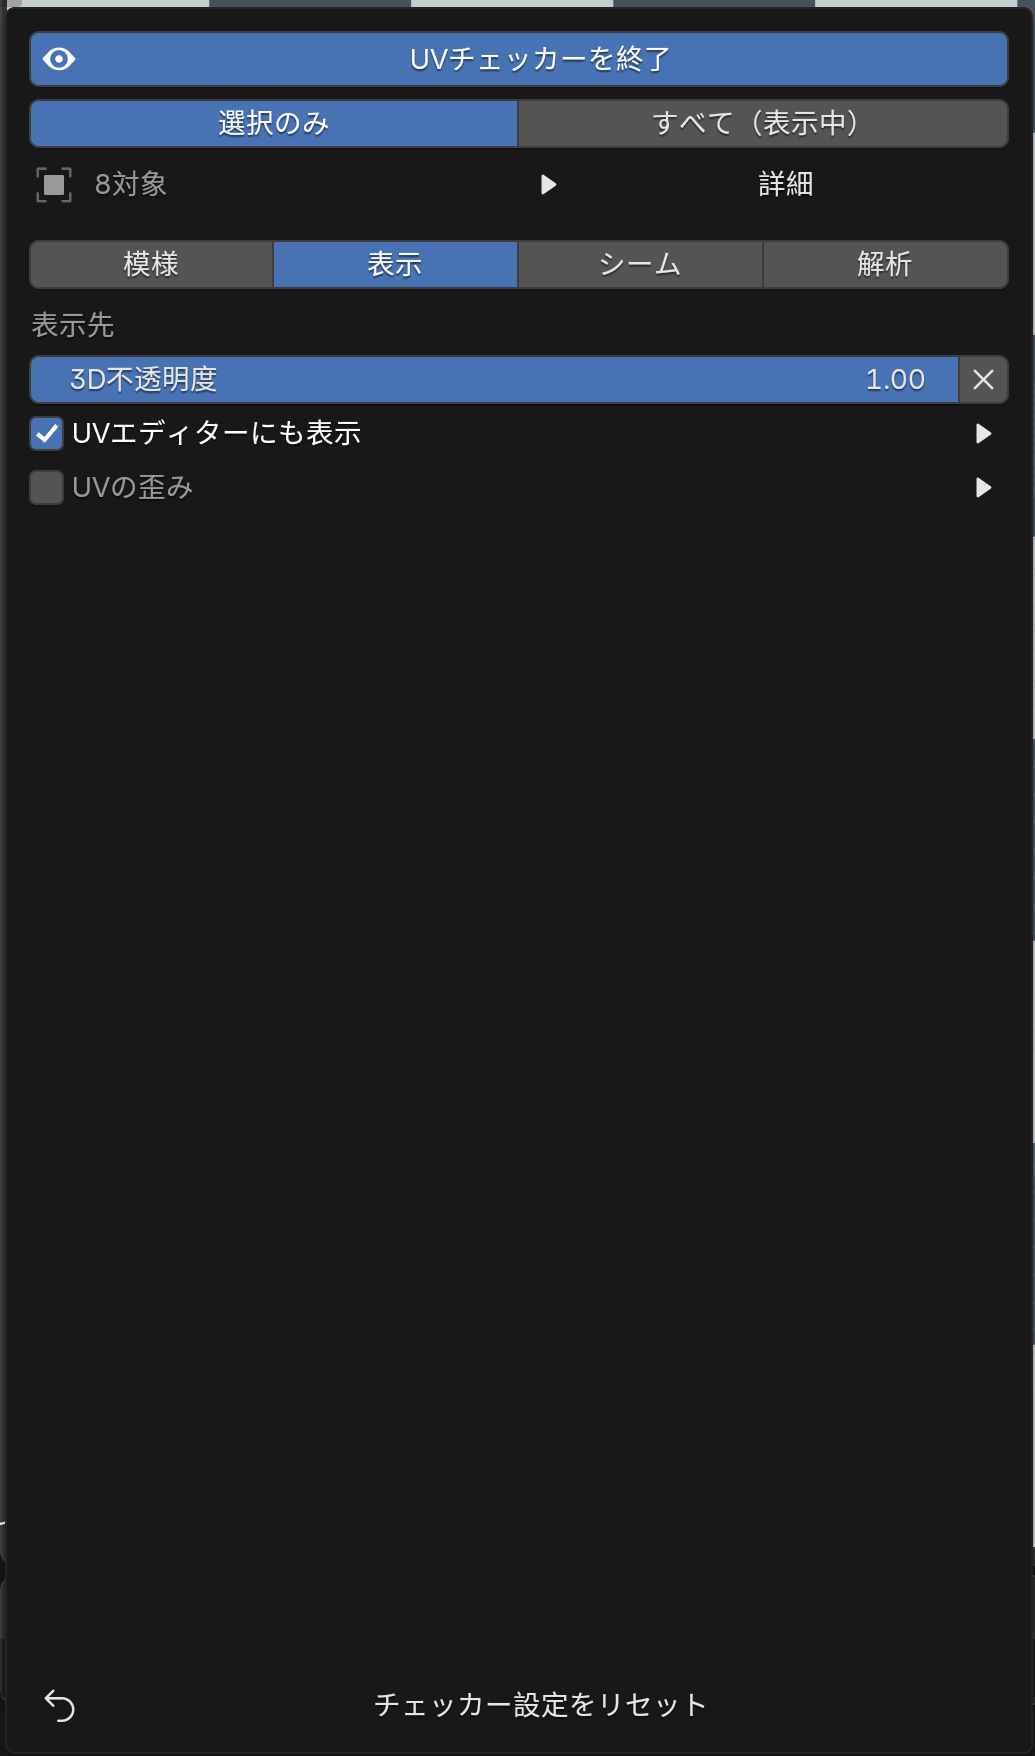
表示タブを開きます。不透明度(3D/UV共通)で両エディターの模様の濃さを同時に変えます。UVエディターに表示でUV側の表示を有効にします。表示タブとシーム詳細のUVの明るさを1/3にするで、テクスチャを変更せず模様を暗くできます。模様・細かさ・縦横比・色は両エディターで同期します。
模様を画像範囲内に限定と範囲設定で表示を絞れます。画像0–1では最初の1タイル、画像のUDIMタイルでは表示中の画像に登録されたタイルを使います。UVや画像の大きさは変更しません。チェッカーと診断はオブジェクトモードでも表示できます。UV編集とBlender標準のUV線表示にはメッシュ編集モードを使います。ジオメトリノードの評価後出力は編集できるUVケージと異なることがあります。
3DビューはSolid・ワイヤフレーム・マテリアルプレビュー・Renderedに対応します。X-Rayや標準オーバーレイのOFFでも表示します。面による遮蔽に従い、対象の裏面を表面越しに表示する機能ではありません。未選択のワイヤフレーム物体には面による遮蔽がありません。Alt+Bのクリッピング領域は解除してください。どのモードでも、現在のツールを保ったまま表示を切り替えられます。評価後の面にUVが必要です。UVのない形状にUVを作成する機能ではありません。
方向による伸びを見つける
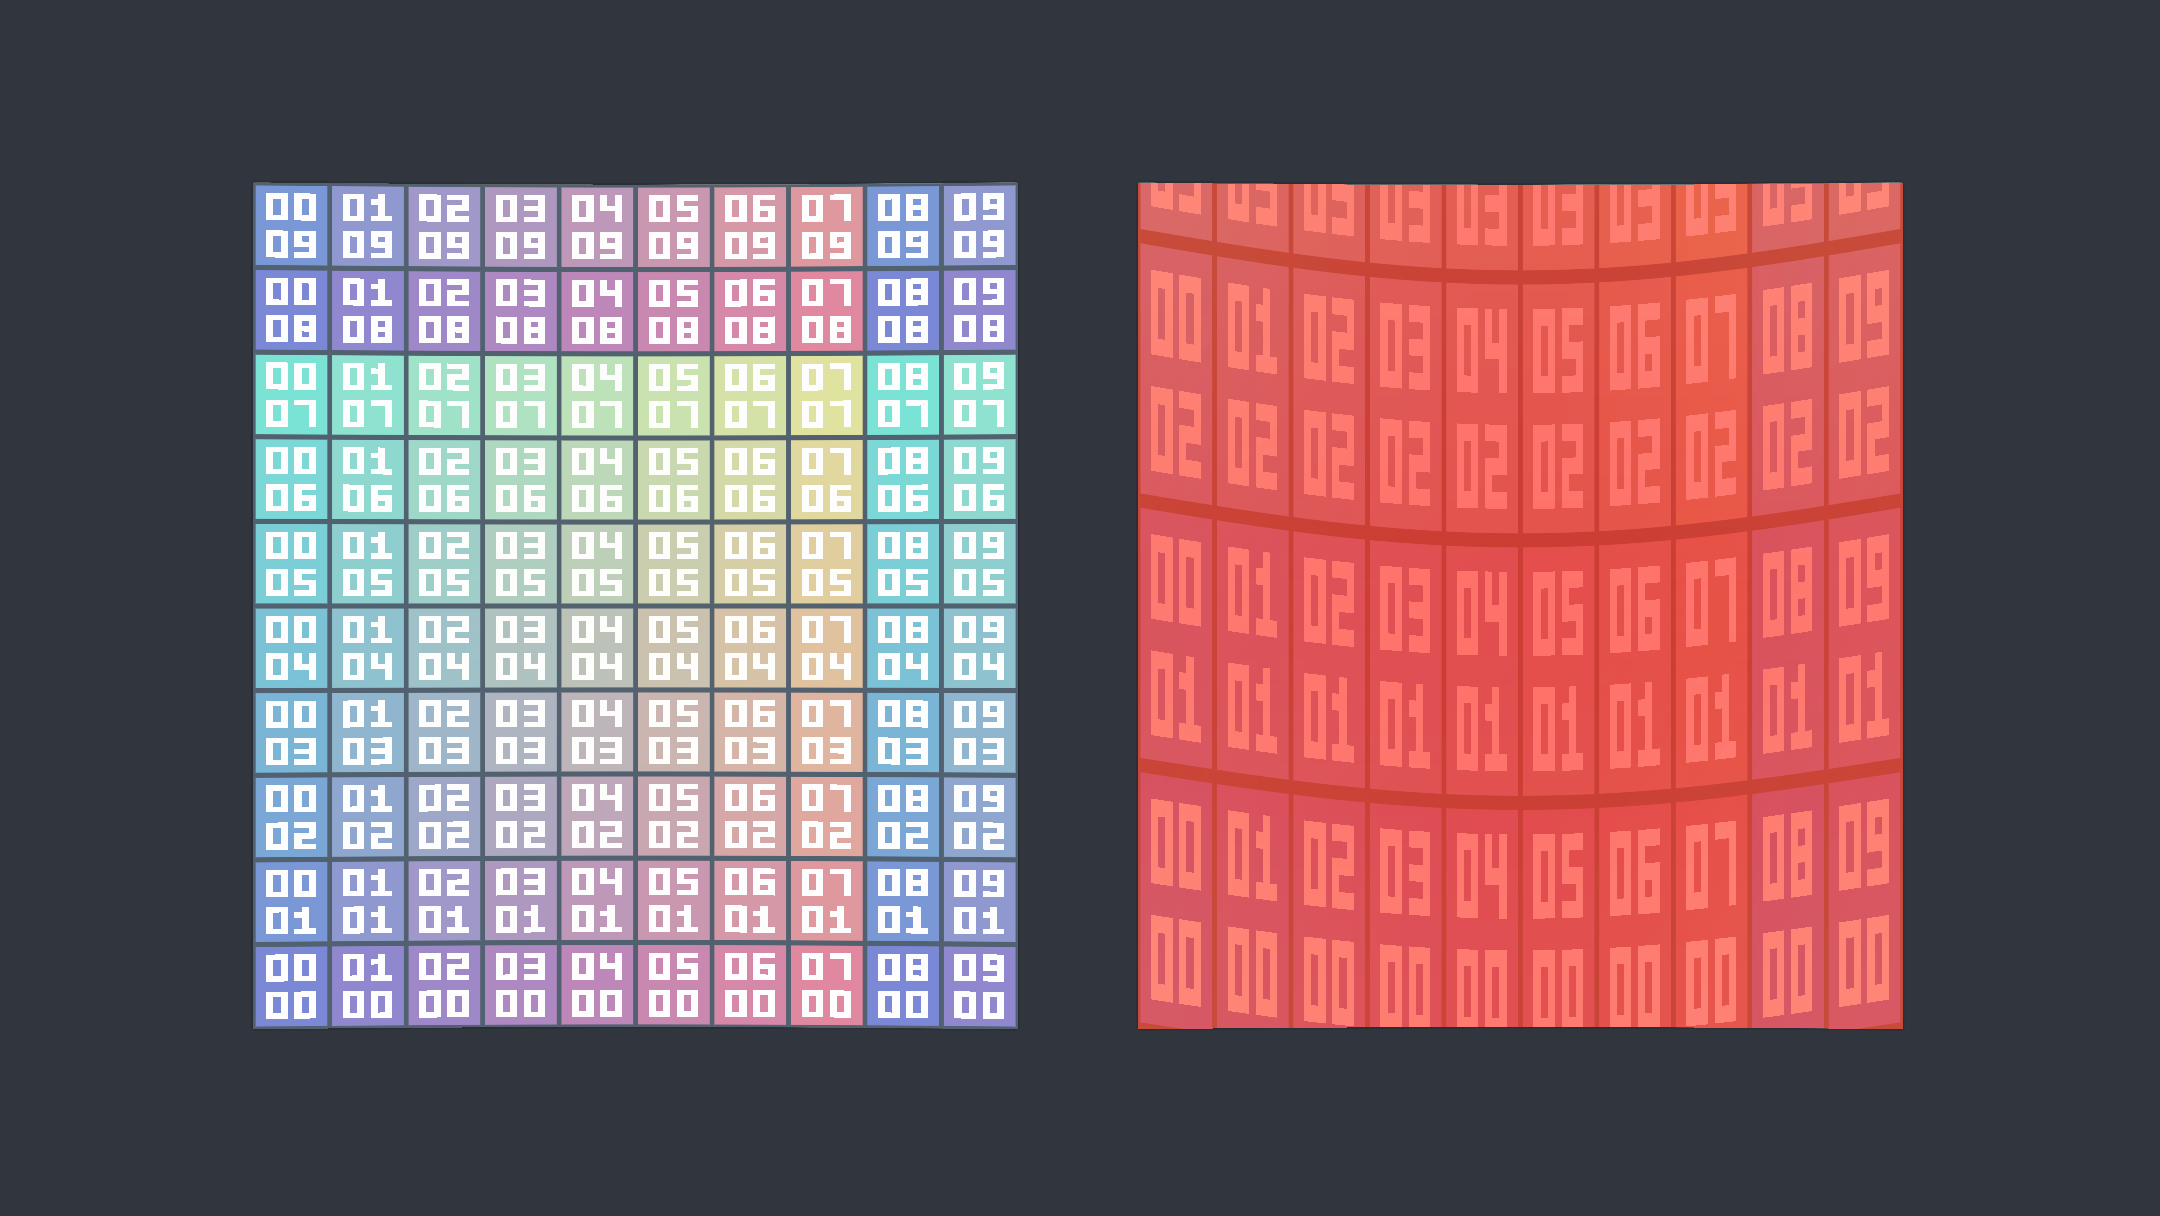
UVの歪みを有効にし、詳細を開きます。方向による伸びが強いほど黄から赤になり、潰れたUVはマゼンタになります。赤くなる歪み比で色分けの範囲を調整します。UV全体を均等に拡大縮小した差は歪みとして扱いません。解像感の比較には密度解析を使います。
3種類の切れ目を見分ける
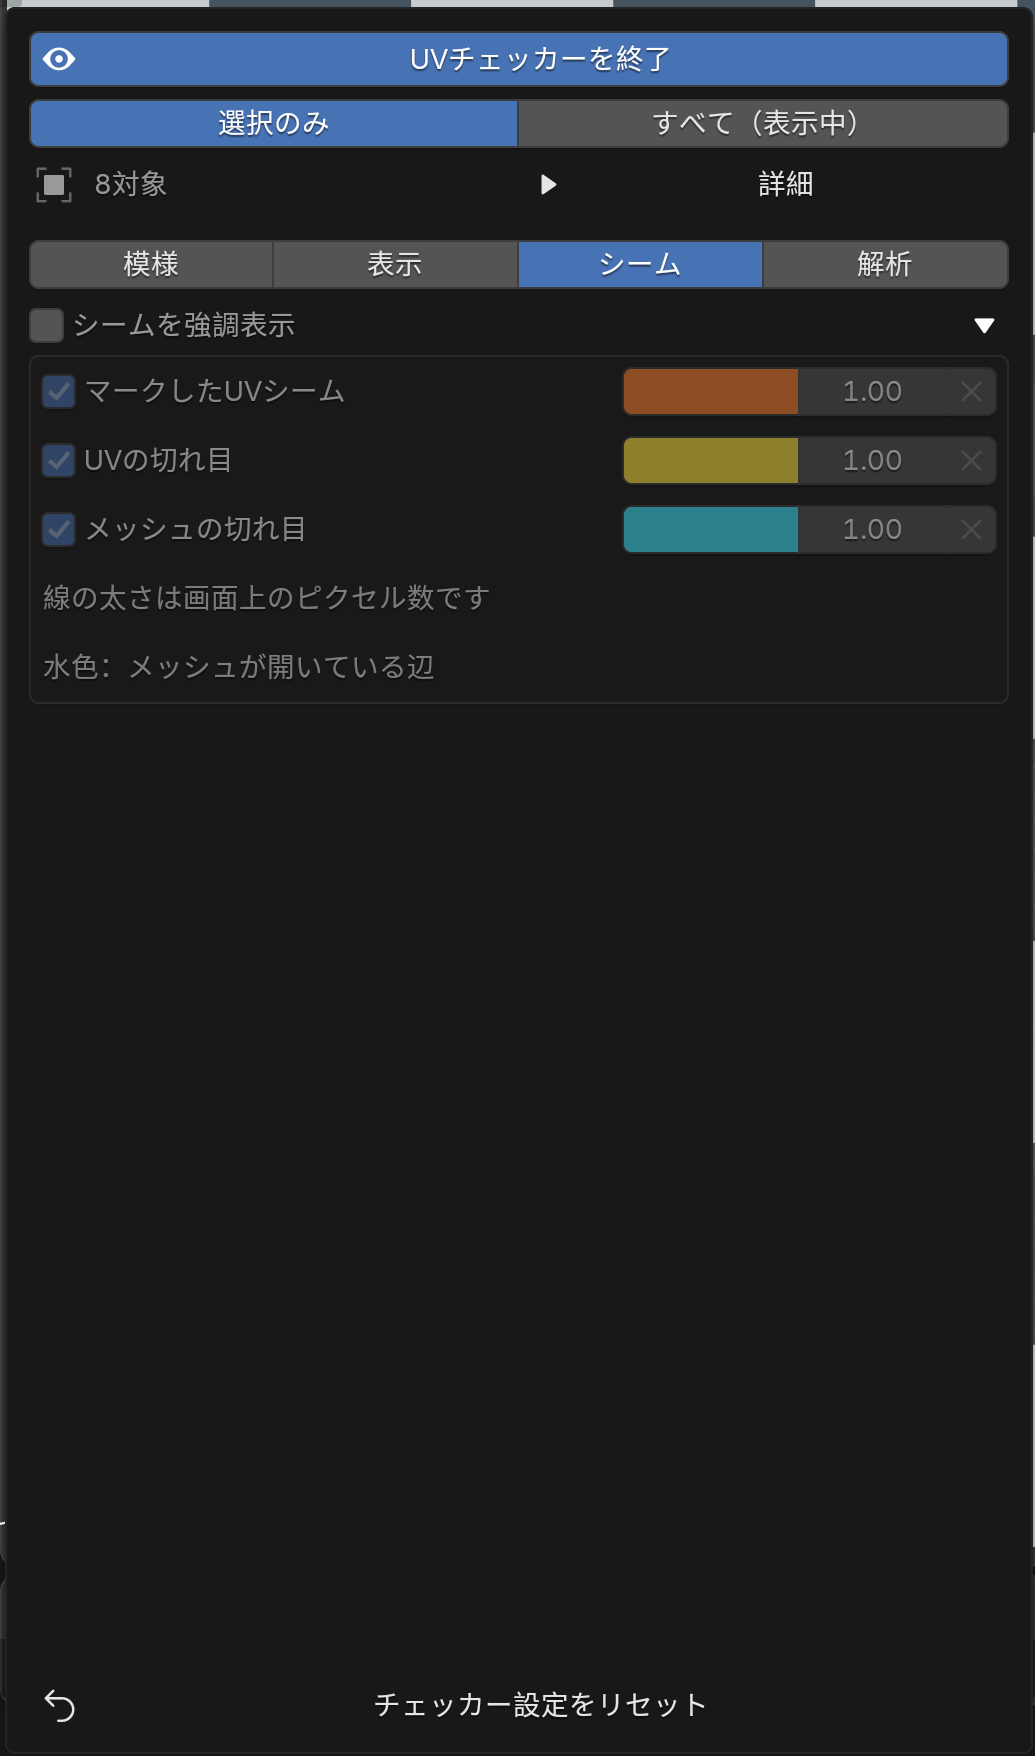
シームタブでシームを強調表示を有効にし、詳細を開きます。各種類のチェック・色・太さを個別に設定でき、両エディターに表示します。
| 種類 | 表示するもの | 初期色 |
|---|---|---|
| マークしたUVシーム | Blenderでシームとしてマークした辺。UVがつながっている場合もあります。 | 橙 |
| UVの切れ目 | 同じメッシュ辺を共有する面の実際のUV分断。マークのない辺も含みます。 | 黄 |
| メッシュの切れ目 | 1枚のポリゴンだけが接する、形状そのものの開いた境界。 | 水色 |
太さは画面上の1pxが初期値で、1~8pxの範囲です。UI倍率には連動しません。横のXで個別に戻せます。同じ位置で重なると水色を最後に描きます。表示タブの緑色のUV島境界は別の表示レイヤーです。
UVを解析する
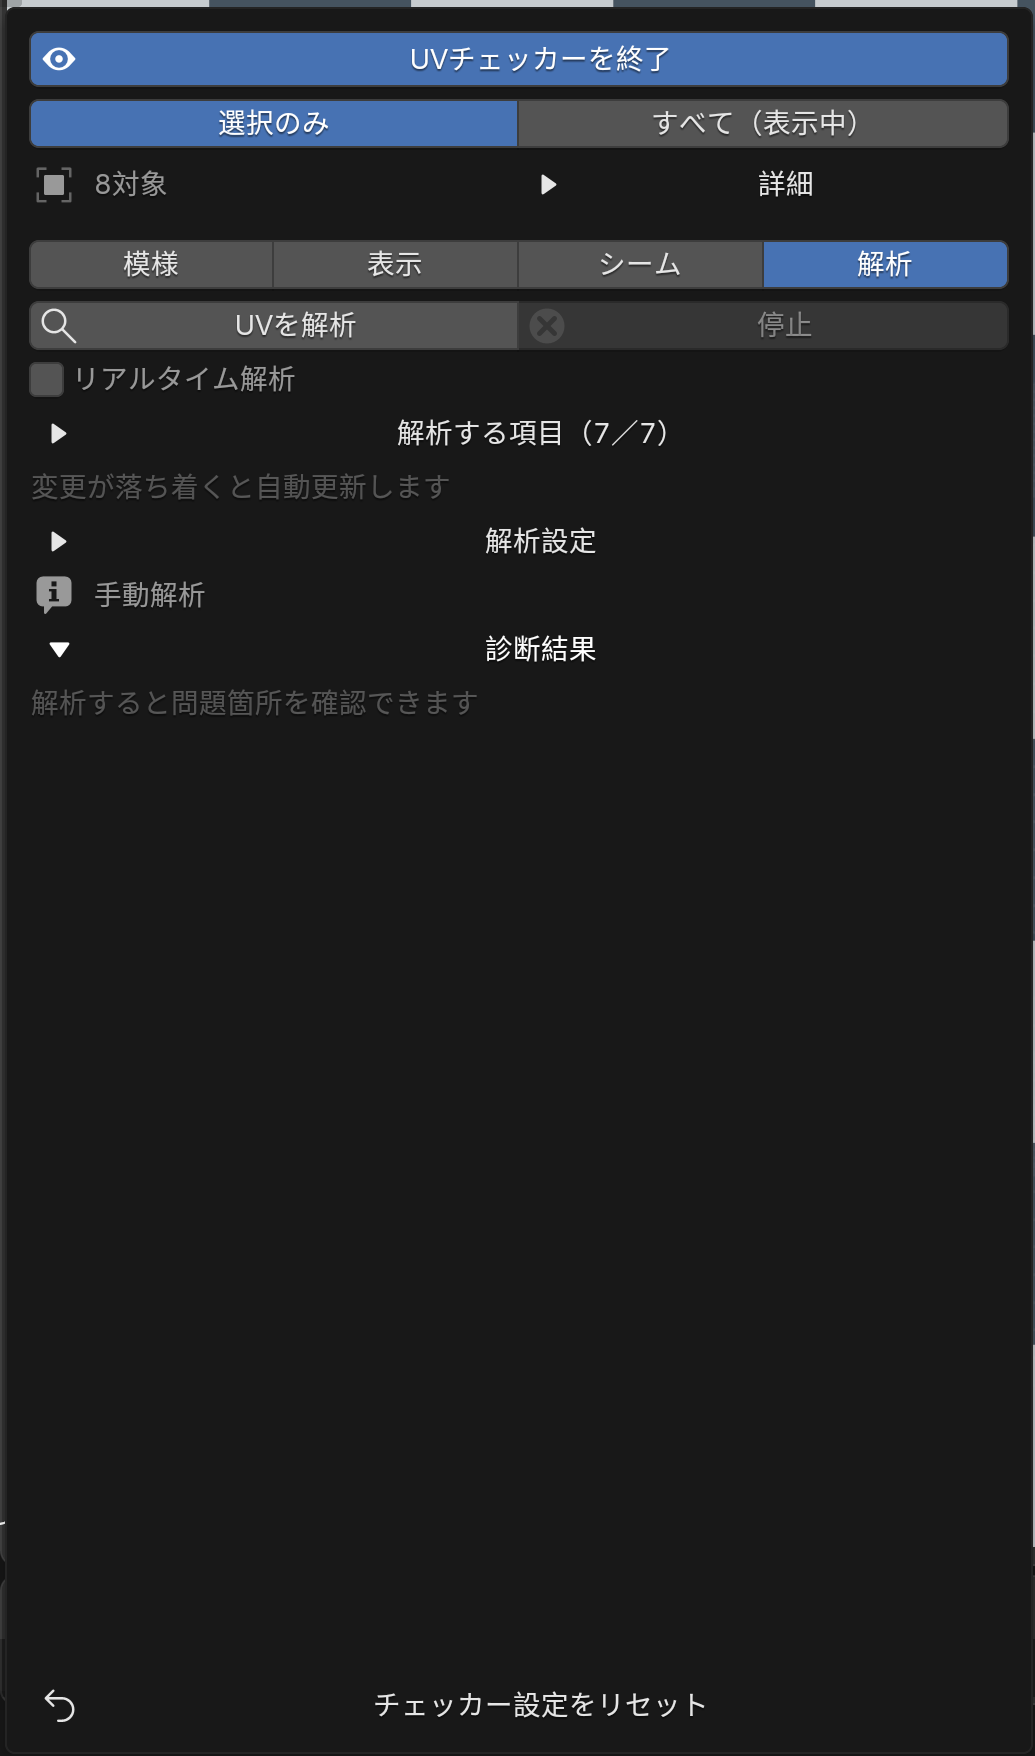
- 表示対象を選び、解析タブを開きます。
- 必要なら解析設定を展開し、画像の幅・高さ、基準密度、最小余白を入力します。
- UVを解析を押します。
- 診断結果を開き、結果の行を押すと、該当する三角形が3DビューとUVエディターで強調されます。
リアルタイム解析は初期状態でONです。UV・形状・対象・シーン単位・解析設定の変更が約0.3秒落ち着くと、自動で結果を更新します。計算中も編集できますが、毎フレームの更新を保証する機能ではありません。OFFでは「UVを解析」で手動更新します。停止で解析モードを終了します。UV表示補助をONにしている場合は、解析を停止しても表示に必要な更新が続きます。
解析する項目を開くと7項目を選べます。無効にした項目の診断表示や問題数は使いません。対象全体を1つのUV領域として比較するため、別々の用途のオブジェクトが重なることもあります。最初は選択のみで対象を絞ってください。
件数は重複を除いた評価後の面数で、インスタンスごとに数えます。問題箇所すべては警告をまとめて表示し、曖昧な点数は付けません。完全な重ね合わせは参考情報として別扱いです。強調するのは関係する三角形で、選択・展開・修復は行いません。
変更前の結果の行と件数は、再計算まで使えません。リアルタイム更新中は、条件の合う前回の診断表示を新しい結果が出るまで残す場合があります。未完了なら0件でも正常とは判断できません。対象を減らして再解析してください。100万三角形までを対象にし、極端に複雑な接続や比較回数にも上限があります。UVの不足・不正は別に表示します。
診断の見方
テクセル密度
画像サイズと基準px/mを指定します。ワールド表面1mに対する画素の密度を、オブジェクトの変換と長方形画像も含めて確認します。シーン単位倍率を使い、単位なしでは1 Blender単位=1mです。初期値は2048×2048、1024px/m、許容差±10%です。青は基準未満、緑は基準、赤は基準超過です。色は連続的に変わり、許容差は件数の判定に使います。
部分重なり・自己重なり・完全な重ね合わせ
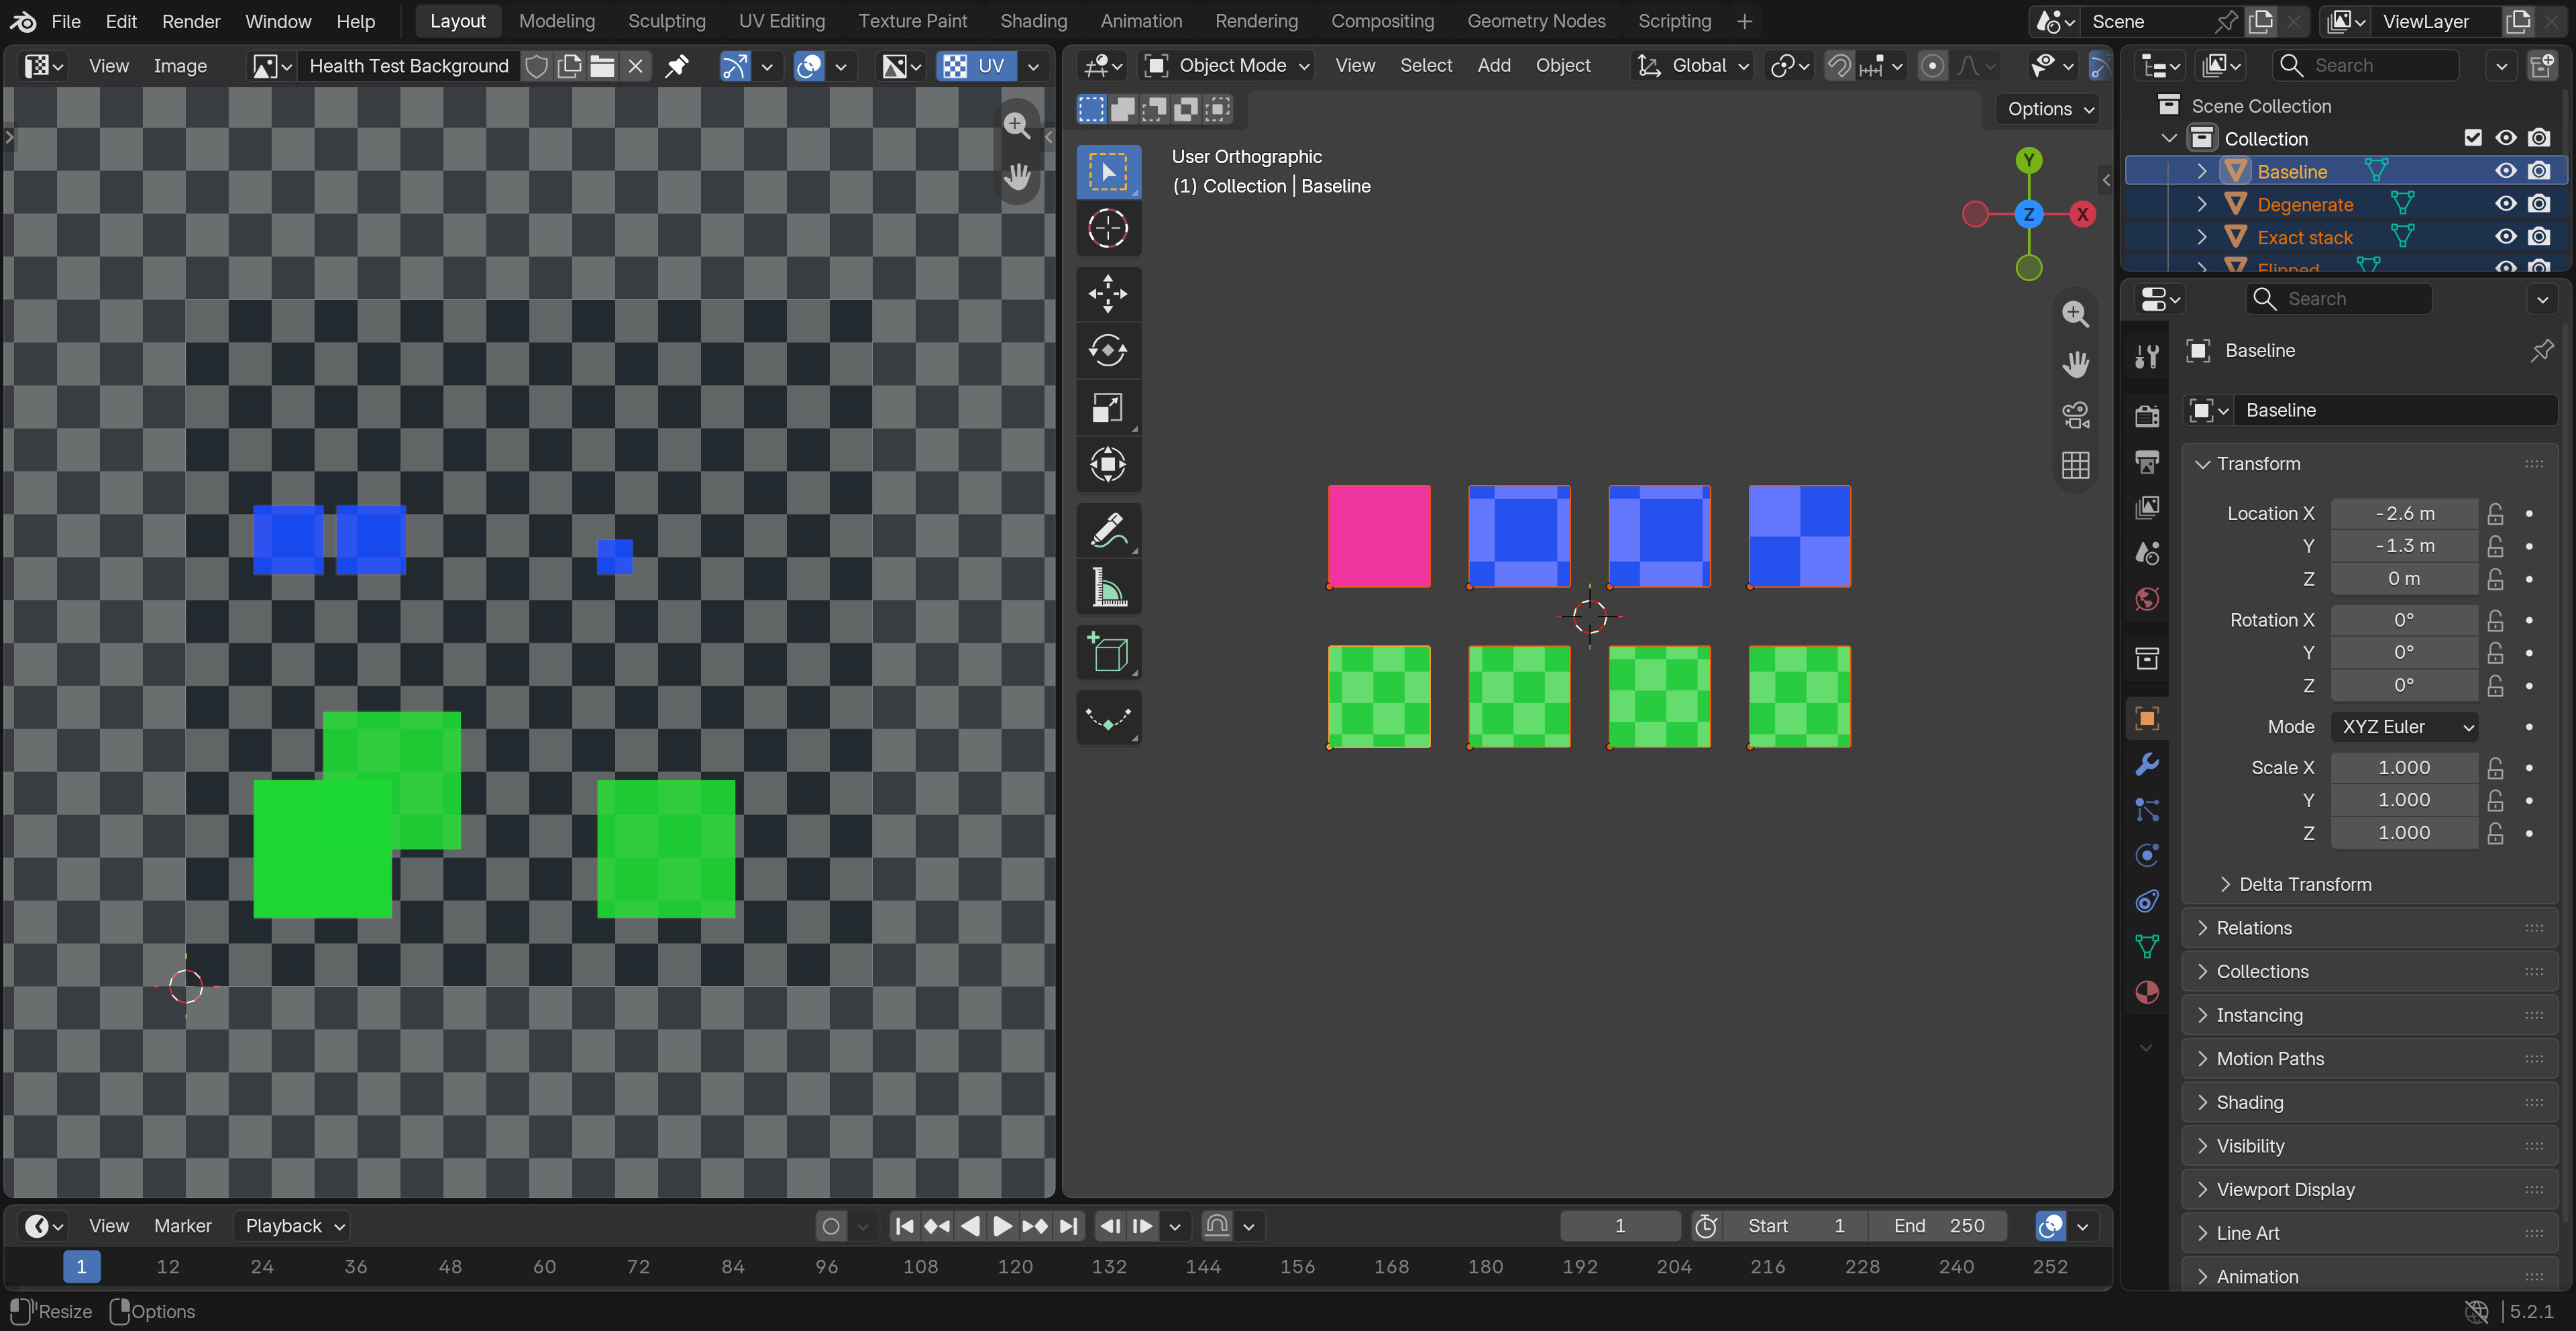
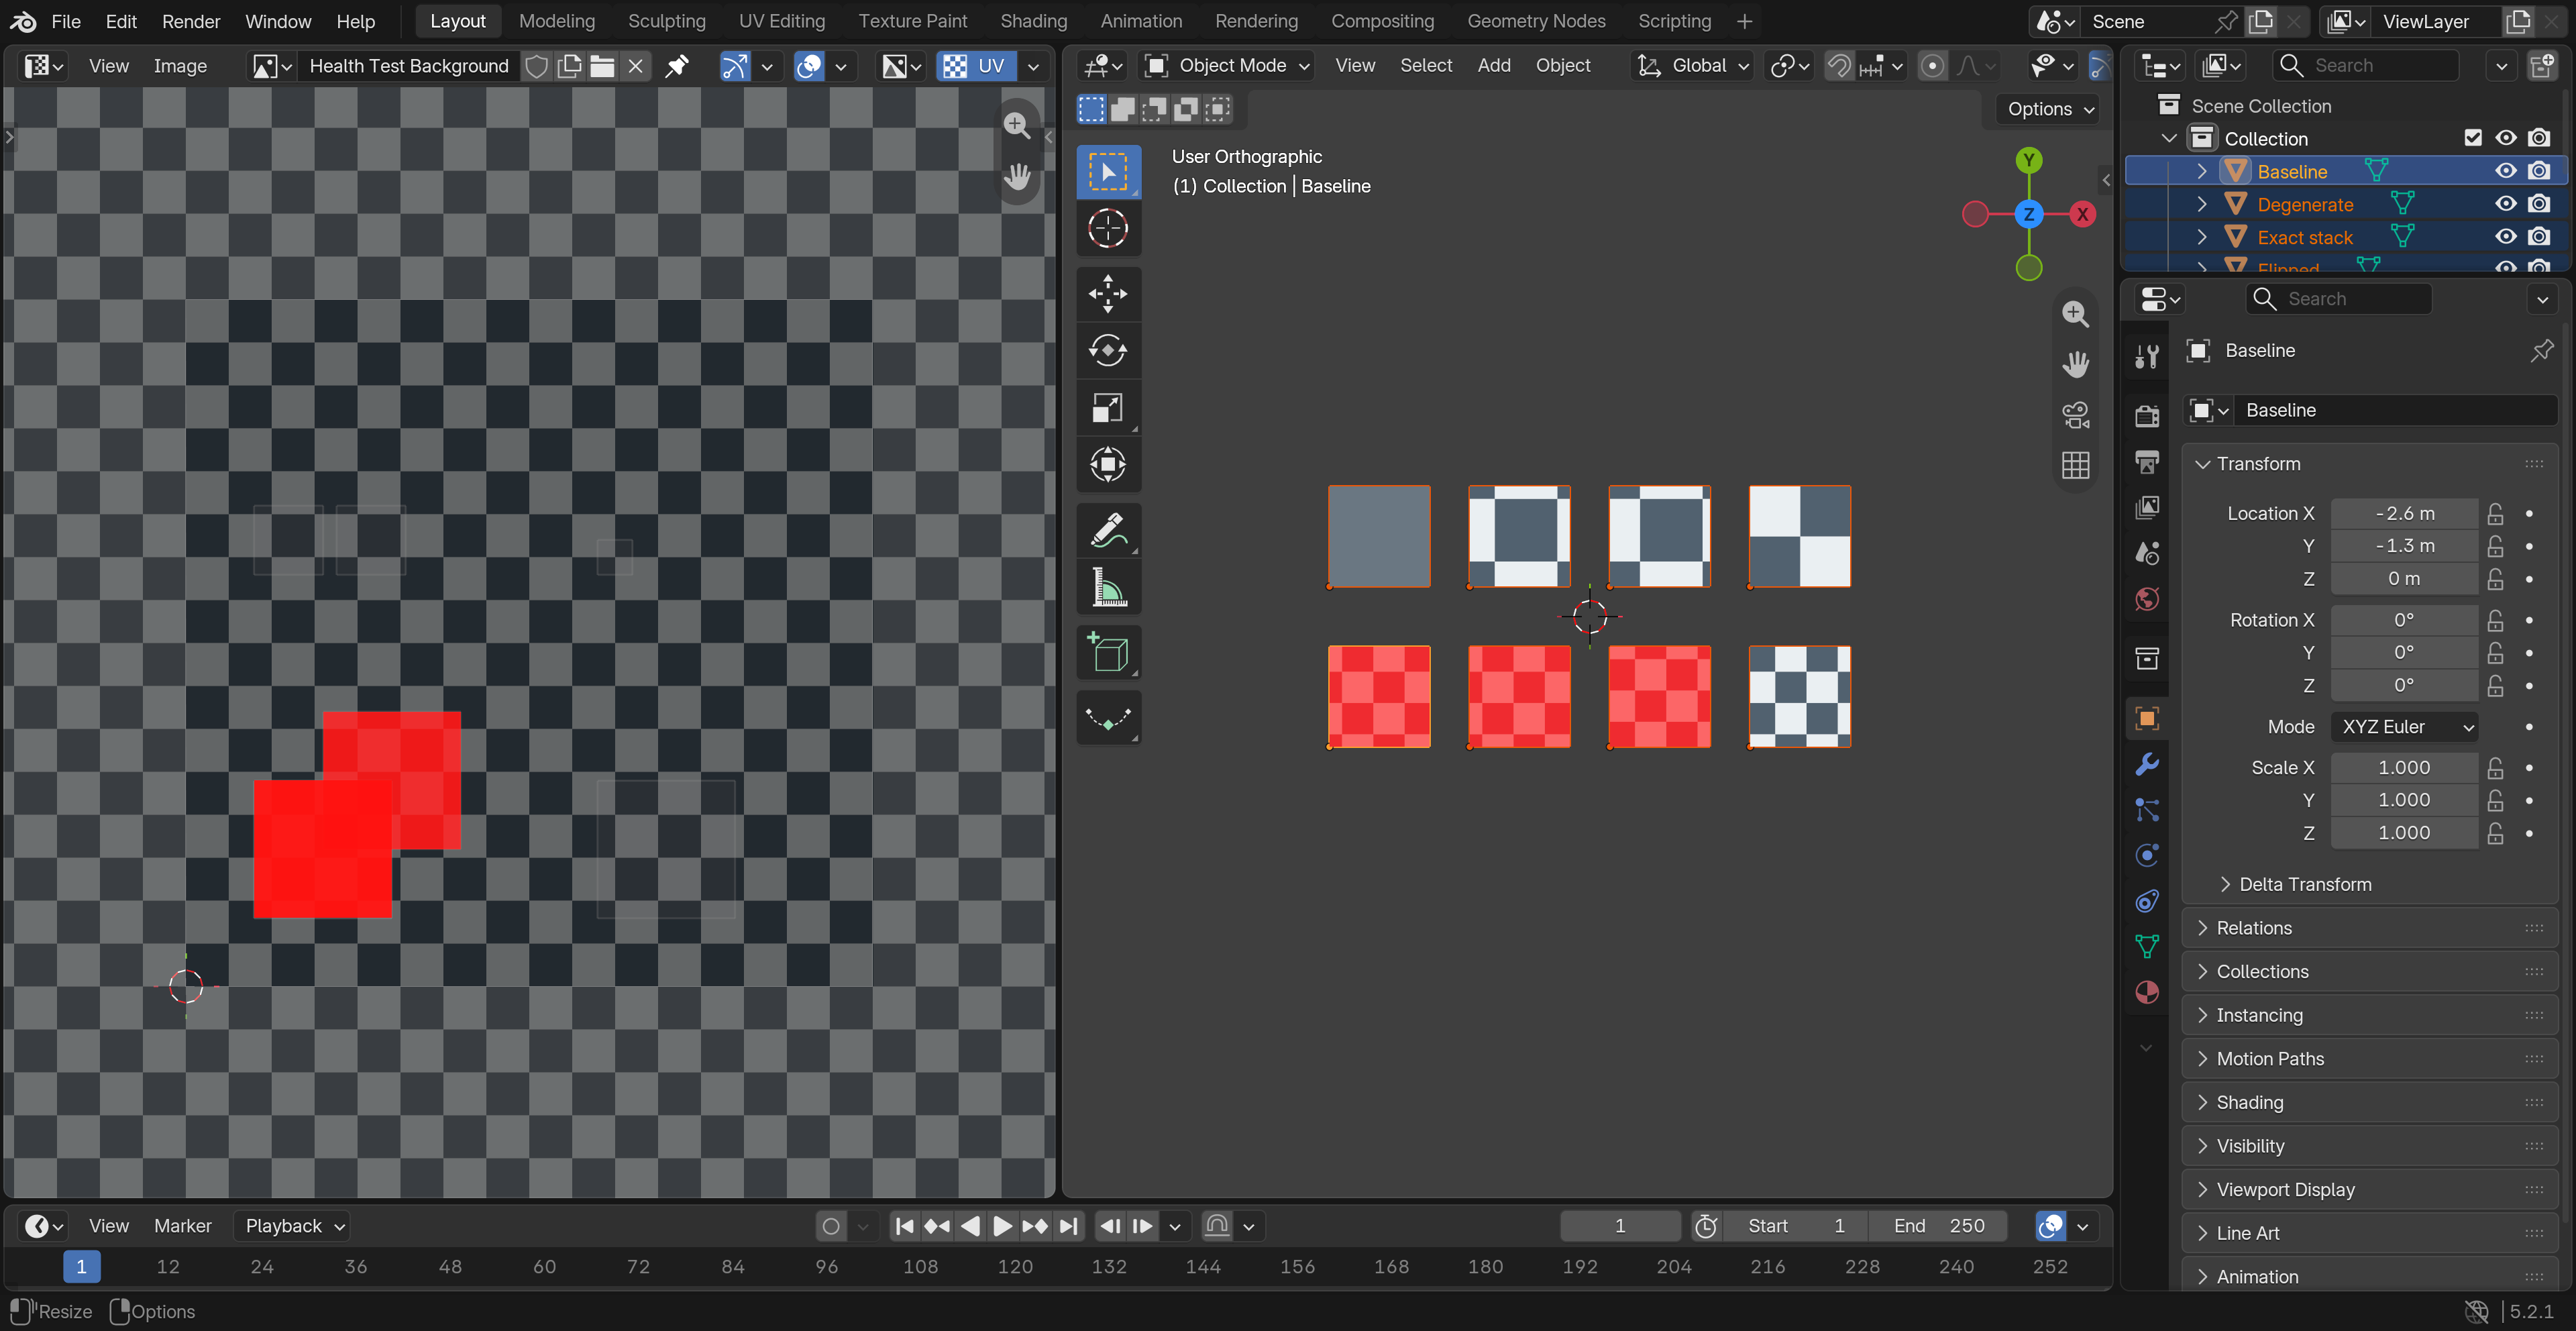
赤は面積を持つUV領域の重なりです。辺が接するだけなら数えません。紫の自己重なりは同じUV島の内部重複で、折り畳まれた四角形や多角形も含みます。青の完全な重ね合わせは、自己重複のない2つの島が同じ領域を覆う状態で、三角形分割が違っていても扱います。意図的な重ね合わせは参考情報です。数値の許容差より小さな交差は無視します。
余白
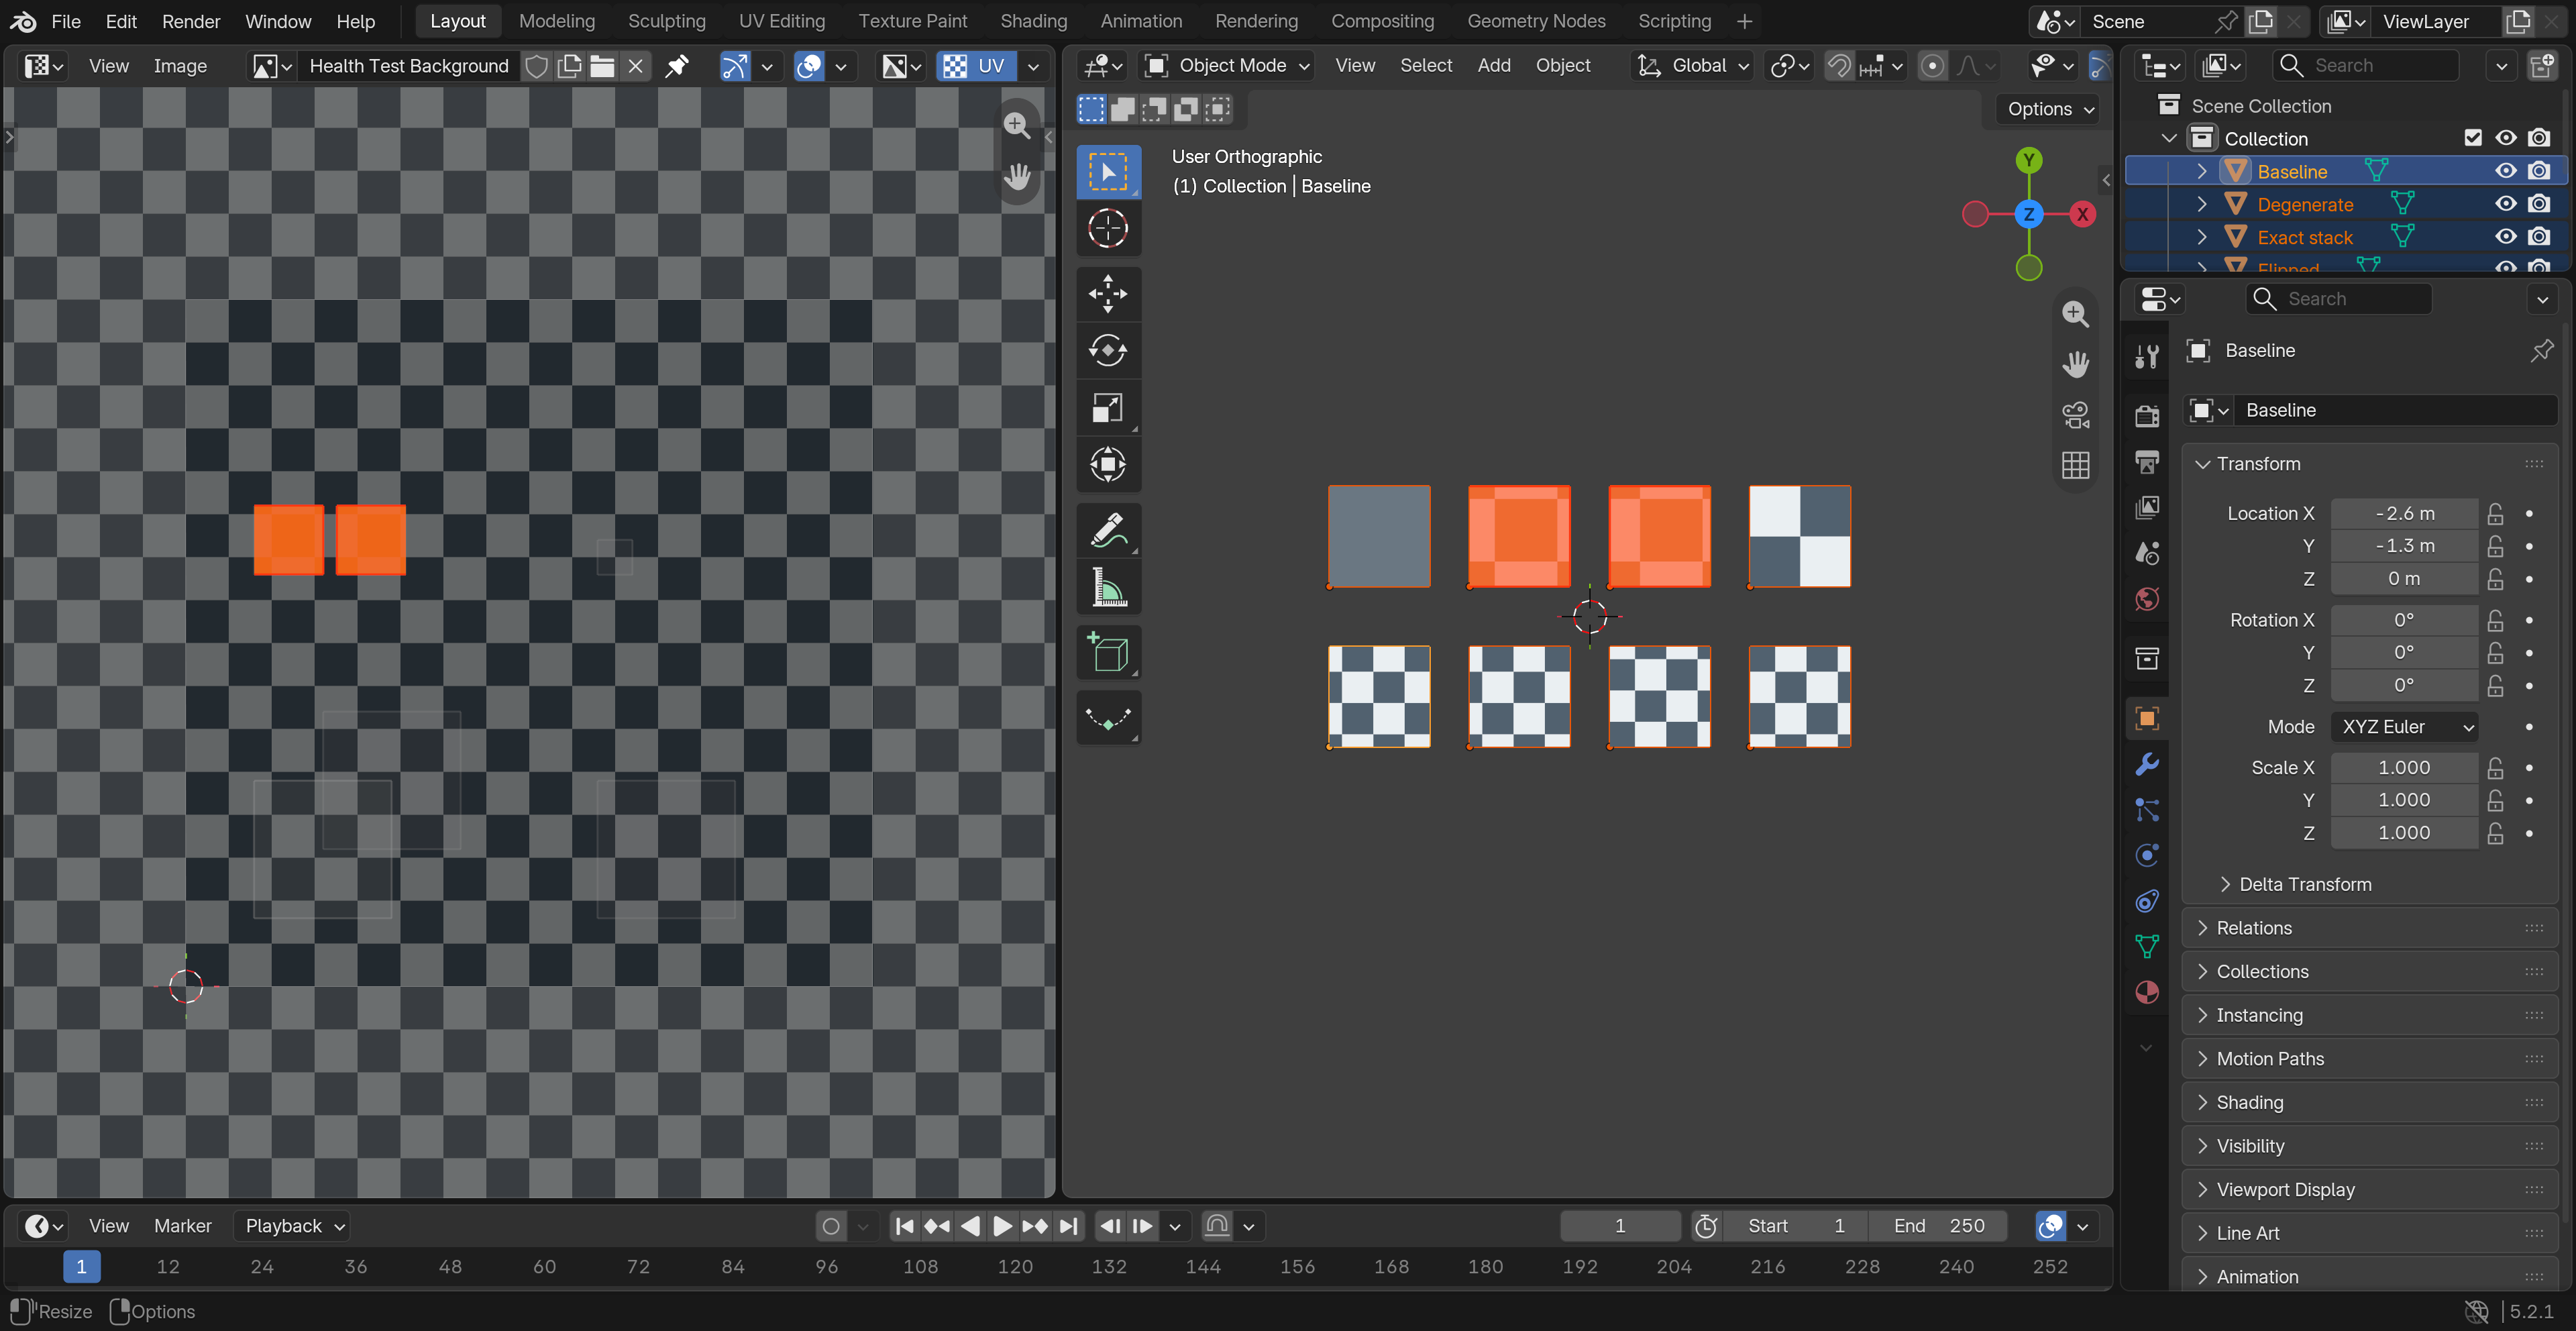
異なるUV島の境界間に、初期値8pxの余白があるか調べます。設定した画像幅・高さを使い、不足する辺と隣接三角形を橙で示します。重なり・完全な重ね合わせは別に分類します。タイル境界の確認では0–1は1枚の領域、UDIMは各タイルの外周を使い、タイルをまたぐ辺にも注意を出します。UDIMは全タイルで同じ解像度を使います。同じ島の内部の隙間や画像のアルファは判定しません。
縮退・反転
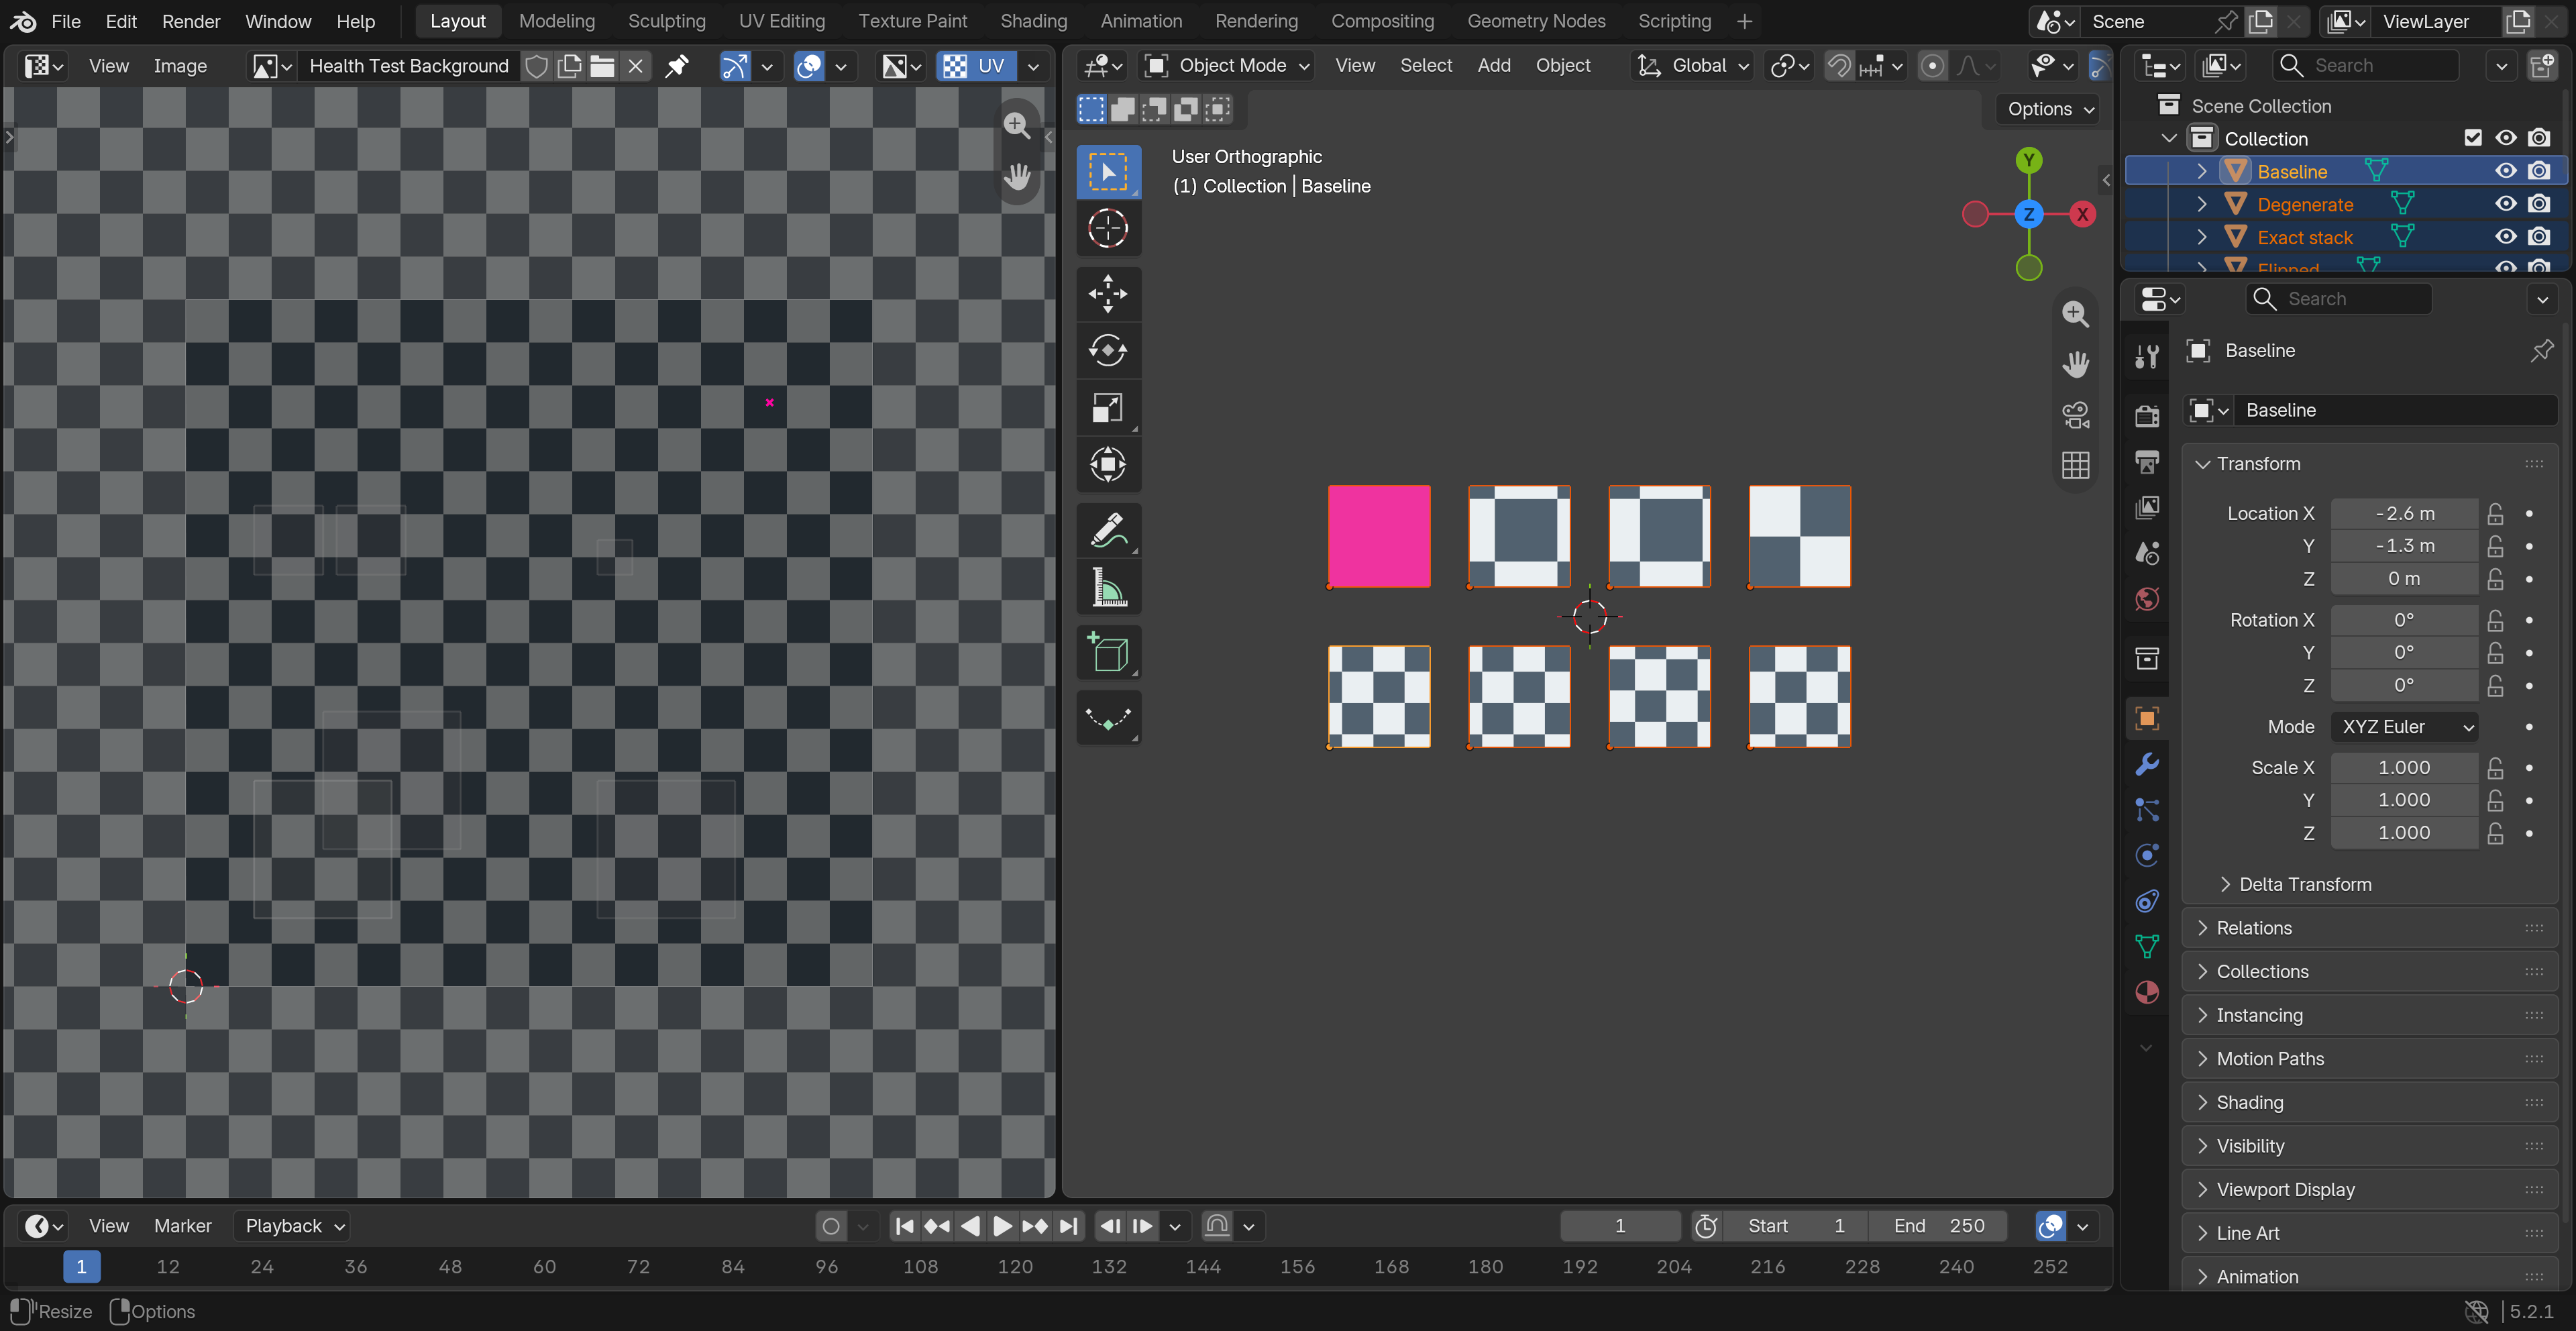
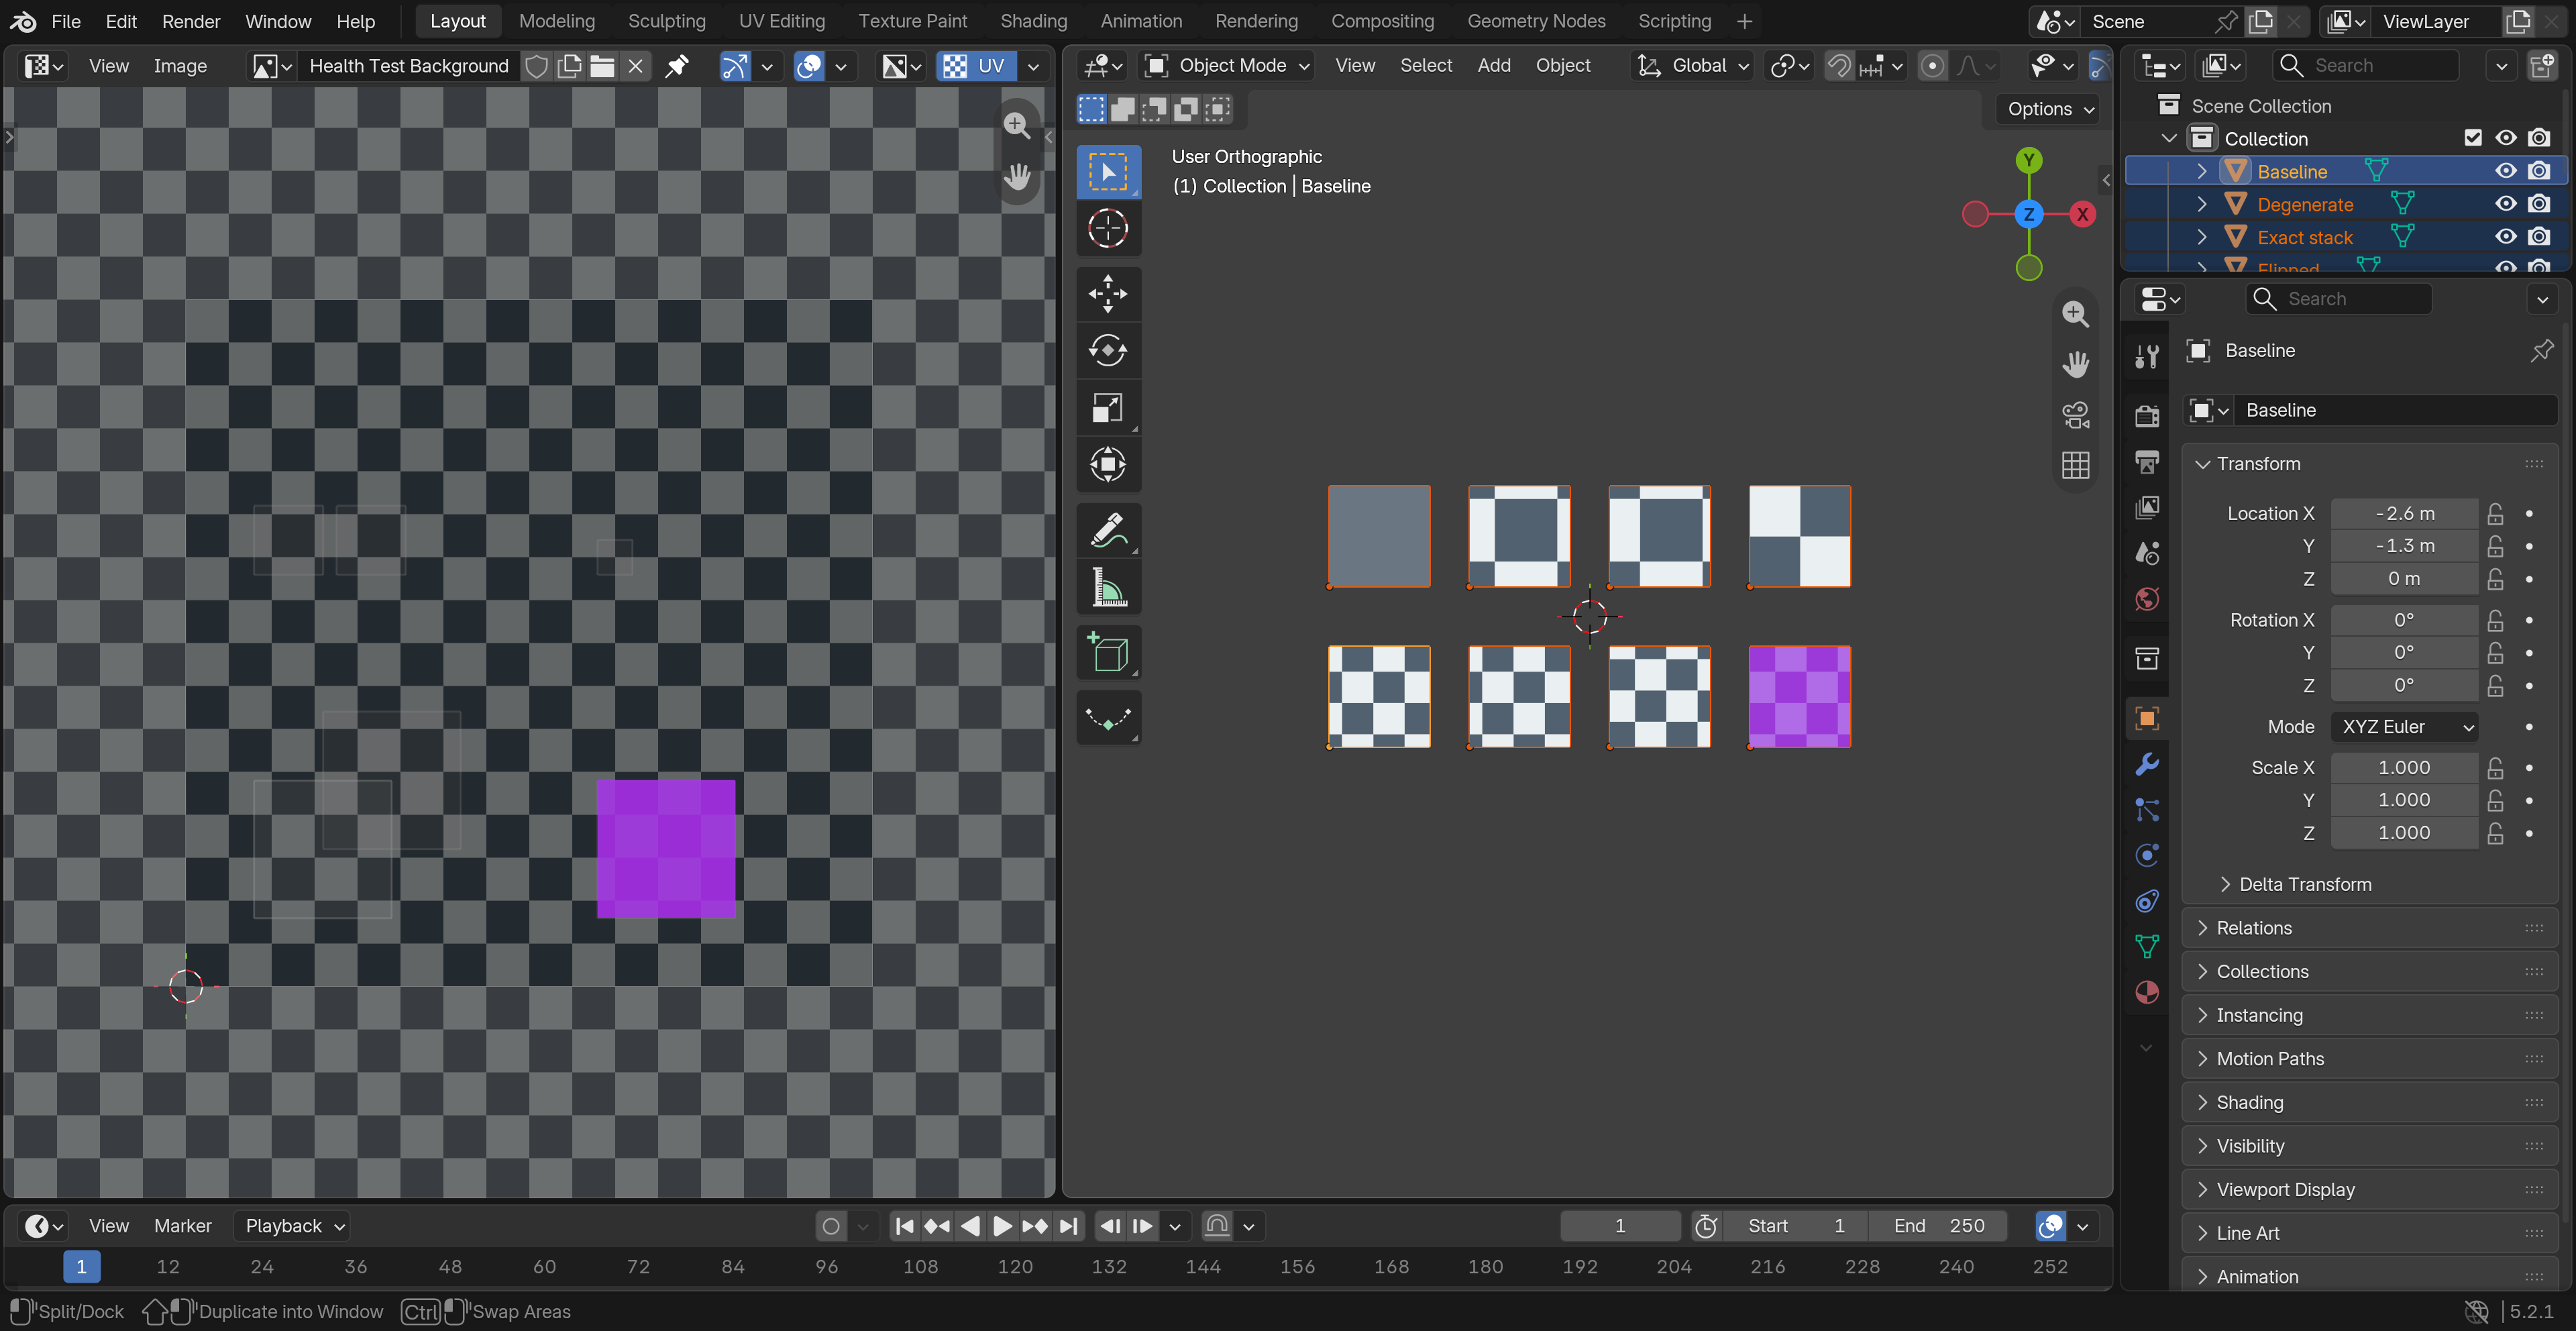
UV三角形の画素面積がしきい値以下(初期値0.01px²)、またはワールド面積が0の三角形はマゼンタです。潰れたUVの位置には十字を示します。紫の反転は、メッシュ三角形の頂点順に対してUVの向きが逆になったものです。縮退は除きます。意図的なミラーUVも含むため確認の目印として使います。オブジェクトの反転スケールだけを検出する判定ではありません。
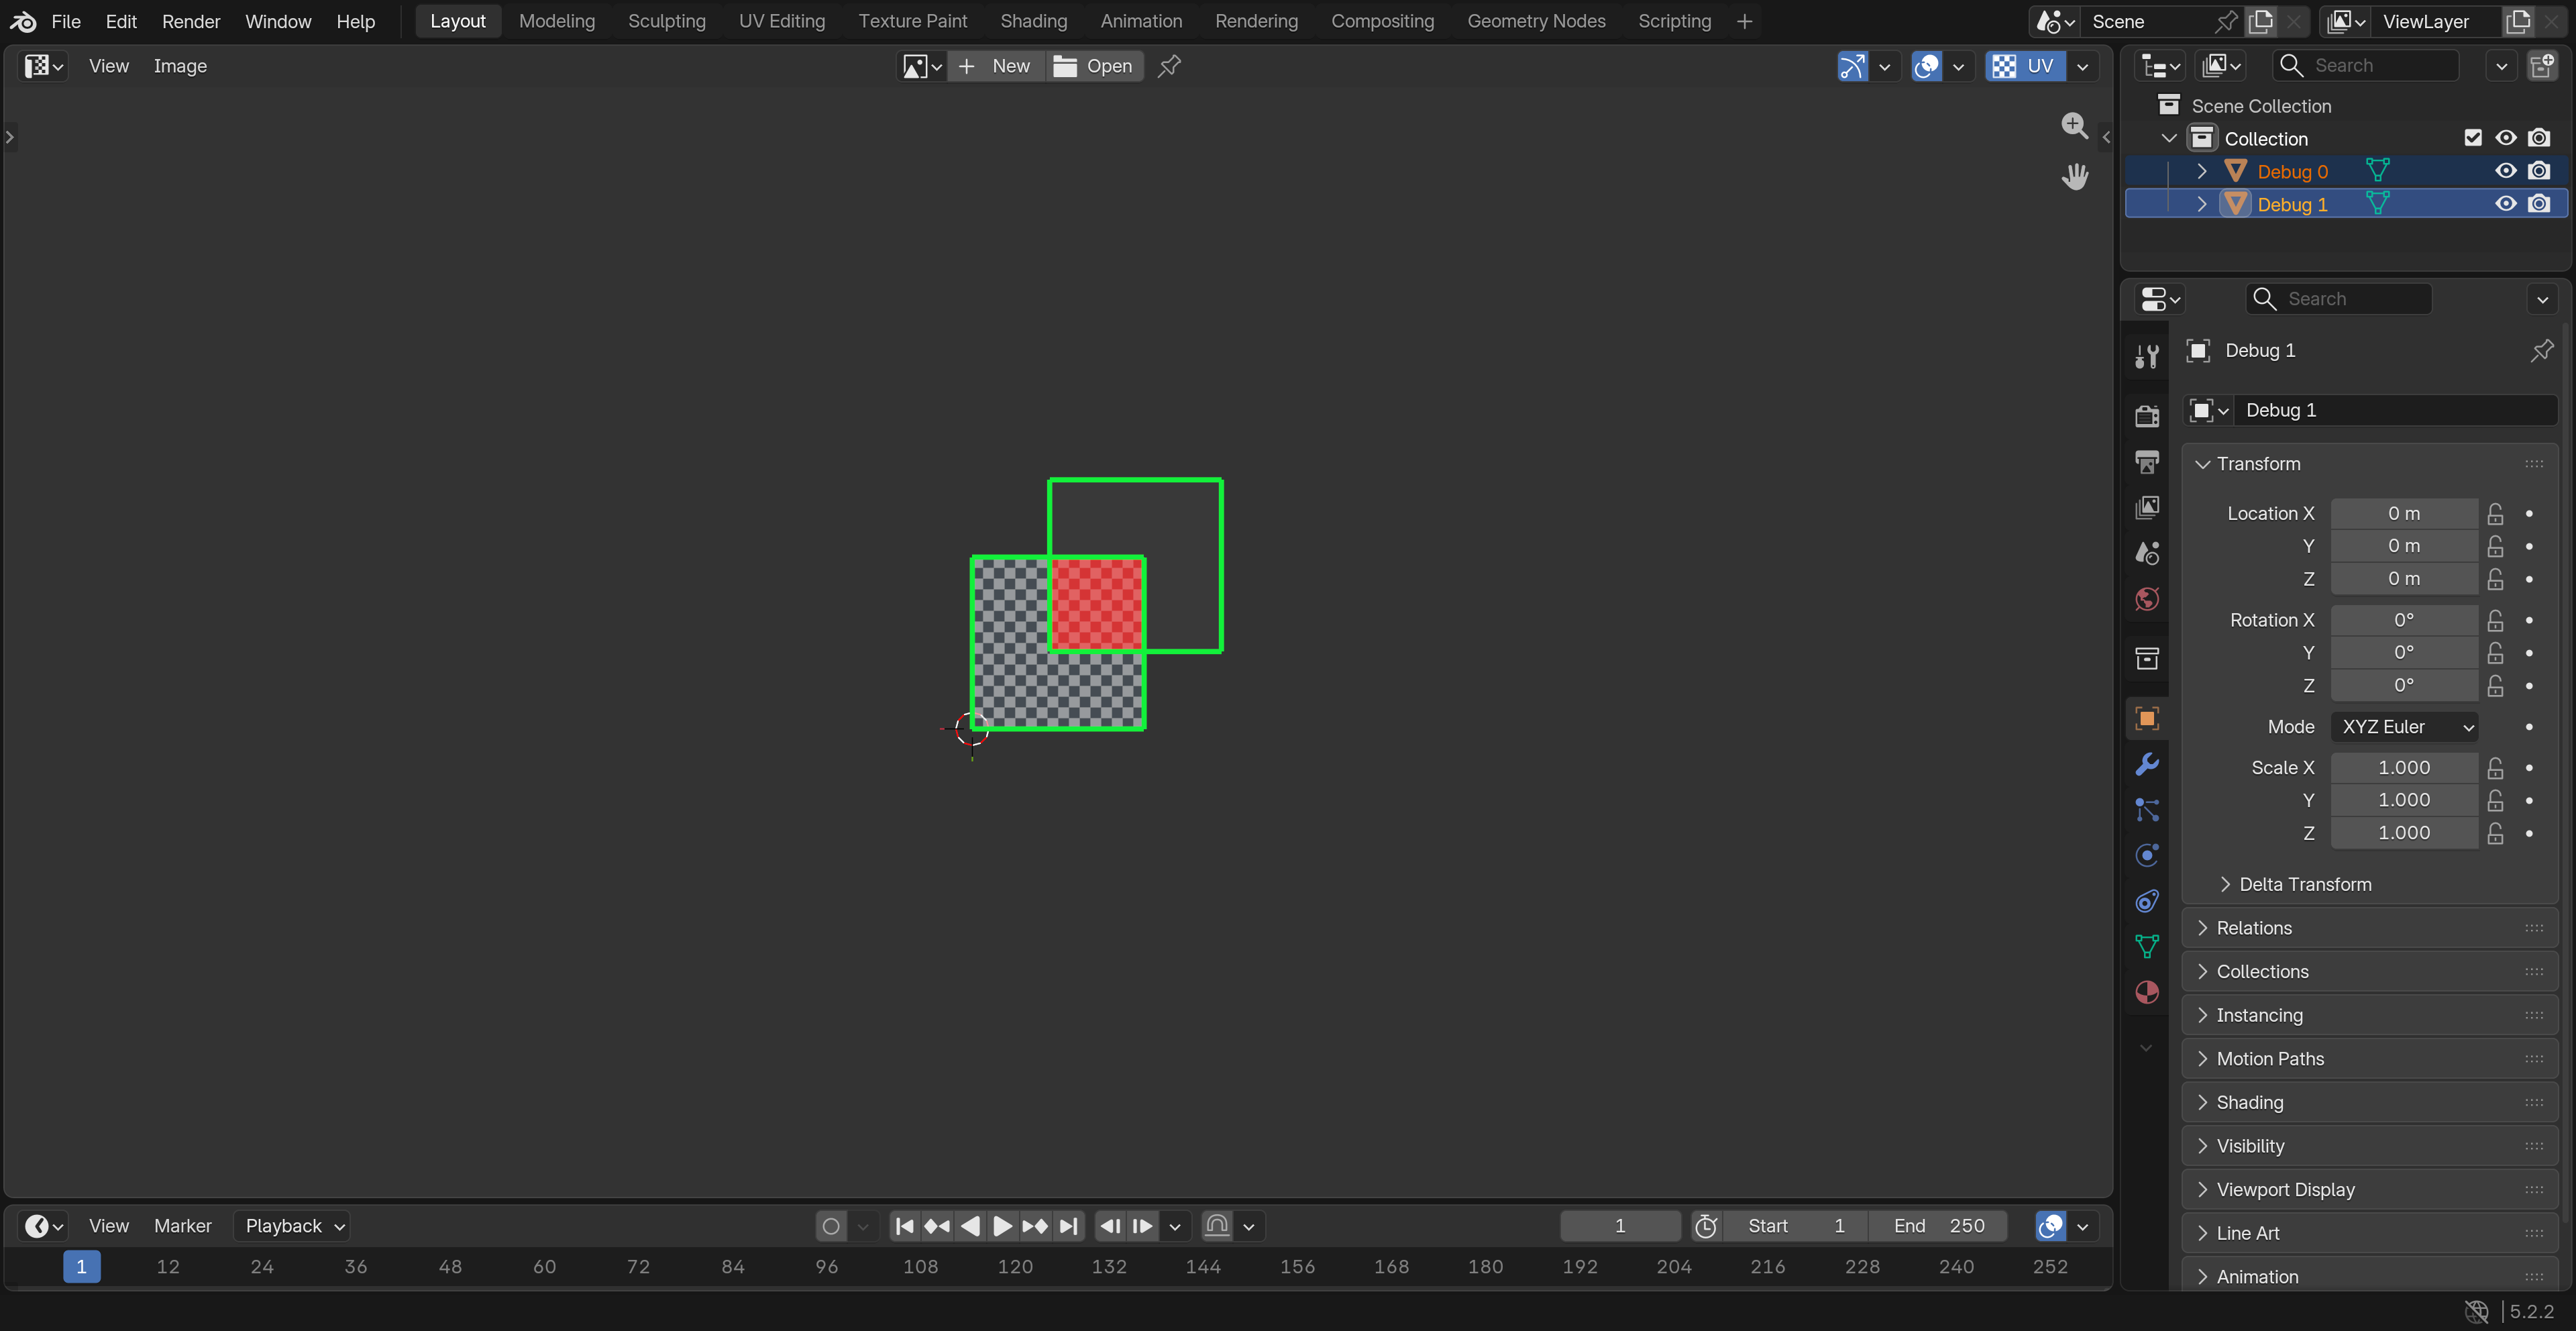
UV重なり・表示補助
UVエディター → Quick UV Checker → 表示タブでUV重なりデバッグを押します。交差したUV領域だけを赤、UV島の境界を緑で示します。詳細を開くと2つの表示を個別に切り替え、不透明度・境界の色・太さを変えられます。編集が落ち着くと結果を更新します。重なり領域の表示上限が出たら対象を減らしてください。
UV表示補助を開くと、次の表示専用ガイドを選べます。
| 表示補助 | 見えるもの |
|---|---|
| UVカバー範囲 | 対象UVが画像を覆う部分。 |
| 奇数回カバー | 奇数枚のUV面が覆う部分。同じ位置の2枚は相殺されるので、重なりがないという判定には使いません。 |
| 対応する切れ目 | 分かれたUV島にある同じメッシュ辺を、同色の印で対応付けます。 |
| UVコーナーのX印 | コーナー位置を白いX印で示します。 |
| 画像の減光 | 表示中の画像だけを暗くして、ガイドを見やすくします。 |
| 参照グリッド | UV単位または画像ピクセル単位の間隔。スナップは有効にしません。 |
赤い重なり表示と奇数回カバーは排他です。奇数回カバーは1タイル512ピクセルのマスクで同時に12タイルまで表示します。広い領域は拡大して確認してください。UV・選択・マテリアル・画像の画素は変更しません。
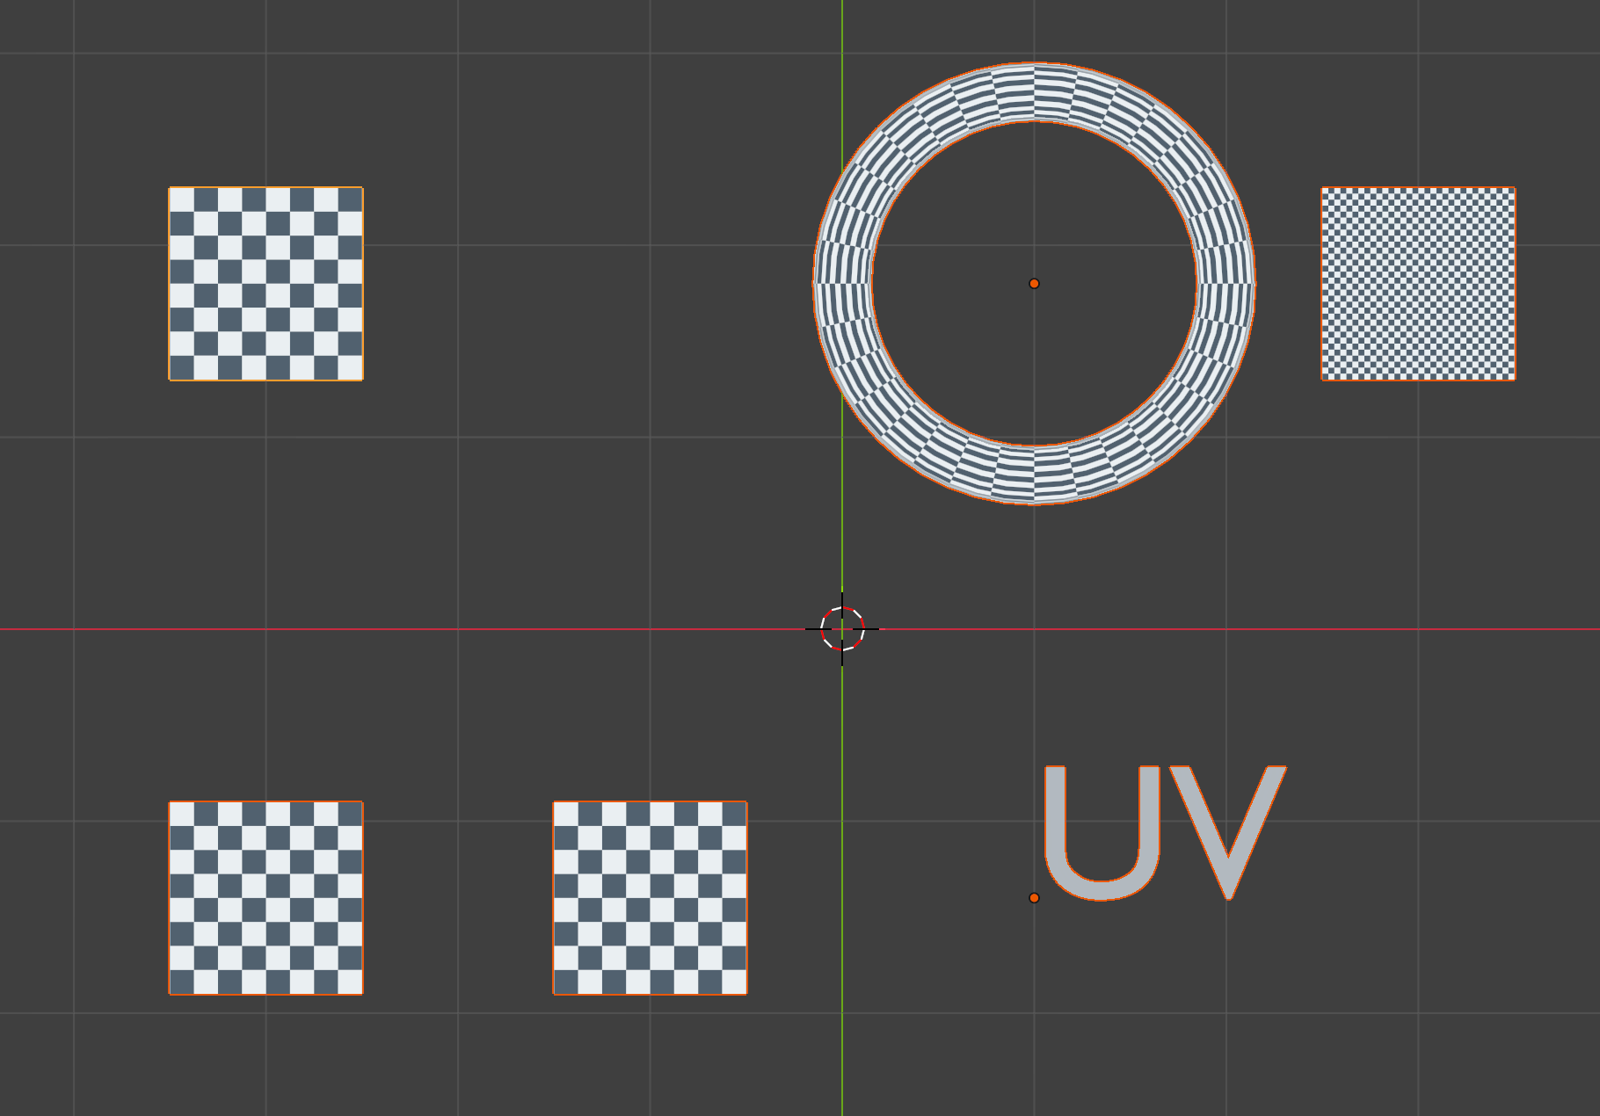
生成された形状のUV
ジオメトリノードのメッシュと未実体化インスタンス、コレクションインスタンス、ベベル付きカーブ、NURBSサーフェス、テキストは、評価後の面にUVがあれば確認できます。変換・モディファイア適用・実体化は不要です。カーブ・ヘアーカーブ・ポイントクラウドから生成したメッシュも、UVがあれば対象です。
- ジオメトリノードのプリミティブのUV Map出力を名前付き属性を格納につなぎます。
- ベクトル型、面コーナー領域、名前は uv_map などにします。
- 生成元を選択してチェッカーを表示します。必要なら対象の詳細でその名前を指定します。
面コーナーまたはポイントの名前付き2D/ベクトル属性は先頭2成分を使い、自動検索ではUVで始まる名前を探します。匿名フィールド・シェーダーのGenerated座標・UVを持つ面のない形状は対象外です。まずBlenderでUVを作成・格納してください。メッシュ編集モードは通常編集ケージを使い、編集モード表示が有効なノードでは評価後の出力を表示する場合があります。編集ケージの非表示面は除外します。
変形・アニメーションを確認する
- UVを持つメッシュを選び、チェッカーを表示します。
- モディファイアの値を変えるか、タイムラインを移動・再生します。現在のフレームの変形に表示が追従します。
- 編集モードで変形後の形状を確認するには、モディファイアの編集モードで表示を有効にします。無効にすると、編集できる元の形状を確認できます。
ポーズモードまたはアーマチュア編集モードの選択のみでは、操作中のアーマチュアで変形する表示中のメッシュも対象になります。リグを選び、ポーズを変えて模様を確認してください。UVや元のマテリアルは変わりません。
変形後の面数が多いと、毎フレームの表示データ更新で再生が遅くなることがあります。確認中は対象や細分化の段数を減らしてください。デモ動画はBlenderの連続したフレームを撮影して編集したもので、再生速度の測定ではありません。
使う項目だけ表示する
プリファレンス → アドオン → cvELD_QuickUVCheckerを開きます。表示する操作項目と表示する模様で、使わない項目のチェックを外します。操作欄やカードを隠す設定で、値を初期化したり実行中の表示をOFFにしたりはしません。表示も止めたい場合は、先に実際の表示スイッチをOFFにしてください。
模様タブではプリファレンスで表示対象にしたカードを常に並べます。カードを非表示にしても、選択中の模様は変更しません。設定JSONを書き出すで別の環境へ持ち出し、設定JSONを読み込むで検証して復元できます。読み込み前の設定もバックアップします。復元情報は交換されるアドオンフォルダーの外に保管します。この表示項目設定と一時的なチェッカー設定は別です。
困ったとき・表示を終了する
| 症状 | 操作 |
|---|---|
| 何も表示されない | 現在のモードのまま、表示中のUV付き形状を対象にして表示をONにします。誤ったUV名を空欄にし、Alt+Bの範囲を解除します。 |
| 設定項目が見つからない | 対応するタブと三角の詳細を開き、プリファレンスの表示項目も確認します。 |
| 色補正が見えない | 色補正をONにし「模様表示に戻る」を押します。診断と歪みは専用の色を保ちます。 |
| UVエディターに出ない | 「UVエディターに表示」をONにし、不透明度と画像/タイル範囲を確認します。標準のUV線はメッシュ編集モードで表示します。 |
| 結果が消えた | 対象・UV・設定の変更後は自動更新を待つか、再解析します。 |
| 解析が遅い・未完了になる | 「選択のみ」で対象を減らし、使わない解析項目をOFFにします。 |
| 遠くの模様が均一になる | 拡大するか、模様の細かさを減らします。 |
| 描画エラーが出る | Blenderのバージョン・描画バックエンド・注意表示・コンソールの内容を添え、購入ページからサポートへ連絡してください。 |
UVチェッカーを終了で表示を、停止で解析を終了します。独立したガイドは各スイッチで終了します。シーン/ビューレイヤー変更、ファイル読み込み、アドオン無効化でも表示セッションは終了します。表示の切り替えはUndo履歴を作りません。通常のUV編集はBlenderのUndoを使います。反応速度は形状の大きさとPC環境に依存します。
現在の操作とライセンス
現在のUIは「模様・表示・シーム・解析」の4タブです。模様カードのドラッグ切り替え、数値の初期値リセット、表示の縦横比、チェッカーの色補正、表示対象の選択、解析の自動更新、シームの個別表示を使えます。項目の表示設定はJSONで復元できます。
バージョンはインストールした拡張機能に従います(現在のマニフェスト:1.4.0)。GPL-3.0-or-laterで提供し、無保証です。LICENSEを参照してください。
カスタム模様を追加
- 模様タブのカスタム模様の横にある+を押します。
- 正方形の静止画像を選びます。縦横の画素数が同じなら解像度は自由で、登録件数の固定上限はありません。
- 追加した画像に切り替わります。名前を押して選択し、横のXで登録を削除できます。元の画像ファイルは削除しません。
細かさ・縦横比・色・不透明度も調整できます。選択した画像は3Dビュー・UVエディター・PNG/PSD書き出しで共通です。カスタム画像の柄はベクターSVGには変換できません。UVの辺のみならSVGに書き出せます。登録一覧はプリファレンスの復元とJSON入出力に含まれます。画像は外部参照なので、登録した場所から移動しないでください。読み込めなくなった画像は登録を削除して追加し直してください。
更新履歴
1.5.0 — 2026-11-03
- +から正方形のカスタム模様を追加。解像度は自由、登録件数の固定上限なし。
- UVヘッダーボタンのすぐ右に内蔵の「表示/UVチェック」メニューを追加。
- 診断線が最後のモディファイア形状とアニメーションに追従するよう対応。ポーズ変形とリンクメッシュごとのモディファイア差も反映。
- 表示メニューの使い方と、両エディターの画面例をマニュアルに掲載。
1.4.0
透過PNG・ベクターSVG・レイヤー付きPSDのUV書き出し、自動書き出し、設定保存、出力フォルダへのショートカット、命名規則のカスタマイズを追加。
See display issues at a glance
The Display / UV Check menu groups visual switches into illustrated cards. Press the overlay icon immediately to the right of the UV header button in the 3D View or UV Editor.
- Choose 3D View or UV Editor.
- Click a card to toggle its display. Blue cards show active settings; unavailable cards are dimmed.
- Use UV Error Check for UV diagnostic results, or Settings for edge colors, line width, targets and visibility through surfaces.
In the 3D View, compare shading, wire overlays, face orientation, seams and normals. In the UV Editor, compare angle/area stretch, UV edges/faces, island borders, seams and sharp edges. Mesh diagnostics distinguish open edges (cyan), loose edges (orange), and edges shared by more than two faces (pink). Loose edges have no UV location.
The diagnostic edges follow the final viewport-evaluated modifier result and update on animation frame changes. In Edit Mode, the modifier's display switches determine the visible result. A Solidify modifier that closes an opening therefore removes that opening from the diagnostic. The original mesh and UVs are not changed.
Choose a left/right/top/bottom position and 1–3 columns. Close with Esc or an outside click; right-click opens edge settings. Arrow keys and Enter operate the cards.
This menu is included in Quick UV Checker. No other add-on is required. Native display settings retain Blender's mode/shading restrictions. Dense evaluated meshes can slow playback; narrow the targets or reduce subdivision while inspecting.
Batch UV export — PNG, SVG and PSD
New in 1.4.0: export the preview as a transparent PNG, vector SVG or layered PSD. Open the Pattern tab.
- Select the UV-bearing objects to export. With Selected only, an empty selection shows a warning.
- Press Auto Export UV to export immediately using saved settings. The default is UV edges only, on a transparent 2048 × 2048 PNG.
- Press the small folder icon to open the output folder. By default, a single UV folder is created beside the saved .blend file.
Use the wrench at the right of Auto Export UV to change and save its settings. Saving settings does not export files. A custom output folder overrides the scene-based location. For an unsaved scene, save the .blend first or set an output folder.
Choose a format and content
| Format | Use |
|---|---|
| PNG (transparent) | UV edges or the checker pattern as an RGBA image. |
| SVG | UV edges, the checker, or both as vector artwork. |
| PSD (layers) | Checker and UV Edges on separate layers, with lossless ZIP compression and transparency. Choosing both with PNG automatically selects PSD. |
Opacity, checker pattern and colors follow the preview. Adjust UV line color, width, image size, UV range and outside-island transparency in export settings. Layers can be edited separately in a PSD-capable painting tool; individual application compatibility can vary.
Batch targets and filenames
Automatic export groups material faces by saved texture references, removes duplicate UV layouts, and puts all files in the same folder. Multiple color or normal maps using the same UV layout therefore produce one layout. Enable All Patterns to export all 14 patterns. Use Export UV Preview for a manual export of the current combined target or a separate file per object; it also supports all-pattern batches.
Filenames get an automatic prefix. Change its rule in Preferences using {object}, {material}, {texture} and {uv}. The default is {object}_{material}_{texture}. Export settings and the naming rule are included in portable preference JSON. Existing files are overwritten only when that option is enabled.
Start here
Inspect UV patterns, stretch, seams and UV health while keeping your materials and UV coordinates intact. Open Sidebar → Quick UV Checker in the 3D View or UV Editor. The 3D View header also has a UV button beside X-Ray; its dropdown opens the same settings.
- In any mode, use a visible object with UV-bearing surfaces. You can keep Sculpt, Vertex Paint, Weight Paint or Texture Paint active.
- Press Show UV Checker, or the header's UV button.
- Choose a pattern and inspect the surface. Press Hide UV Checker to return to your usual view.
The checker is a temporary viewport display. It does not create checker materials or images, edit UVs, unwrap, repair or appear in the final render.
Install and update
Blender 4.5 or later is required. Windows with Blender 4.5.0 LTS and 5.2.2 LTS has been tested; macOS, Linux and other graphics backends have not been validated. QuickBaker is not required.
- Keep your supplied extension ZIP intact. Drag it into Blender and confirm installation, or use Preferences → Add-ons → Install from Disk.
- Enable cvELD_QuickUVChecker.
- Open the Quick UV Checker sidebar and follow the first workflow above.
For an update, end the checker display first and install the replacement ZIP through Blender. Restart Blender if an earlier copy remains loaded. Disable the former cvELD UV Inspector or an old QuickBaker embedded prototype before enabling this standalone product. To uninstall, hide the checker, then disable or remove the extension in Preferences.
Choose targets and a tab
Target selection stays above the tabs. Selected only is the default; All visible includes visible surfaces in the current view layer, including objects outside the active edit session. Hidden objects are excluded. These displayed objects share one atlas during analysis.
Open Details beside the target to enter a UV map or named UV attribute. Leave the name blank for automatic lookup. A named inspection UV does not change active, render or bake UV flags; objects missing that UV are omitted and reported.
| Tab | Use it for |
|---|---|
| Pattern | Pattern cards, frequency, display aspect and checker color. |
| Display | Opacity, UV Editor display, directional stretch and UV guides. |
| Seams | Marked seams, actual UV cuts and open mesh edges. |
| Analysis | Run UV health checks, choose categories and inspect results. |
Switching tabs preserves settings and running analysis. Small triangles expand details; target details and result details start folded. Pattern cards remain visible in the Pattern tab. X beside a number resets that value to its default. Reset Checker Settings resets the checker display and enabled analysis checks. Numeric analysis settings such as texture size, target density and padding are retained. Color adjustment has its own reset. After a reset, press Undo Reset beside the reset button to restore the previous settings in any mode. Object Mode also supports Blender Undo/Redo; use Undo Reset in Edit Mode.
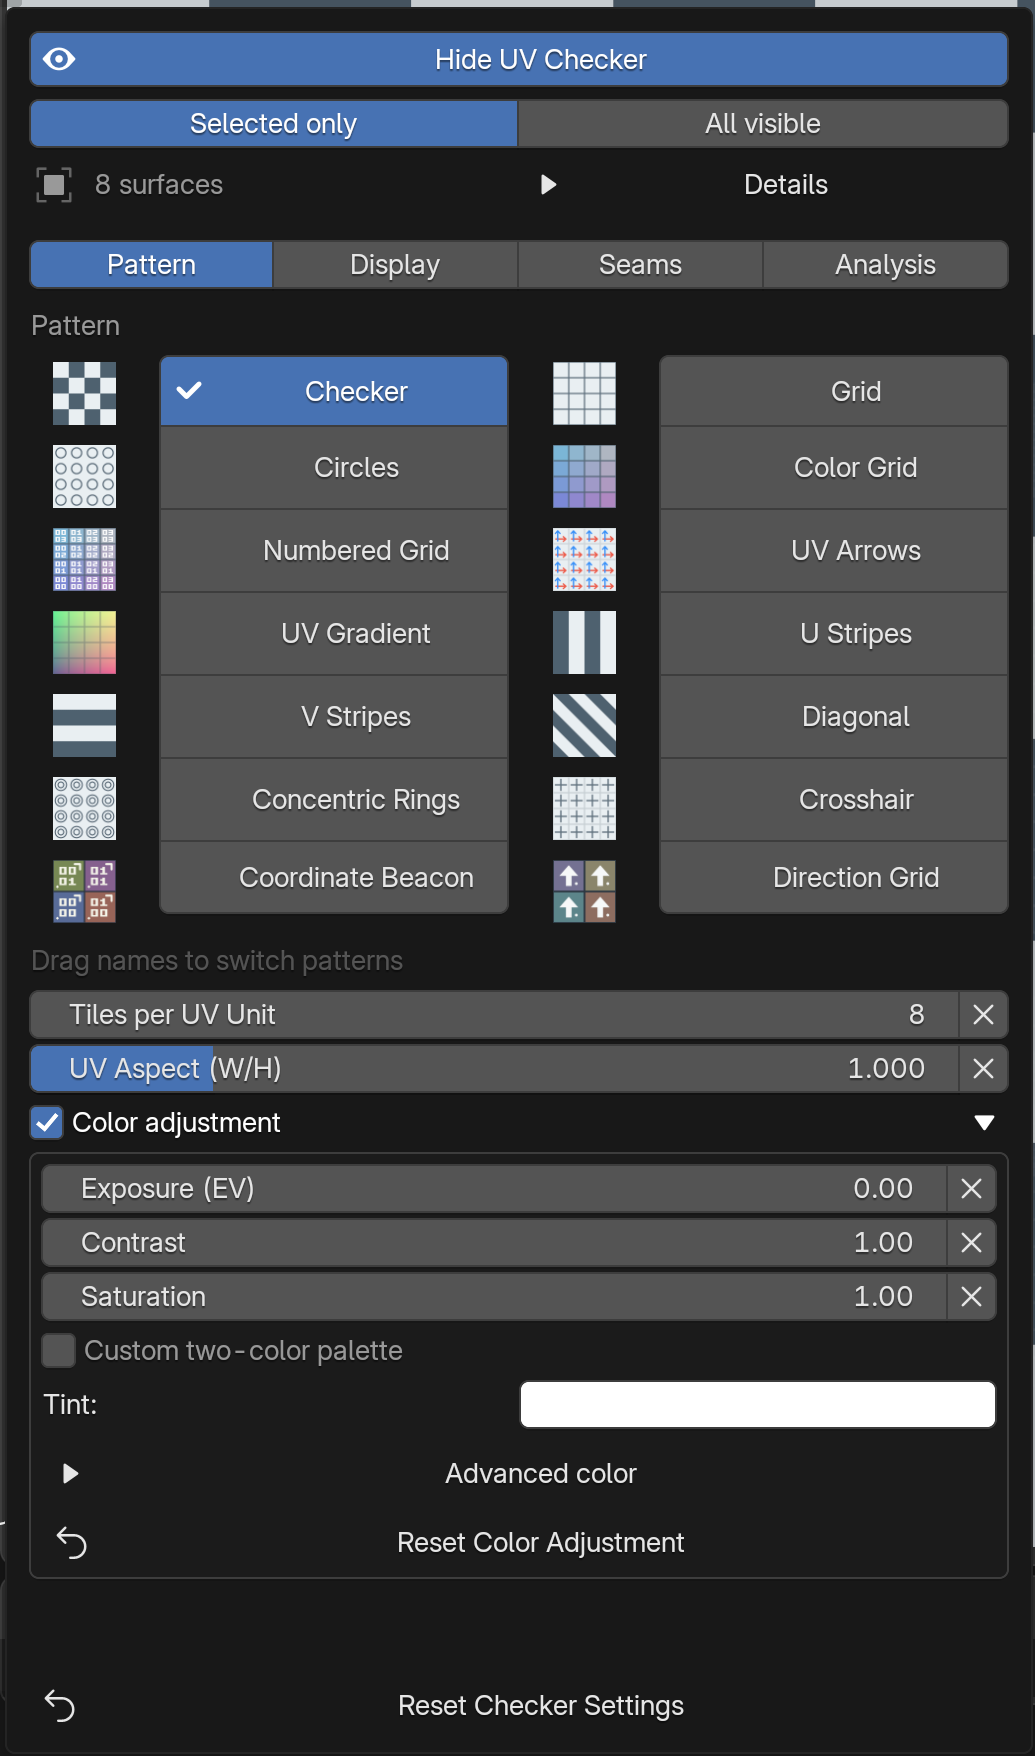
Choose patterns and display aspect
- Open the Pattern tab to view the available pattern cards.
- Click a card's name. You can press and drag across names to switch immediately.
There are 14 original patterns. Squares and circles reveal stretching; grids and diagonals show bending and shear; arrows, gradients and numbered patterns help read position and orientation.
| Setting | Visible effect | Default |
|---|---|---|
| Tiles per UV Unit | Higher values give finer cells; lower values make distortion easier to see at a distance. | 16 (range 1–512) |
| UV Aspect (W/H) | 1 is square. Above 1 makes cells wider; below 1 makes them taller, in both editors. It changes display only. | 1 (range 0.125–8) |
Use ×2, ×5, ÷2, ÷5 below the frequency field. Fractions round to the nearest integer, within 1–512. The aspect buttons set width:height to 0.5:1, 1:1, 2:1 or 4:1. Numeric entry and individual X resets remain available.
Read rotation and mirroring
Direction Grid points along +V; the detached tail dot is on the +U side. A U mirror swaps the dot side; a V mirror reverses the arrow. Coordinate Beacon puts U above V with asymmetric corner marks. Its cell numbers restart in each UV tile and repeat after 100 cells. Direction Grid repeats across UV units, including negative UVs and UDIMs.
Make the checker easy to read
In Pattern, expand Color adjustment. Start with Exposure (EV), Contrast and Saturation; Tint changes the overall color. For supported patterns, enable Custom two-color palette and choose A/B. The swap button exchanges them. Patterns without this option keep their source palette.
Advanced color includes hue, gamma, contrast pivot, RGB gain/offset, invert, strength and output clamping. Gamma above 1 brightens the checker. Strength blends the adjustment with the original pattern. All changes affect the checker in both editors; scene color management, materials and image pixels remain unchanged.
Diagnostic and distortion colors stay unchanged so warnings remain readable. You can still edit color settings during diagnosis. Press Return to pattern display to inspect the adjusted pattern; analysis keeps running and its results remain available.
Uncheck Color adjustment to bypass it while retaining your settings. Use the X beside a number for a single default, or Reset Color Adjustment for the entire grade and palette.
Sync the 3D View and UV Editor
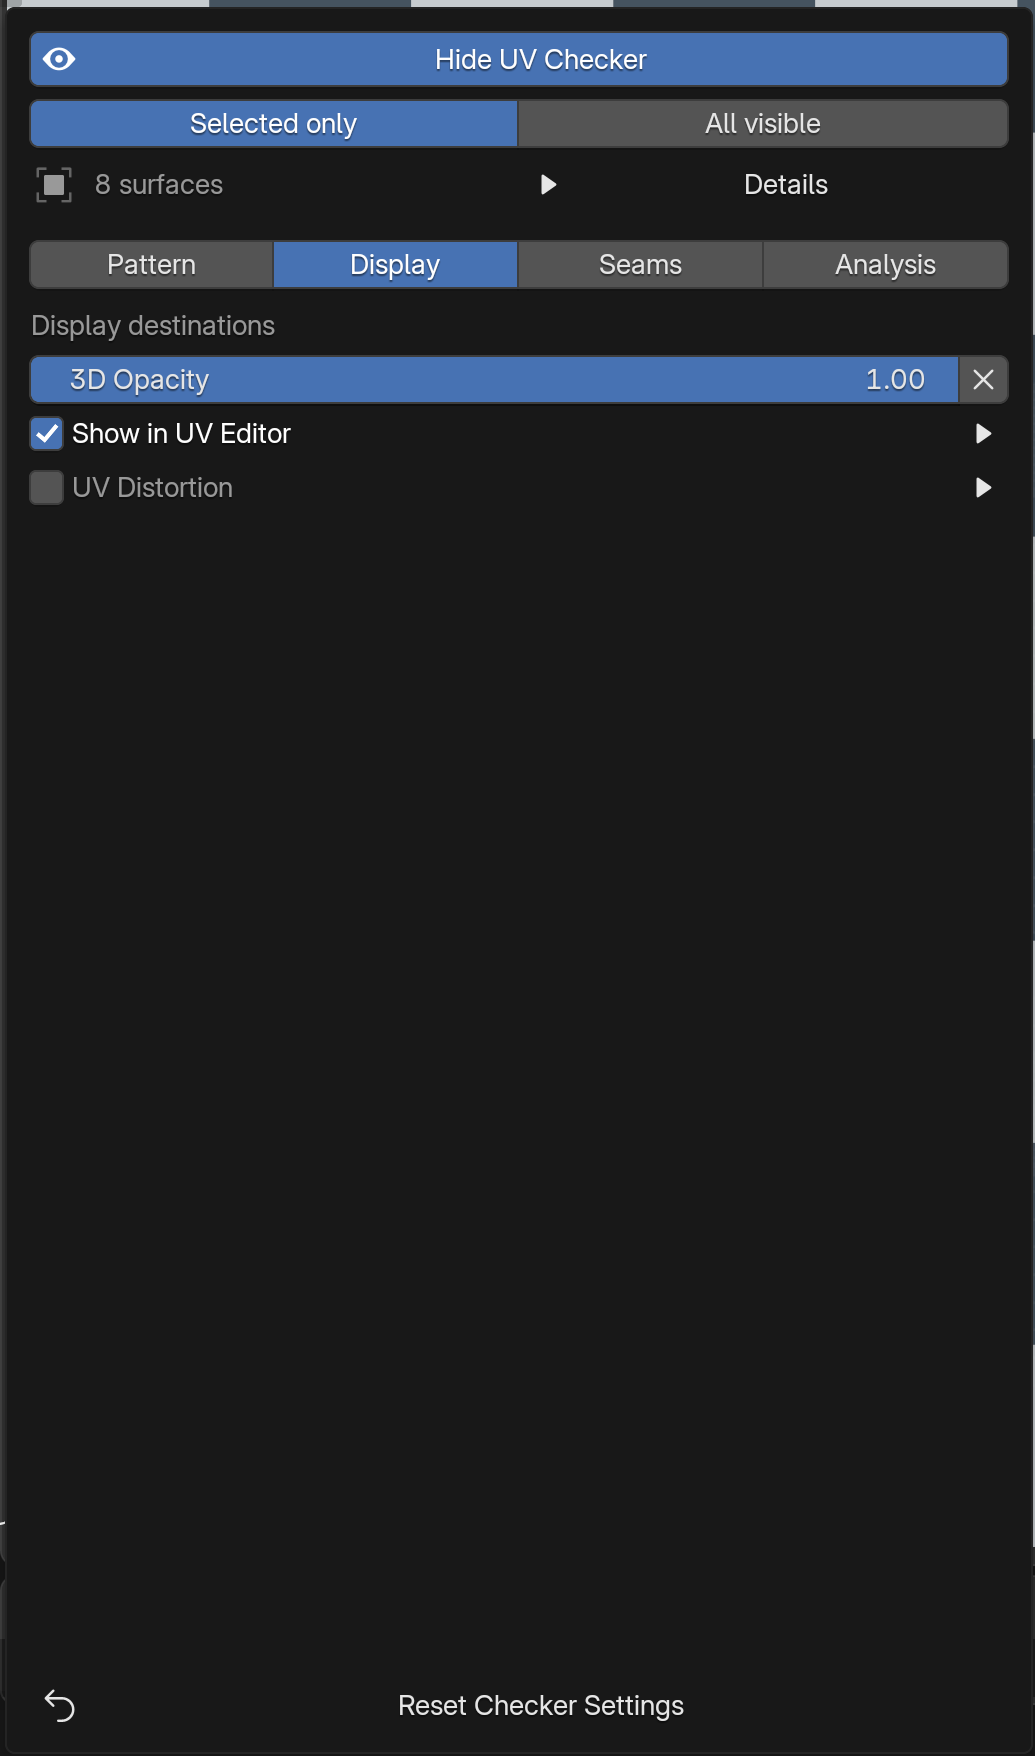
Open Display. Opacity (3D / UV) adjusts the checker in both editors together. Enable Show in UV Editor to display it there. Dim UV to 1/3, available in Display and expanded Seams, reduces checker brightness without changing textures. Pattern, frequency, aspect and color stay synchronized.
Limit pattern to image confines the pattern to the displayed image bounds. Choose Image 0–1 for the first tile or Image UDIM tiles for the displayed image’s registered tiles. The reference size does not change UVs or the image. The checker and diagnostic overlays can display in Object Mode too. Use mesh Edit Mode to edit UVs and see Blender’s native UV outlines. Geometry Nodes evaluated output may differ from the editable UV cage.
In the 3D View, Solid, Wireframe, Material Preview and Rendered shading work with the checker. X-Ray and disabling ordinary overlays do not hide it. Occlusion follows filled visible surfaces; the checker does not show a target's back surface through its front. Unselected wireframe objects do not provide filled-surface occlusion. Disable an active Alt+B clipping region. The checker can be toggled in any mode without leaving the current tool. UV-bearing evaluated surfaces are required; it does not create UVs for geometry that has none.
Find directional stretch
Enable UV Distortion and expand its details. Yellow to red shows increasing directional stretch; magenta marks collapsed UVs. Red at Stretch Ratio controls the display range. Uniform UV scale is not directional distortion; use density analysis to compare overall resolution.
Distinguish three kinds of edges
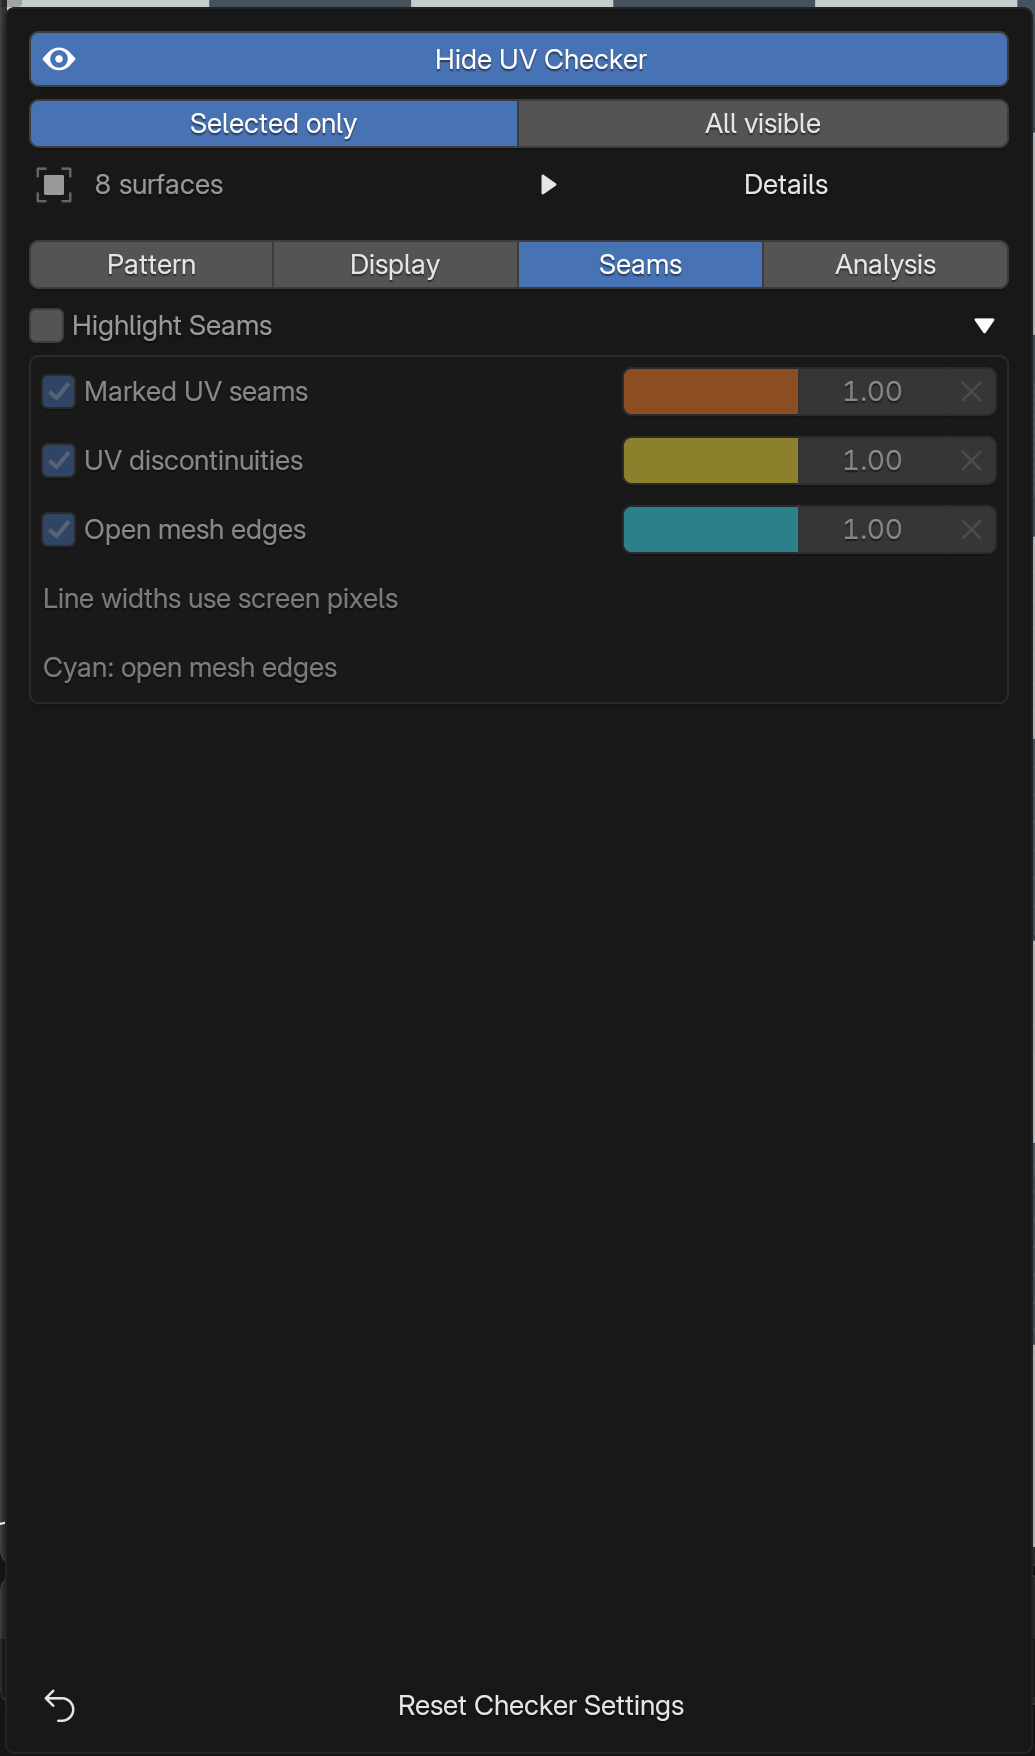
Open Seams, enable Highlight Seams and expand its details. Each category has an independent checkbox, color and width in both editors.
| Category | What it shows | Default color |
|---|---|---|
| Marked UV seams | Edges marked as seams in Blender. Their UVs may still be continuous. | Orange |
| UV discontinuities | Actual UV splits between faces sharing a mesh edge, even if the edge is unmarked. | Yellow |
| Open mesh edges | Physical boundaries with only one adjacent polygon. | Cyan |
Widths start at 1 screen pixel and range from 1–8 px, independent of interface scale. Use X to reset an individual width. Where categories coincide, cyan draws last. The green UV island borders in Display are a separate layer.
Run UV health checks
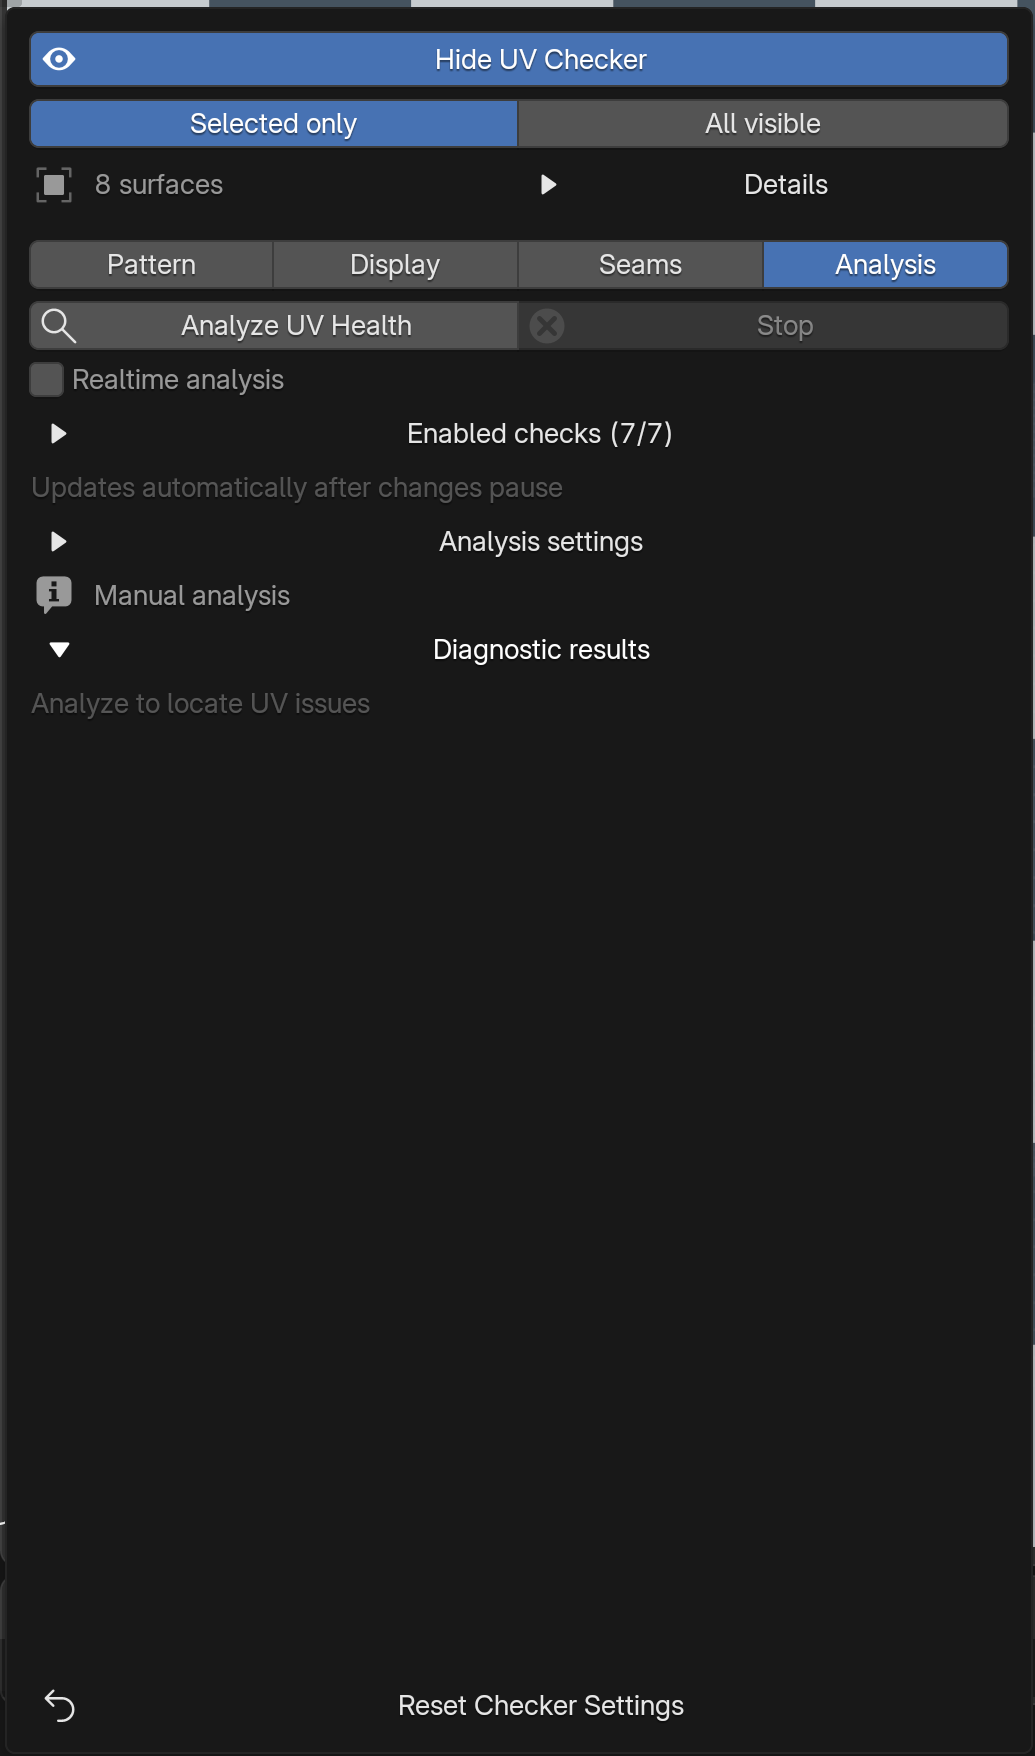
- Choose the target objects, then open Analysis.
- Expand Analysis settings and enter texture width/height, target density and minimum padding if needed.
- Press Analyze UV Health.
- Expand Diagnostic results and click a result row to highlight affected triangles in the 3D View and UV Editor.
Realtime analysis is on by default. After UVs, geometry, targets, scene units or analysis settings stop changing for about 0.3 seconds, results update automatically. You can keep editing while calculation runs; this is not a per-frame guarantee. Turn realtime off to update manually with Analyze. Stop ends analysis mode; independent UV display aids can still request their own calculations.
Expand Enabled checks to choose seven categories. Disabled categories have no active result view or issue count. All displayed objects are compared as one shared atlas, so unrelated objects may overlap intentionally. Start with Selected only to narrow the scope.
Counts are unique evaluated faces, including instance copies. All issues combines warnings, without a synthetic score; exact stacks are informational and excluded. Highlights mark involved triangles. They do not select, unwrap or repair geometry.
Changed result rows and counts are unavailable until recalculation. During realtime updating, the last compatible diagnostic overlay may remain visible until the new result is ready. An Incomplete message means zero counts are not an all-clear: reduce the targets and analyze again. The triangle limit is one million, and very complex topology or pair searches also have bounded limits. Missing or invalid UV surfaces are reported separately.
Read each diagnostic
Texel Density
Set texture dimensions and Target px/m. Density reflects texture pixels per metre of world surface, including object transforms and rectangular textures. Scene unit scale applies; None means one Blender unit is one metre. Defaults are 2048 × 2048, 1024 px/m and ±10% tolerance. Blue is below target, green is target, red is above. The tolerance controls counts; the heatmap varies continuously.
Partial overlap, self overlap and exact stacks
Red means positive-area overlap between UV regions; touching edges alone do not count. Purple self overlap is within the same UV island, including folded quads and n-gons. Blue exact stacks are two non-self-overlapping islands covering the same area, including different triangulations. Intentional stacks are informational. Tiny intersections below numerical tolerance are ignored.
Padding
The default minimum is 8 px between different island boundaries, using the configured texture width/height. Orange marks insufficient clearance and adjacent triangles. Overlap and exact stacks are classified separately. Enable tile-border checks: 0–1 checks one atlas; UDIM checks local tile edges and warns about cross-tile edges. Each UDIM tile uses the same resolution. Gaps within one island and image alpha are not checked.
Degenerate and flipped
Magenta flags UV triangles at or below the area threshold (default 0.01 px²), or zero-area world triangles. Collapsed UV positions have cross markers. Purple flipped UVs have reversed UV winding relative to triangle ordering, excluding degenerate triangles. Mirrored UVs can be intentional; mirroring an object transform alone is not this winding test.
Inspect UV coverage and borders
In the UV Editor → Quick UV Checker → Display tab, press UV overlap debug. It shows only the intersecting UV area in red and island borders in green. Expand its details to switch those layers independently, change opacity, border color and width. Results update after edits pause. If overlap regions are limited, reduce the target set.
Expand UV display aids to choose the following display-only guides.
| Guide | What to look for |
|---|---|
| UV coverage | The image area covered by target UV surfaces. |
| Odd coverage | Areas covered an odd number of times. Identical paired stacks cancel, so this is not an overlap all-clear. |
| Matching cut edges | Matching colored tabs identify the same mesh edge on split UV islands. |
| UV corner X marks | White X marks show corner positions. |
| Dim UV image | Darkens only the displayed image to help read overlays. |
| Reference grid | Use UV-unit or image-pixel spacing. It does not enable snapping. |
Red overlap and odd coverage are mutually exclusive. Odd coverage supports up to 12 visible tiles at a time with a 512-pixel mask per tile; zoom in for a wider atlas. Guides do not change UVs, selection, materials or image pixels.
Inspect generated surfaces
Geometry Nodes meshes and unrealized instances, collection instances, beveled curves, NURBS surfaces and text can be inspected when their evaluated faces carry UVs. No conversion, modifier application or realization is required. Mesh output generated from curves, hair curves and point clouds is also supported when it carries UVs.
- In Geometry Nodes, connect a primitive's UV Map output to Store Named Attribute.
- Use a Vector attribute on the Face Corner domain and a name such as uv_map.
- Select the generator and show the checker. If necessary, enter that name in target Details.
Named 2D/vector attributes on face corners or points use their first two components. Automatic lookup searches UV-prefixed names. Anonymous fields, shader Generated coordinates and shapes without UV-bearing faces do not provide an inspection UV. Create or store UVs with Blender first. In mesh Edit Mode the edit cage is normally used; nodes with edit-mode display enabled may show evaluated output instead. Hidden edit-cage faces are excluded.
Inspect modifiers and animation
- Select the UV-bearing mesh and show the checker.
- Adjust a modifier, scrub the timeline or play the animation. The overlay follows the evaluated surface at the current frame.
- In Edit Mode, enable the modifier’s Show in Edit Mode option to inspect its evaluated result. With it disabled, inspect the editable cage.
In Pose or Armature Edit Mode, Selected only includes visible meshes deformed by the active armature. Select the rig and pose it to check the pattern on its meshes. UVs and original materials remain unchanged.
Large evaluated meshes need new display data each frame and can slow playback. Reduce visible targets or subdivision levels while checking movement. The demonstration is assembled from consecutive Blender frame captures; it is not a playback-speed measurement.
Keep the controls you use
Open Preferences → Add-ons → cvELD_QuickUVChecker. Under Visible controls and Visible patterns, uncheck items you rarely use. These preferences hide controls or cards; they do not reset their values or switch off active overlays. Turn the actual overlay off before hiding its controls.
The Pattern tab always shows the cards enabled in Preferences. Hiding a card does not change the current pattern. Export Preferences JSON saves visibility choices for another installation; Import Preferences JSON validates and restores them, keeping a backup of the current preferences. Visibility recovery is stored outside the replaceable add-on folder. These visibility preferences are separate from the temporary checker values.
Troubleshooting and ending a session
| Symptom | Action |
|---|---|
| Nothing appears | Use a visible UV-bearing surface in the current mode, show the checker, clear an incorrect UV name and disable Alt+B clipping. |
| A control is missing | Choose the correct tab, expand its triangle, then check Visible controls in Preferences. |
| Color changes are not visible | Enable Color adjustment and press Return to pattern display. Diagnostics and distortion deliberately retain their own colors. |
| UV Editor is empty | Enable Show in UV Editor and increase its opacity. Use mesh Edit Mode for native UV outlines. Check image/tile bounds. |
| Results disappeared | Wait for realtime updating or analyze again after the target/UV/settings change. |
| Analysis is slow or incomplete | Use Selected only, reduce objects and disable checks you do not need. |
| Pattern looks flat at a distance | Zoom in or reduce Tiles per UV Unit. |
| Drawing error | Record Blender version, graphics backend, visible warning and console message; contact support through your purchase page. |
Hide UV Checker ends the display; Stop ends analysis. Independent guides have their own switches. Display sessions end on scene/view-layer change, loading a file or disabling the add-on. Display toggles do not add an Undo step; ordinary UV editing still uses Blender Undo. Mesh size and hardware affect responsiveness.
Current controls and license
The current interface groups settings into Pattern, Display, Seams and Analysis. It includes draggable pattern cards, numeric default resets, display aspect, checker color adjustment, selectable display targets, automatic analysis updates and independent seam categories. Visibility preferences can be recovered with JSON.
Version follows the installed extension (current manifest: 1.4.0). Licensed under GPL-3.0-or-later, without warranty; see LICENSE.
Add your own square patterns
- Open Pattern and press + beside Custom Patterns.
- Choose a square still image. Width must equal height; there is no resolution whitelist or fixed entry limit.
- The new image becomes active. Click a name to switch; use its X to remove the registration without deleting the source file.
Frequency, aspect, color and opacity also apply to custom patterns. The 3D View, UV Editor and PNG/PSD preview export share the selected image. Custom image patterns cannot be exported as vector SVG; UV-edges-only SVG remains available. Registrations are saved with Preferences recovery and JSON import/export. Images remain external references: keep them at the registered paths. If an image is unavailable, remove its registration and add it again.
Version history
1.5.0 — 2026-11-03
- Added square custom pattern images with a + button, arbitrary resolutions and no fixed registration limit.
- Added the built-in Display / UV Check menu immediately beside the UV header button.
- Diagnostic edges follow the final displayed modifier result and animation, including pose deformation and object-specific linked-mesh stacks.
- Added the illustrated display-menu guide and examples for both editors.
1.4.0
Transparent PNG, vector SVG and layered PSD UV export; automatic export, saved settings, output-folder shortcut and customizable naming.