Requirements: Blender 4.5 or newer, below 5.3. Verified with 4.5.0 and 5.2.1 on Windows.
Drag the unextracted ZIP into Blender or choose Install from Disk in Preferences, then enable it. Finish active strokes before updating. Do not enable development and extension copies simultaneously. Disable and uninstall through Preferences.
Select the clothing mesh to move. The body is the fitting target, not the object you reshape.
In the 3D View sidebar, choose cvELD Shell fit Brush → Start Brush, or choose ShellFitBrush in the left toolbar.
Select a brush in the header and left-drag. Release to confirm, Esc to cancel the stroke, or Ctrl+Z to undo.
First exercise: select clothing → Grab → cover an entire decoration → drag a short distance. Once movement is clear, try Shell Fit or Space.
Starting in Object Mode enters Edit Mode. Weight, Texture and Vertex Paint keep their current mode. Return to Paint restores the previous tool. Native Sculpt Mode and the Image Editor are outside this tool’s scope.
Choose from the header, thumbnails or bottom catalog. Catalog presets enable their corresponding preservation option; the header can still toggle it afterward.
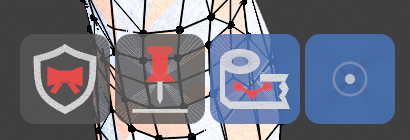
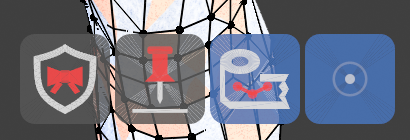
Header and effect icons
The Auto / eyedropper beside the brush chooses the fitting target. Empty means automatic search; an explicit target restricts fitting to that mesh. Size, Strength, Offset and Fit Reach follow. Default reach is 10 cm. Offset is the gap to retain; reach is how far to search for a surface.
Shell Fit header. Click an image to open it at full size.
Control
Effect / use
Shield + red bow: Preserve Shape
Retains decorative depth while moving or fitting. Cover the whole ribbon. Turn off for stronger conformance of thin cloth; this is not an exact rigid-body constraint.
Pin: Pin Boundary
Keeps vertices on open mesh borders in place, preserving cuffs and hems. A footprint containing only boundary vertices cannot deform.
Tape + vertices: Use Selection as Mask
Moves only vertices selected at the start of the stroke. With no selection, a warning stops the stroke. Turn off to remove the selection restriction.
Scope icon
Shows the active scope. Click to open three vertical choices: All Within Radius, Connected Only and Intersecting Islands. Intersecting Islands is the default.
Preserve Volume
Reduces shrinkage or thickness changes in Smooth, Flatten and Space. Separate from Preserve Shape; not an exact volume constraint.
Viewport effect icons show only options supported by the current brush.
Header and viewport icons control the same settings. Hover for the feature name and effect. Preferences → General controls the help inside Settings, plus effect-bar auto-hide, size and opacity.
The General tab changes the offset drag limit. Typed values may exceed that limit within the finite numeric range. A larger value increases the gap; check target placement and reach as well.
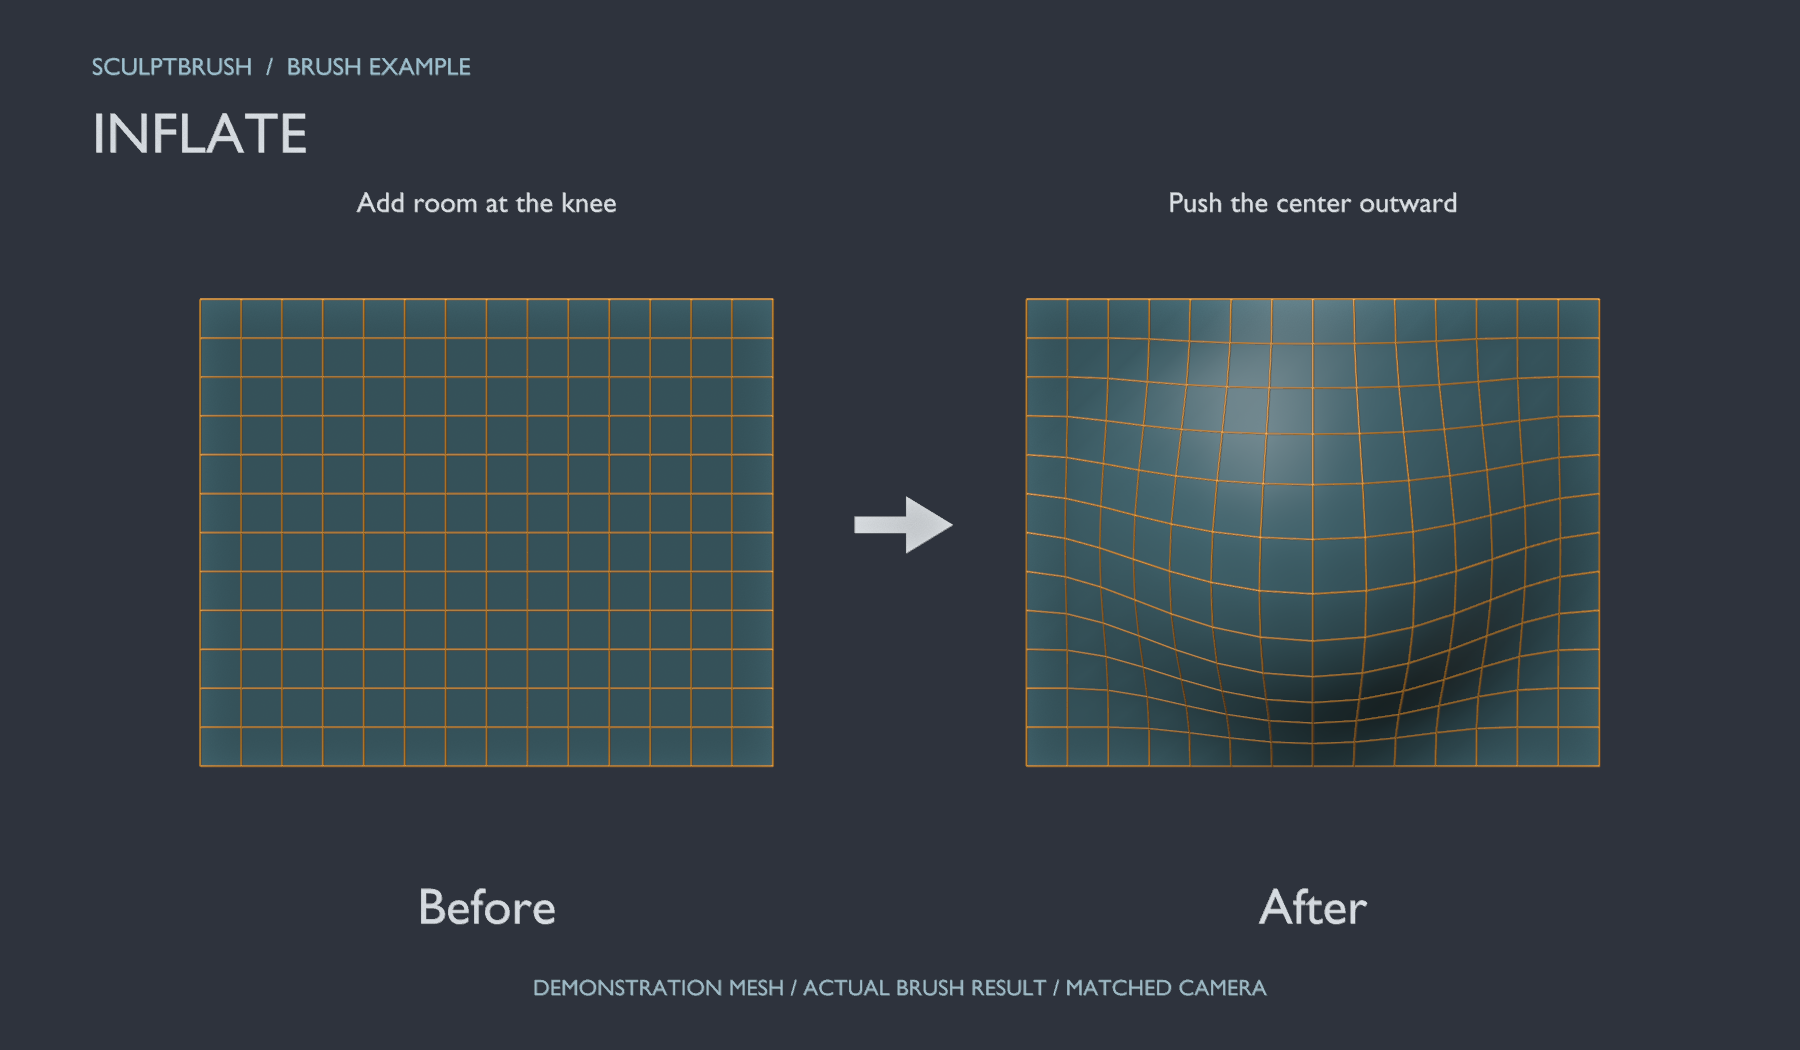
Inflate
Add a little room at a knee or elbow
Choose Inflate. Start with strength 0.2–0.4 and center the circle on the area that needs room.
Make a short pass, release, and inspect from the side. Repeat if more room is needed.
Left: before. Right: actual result. Demonstration mesh captured through Blender MCP.
The center moves outward and blends into its surroundings. Inflate follows vertex normals; check face orientation if it moves inward. It does not enforce a body gap.
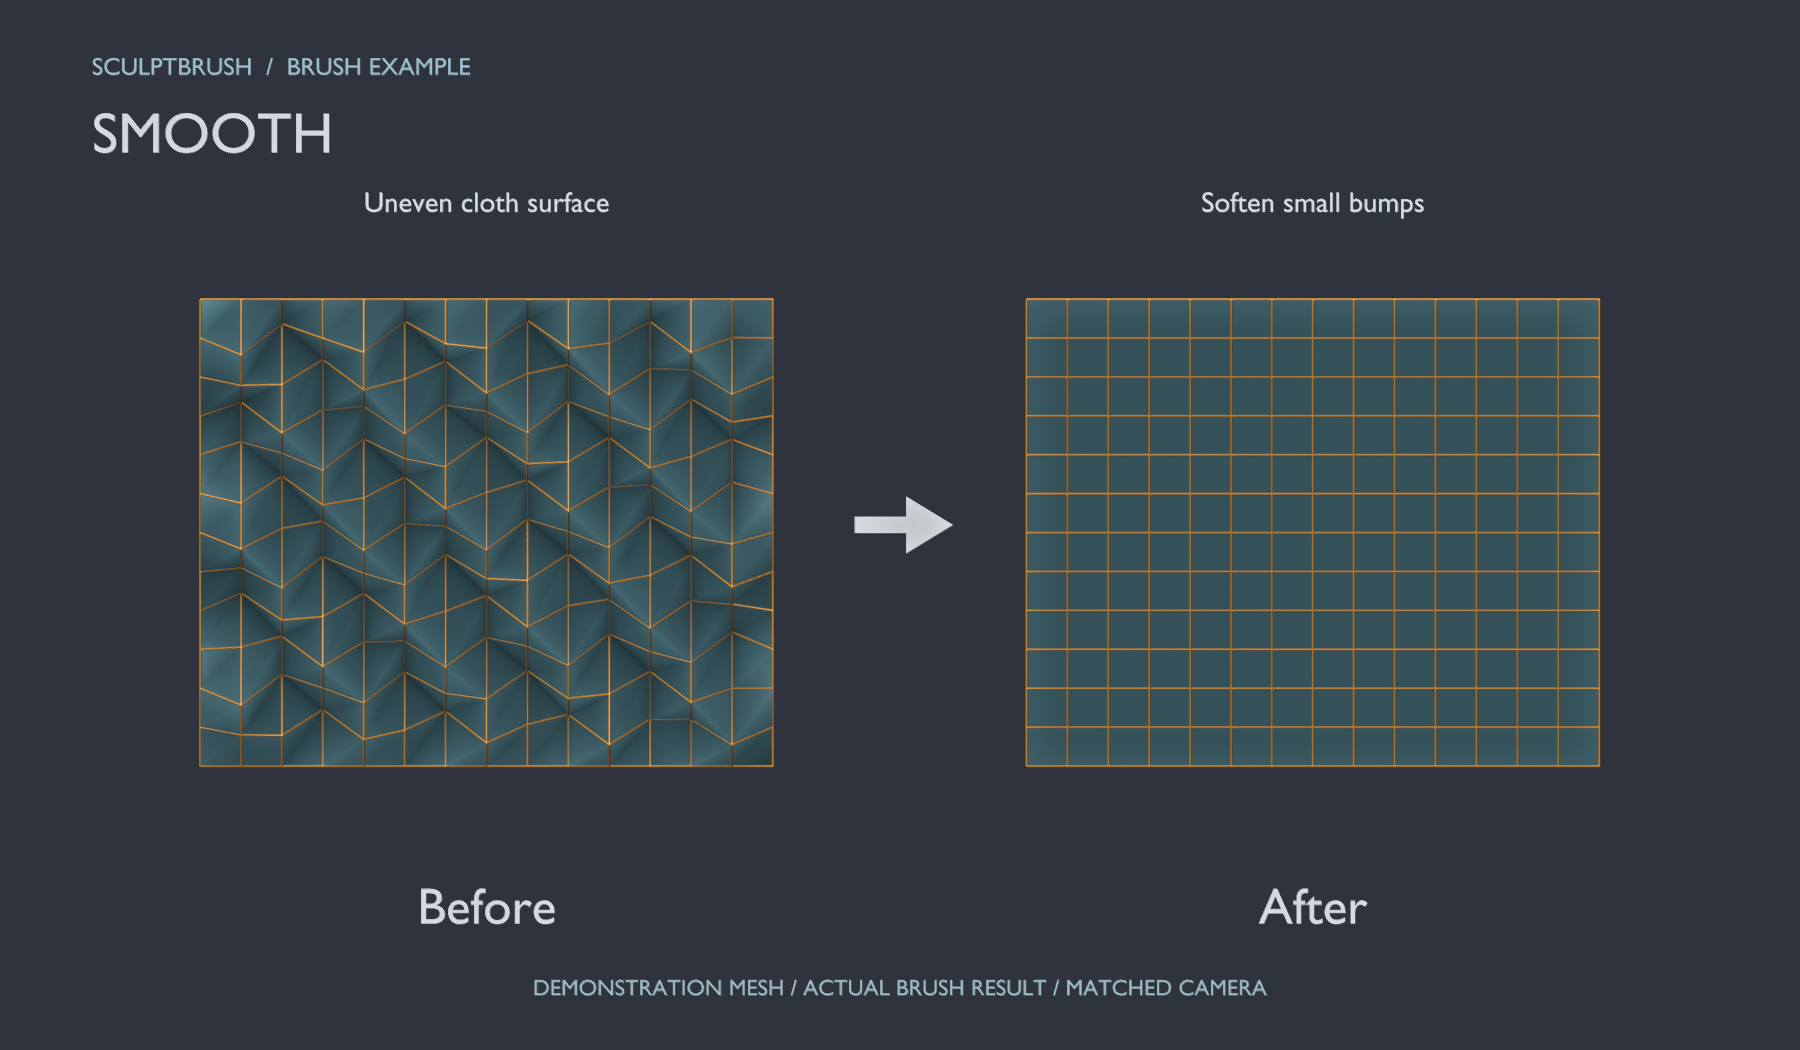
Smooth
Soften small bumps after fitting
Choose Smooth and switch Preserve Volume off. Start at strength 0.2–0.4 with a circle covering several small bumps.
Brush lightly over the uneven surface. Enable Pin Boundary to pin its open rim. In the initial Softimage preset, right-drag also invokes ordinary smoothing.
Left: before. Right: actual result. Demonstration mesh captured through Blender MCP.
Small peaks soften, but cloth or decorations may shrink or become thinner. Enable preservation when retaining roundness matters.
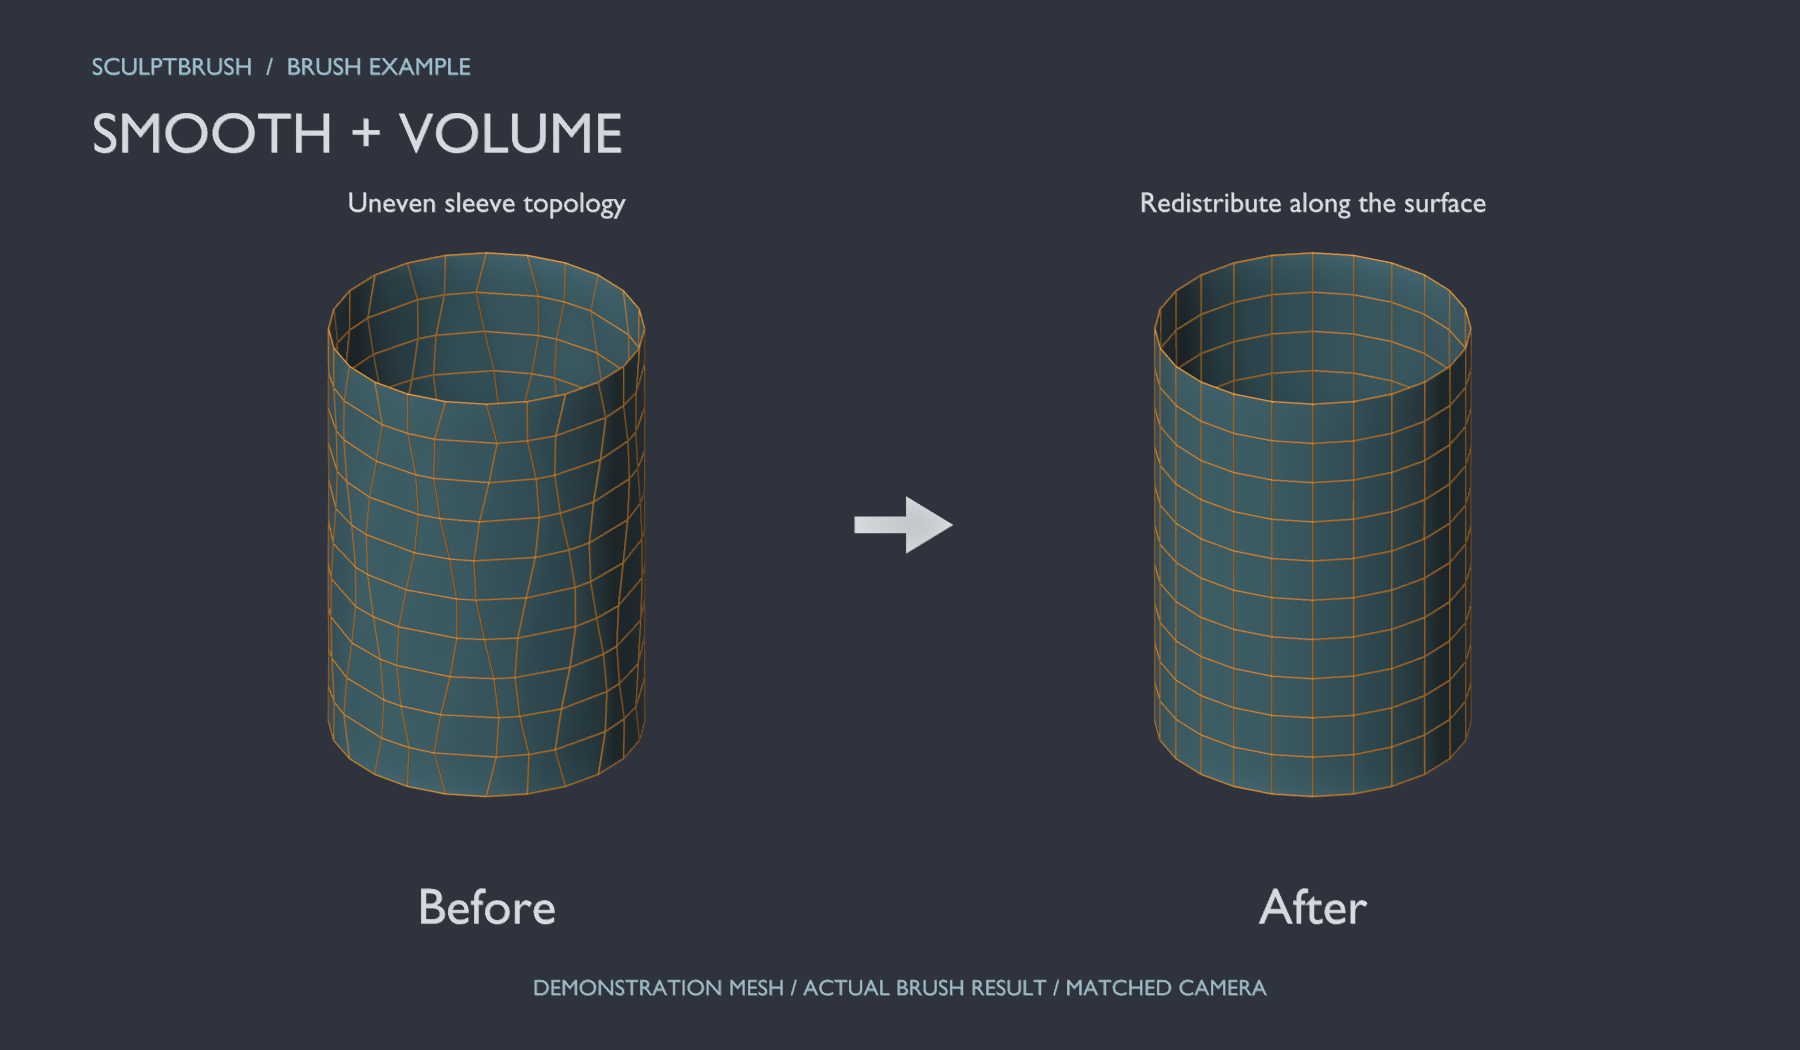
Smooth + Preserve Volume
Relax uneven sleeve vertices while retaining roundness
Enable Preserve Volume beside Smooth. Enable Boundary to retain the cuff, starting around strength 0.3.
Brush the uneven region in short passes. In non-Custom initial presets, middle-drag temporarily uses this smoothing regardless of the selected brush.
Left: before. Right: actual result. Demonstration mesh captured through Blender MCP.
Vertices move tangentially, retaining roundness better than ordinary smoothing. This is not an exact volume constraint. Use ordinary Smooth to remove strong surface-normal bumps.
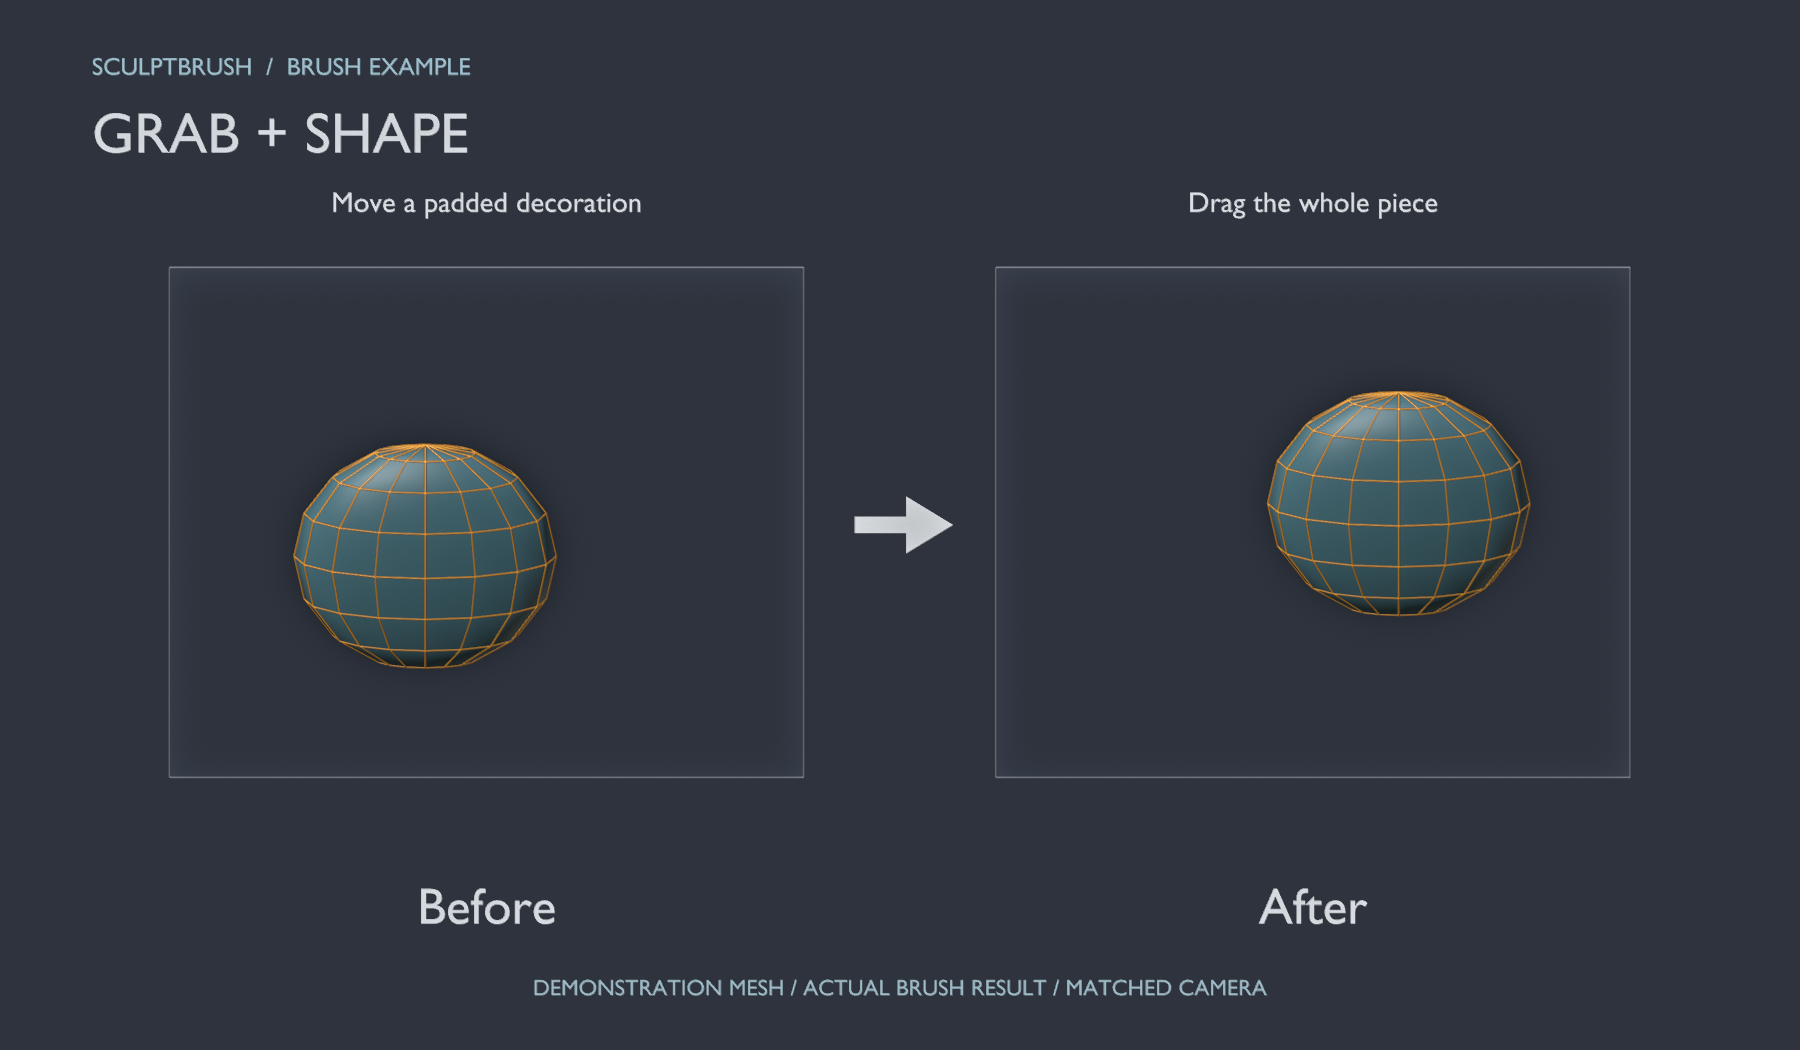
Grab
Reposition a ribbon or padded decoration
Choose Grab with Preserve Shape enabled. Cover the whole independent thick part. Strength 1.0 makes the drag displacement easier to judge.
Press on the part, drag to its new position, and release. The affected region is captured when the drag begins.
Left: before. Right: actual result. Demonstration mesh captured through Blender MCP.
The example moves the decoration while retaining its depth. Grab does not enforce body contact; choose Shell Fit Move when the part must follow a target.
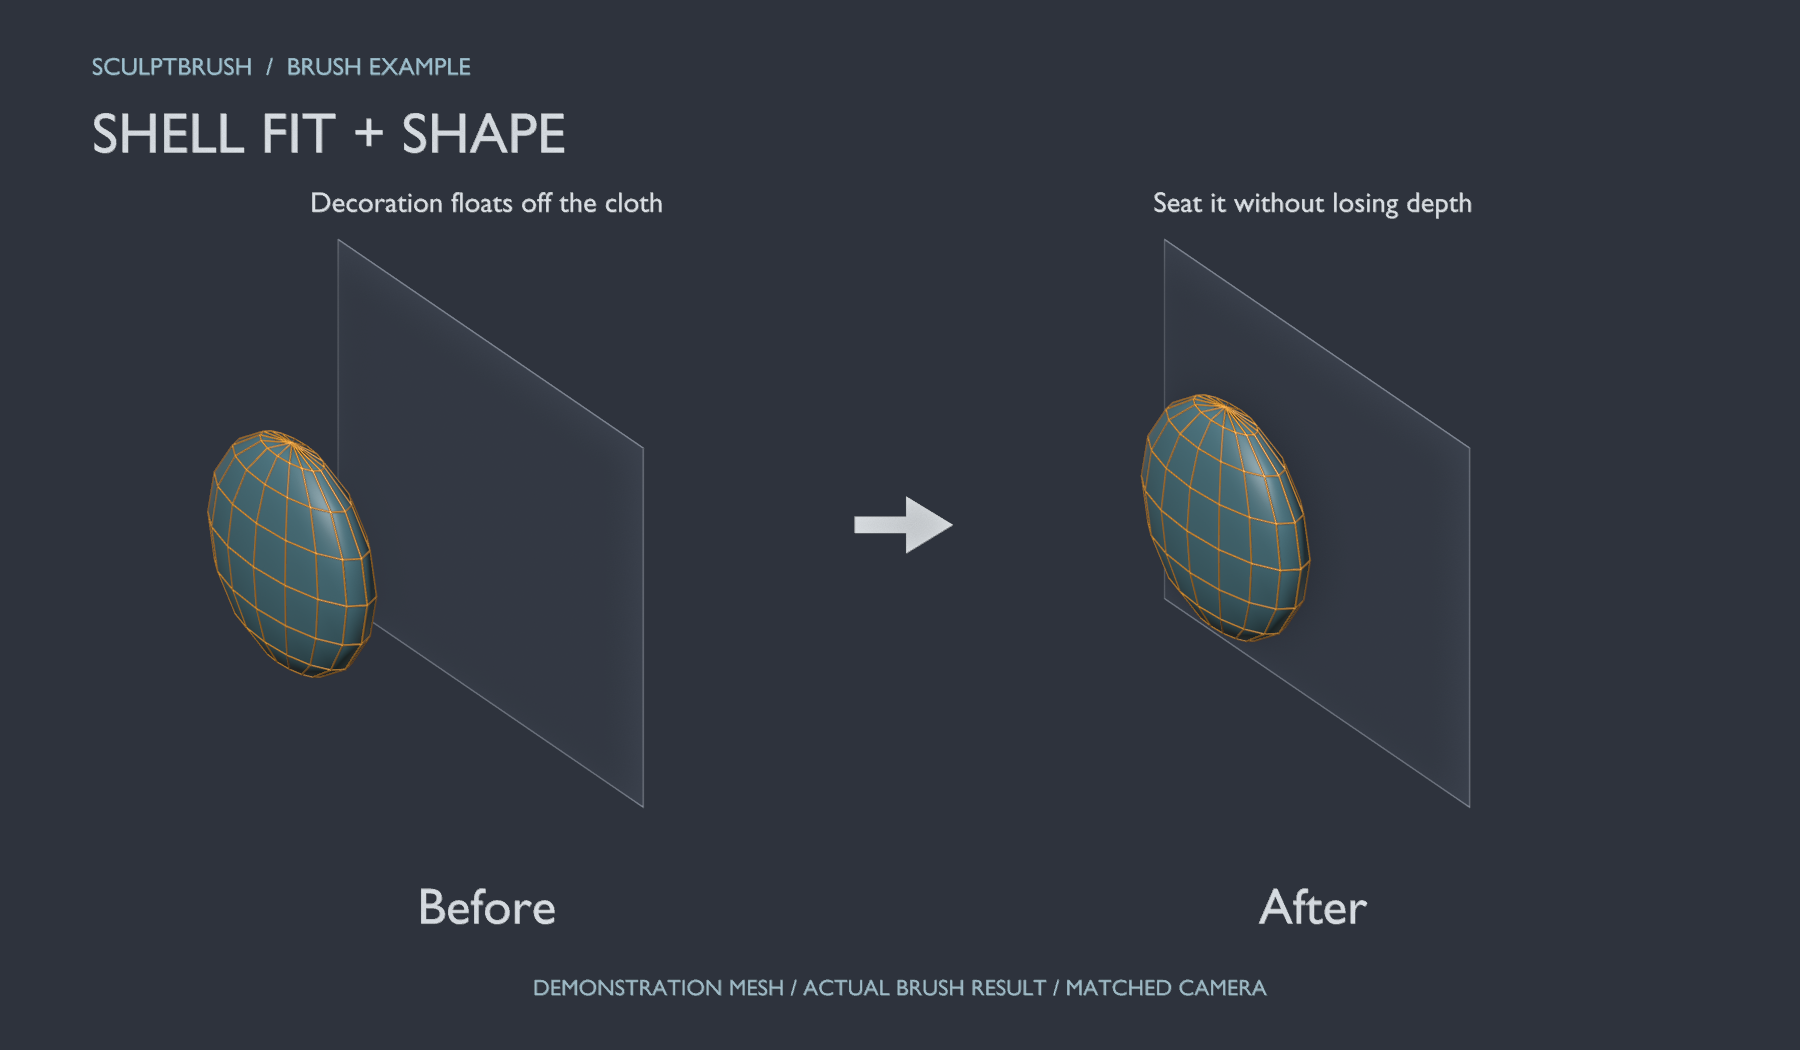
Shell Fit
Seat a floating part onto a body or inner garment
Choose the Shell Fit brush. For the first try, use the eyedropper to choose the body or inner garment. Offset sets the gap; Fit Reach sets how far to search.
For thick decorations, enable Preserve Shape, cover the whole part and make short passes. For thin cloth, try preservation off when stronger conformance is needed.
Left: before. Right: actual result. Demonstration mesh captured through Blender MCP.
The oblique comparison shows the decoration moving toward the cloth while retaining depth. Increase Fit Reach if the target is unreachable. Narrow spaces may not accommodate both thickness and the requested gap.
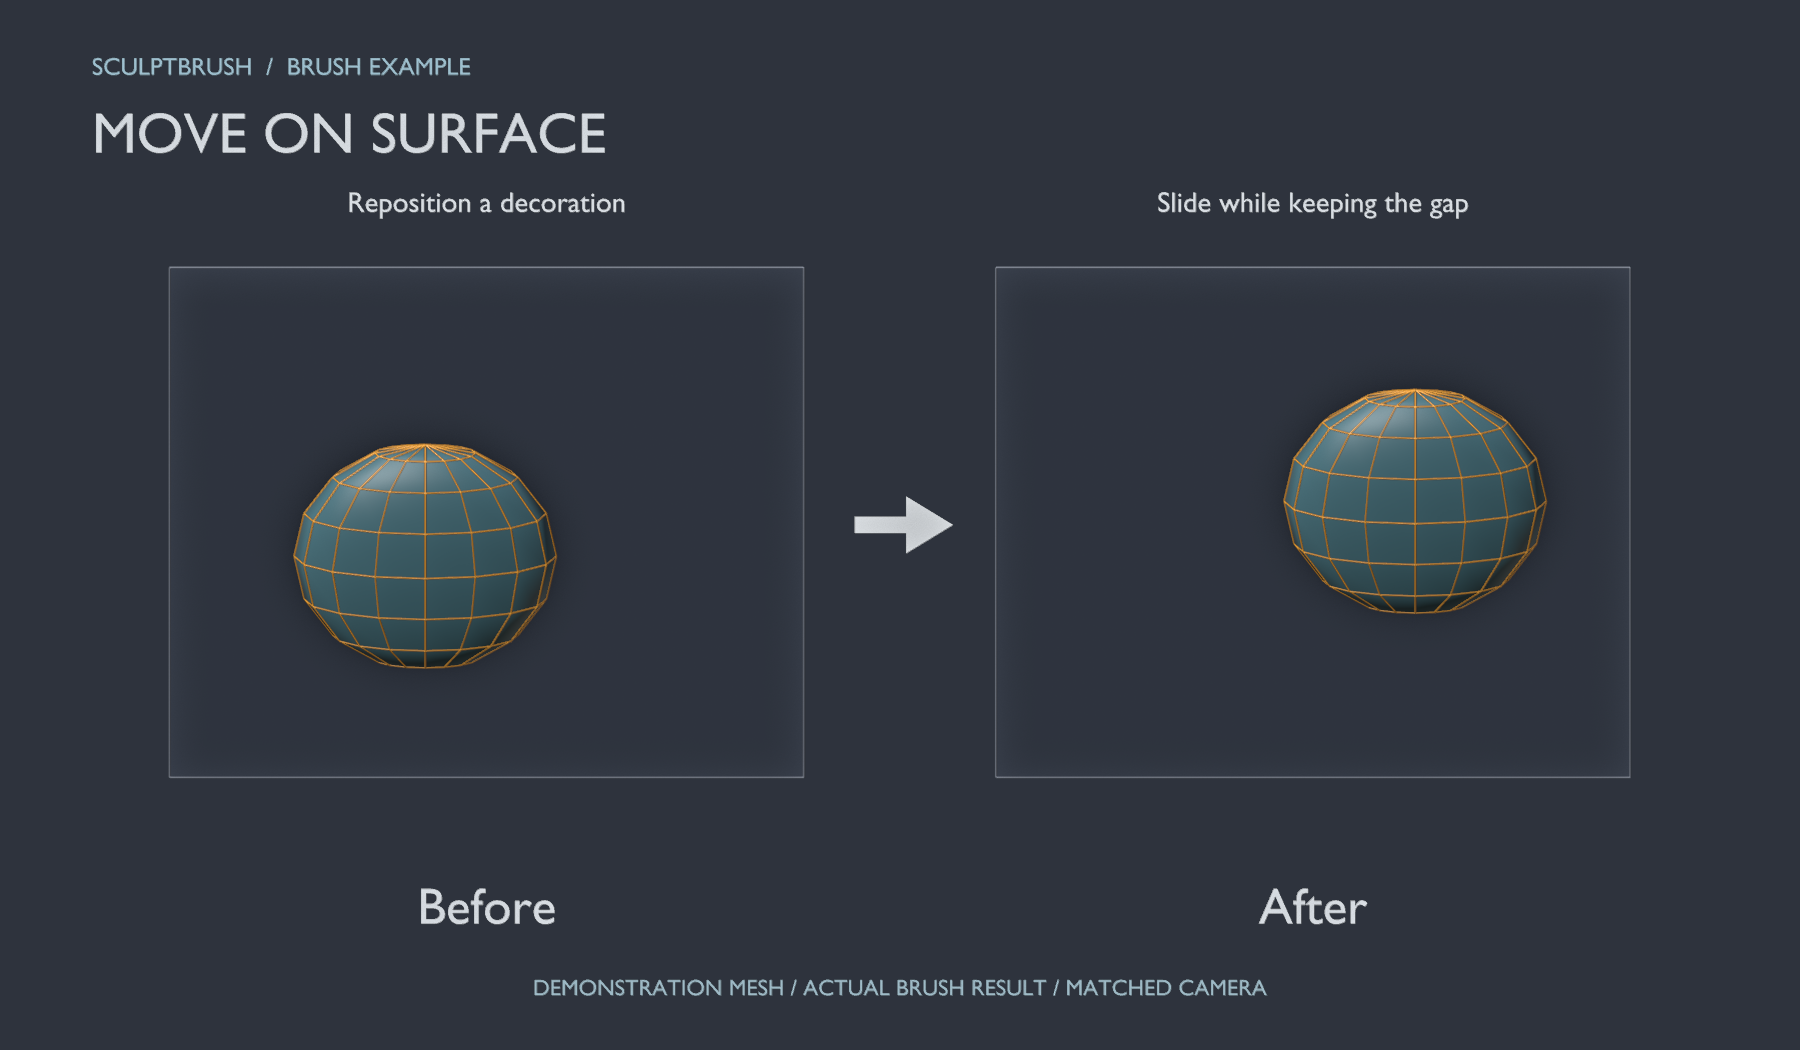
Shell Fit Move
Slide a decoration sideways while keeping it on the cloth
Choose the Shell Fit Move brush, set the target and offset, and enable shape preservation for a decoration. Fit it first for a clearer starting point.
Cover the part and left-drag. Choose a view where the intended direction is easy to see.
Left: before. Right: actual result. Demonstration mesh captured through Blender MCP.
The part follows the target surface. If the drag leaves the target completely, it retains its last valid position. Use ordinary Grab for free movement.
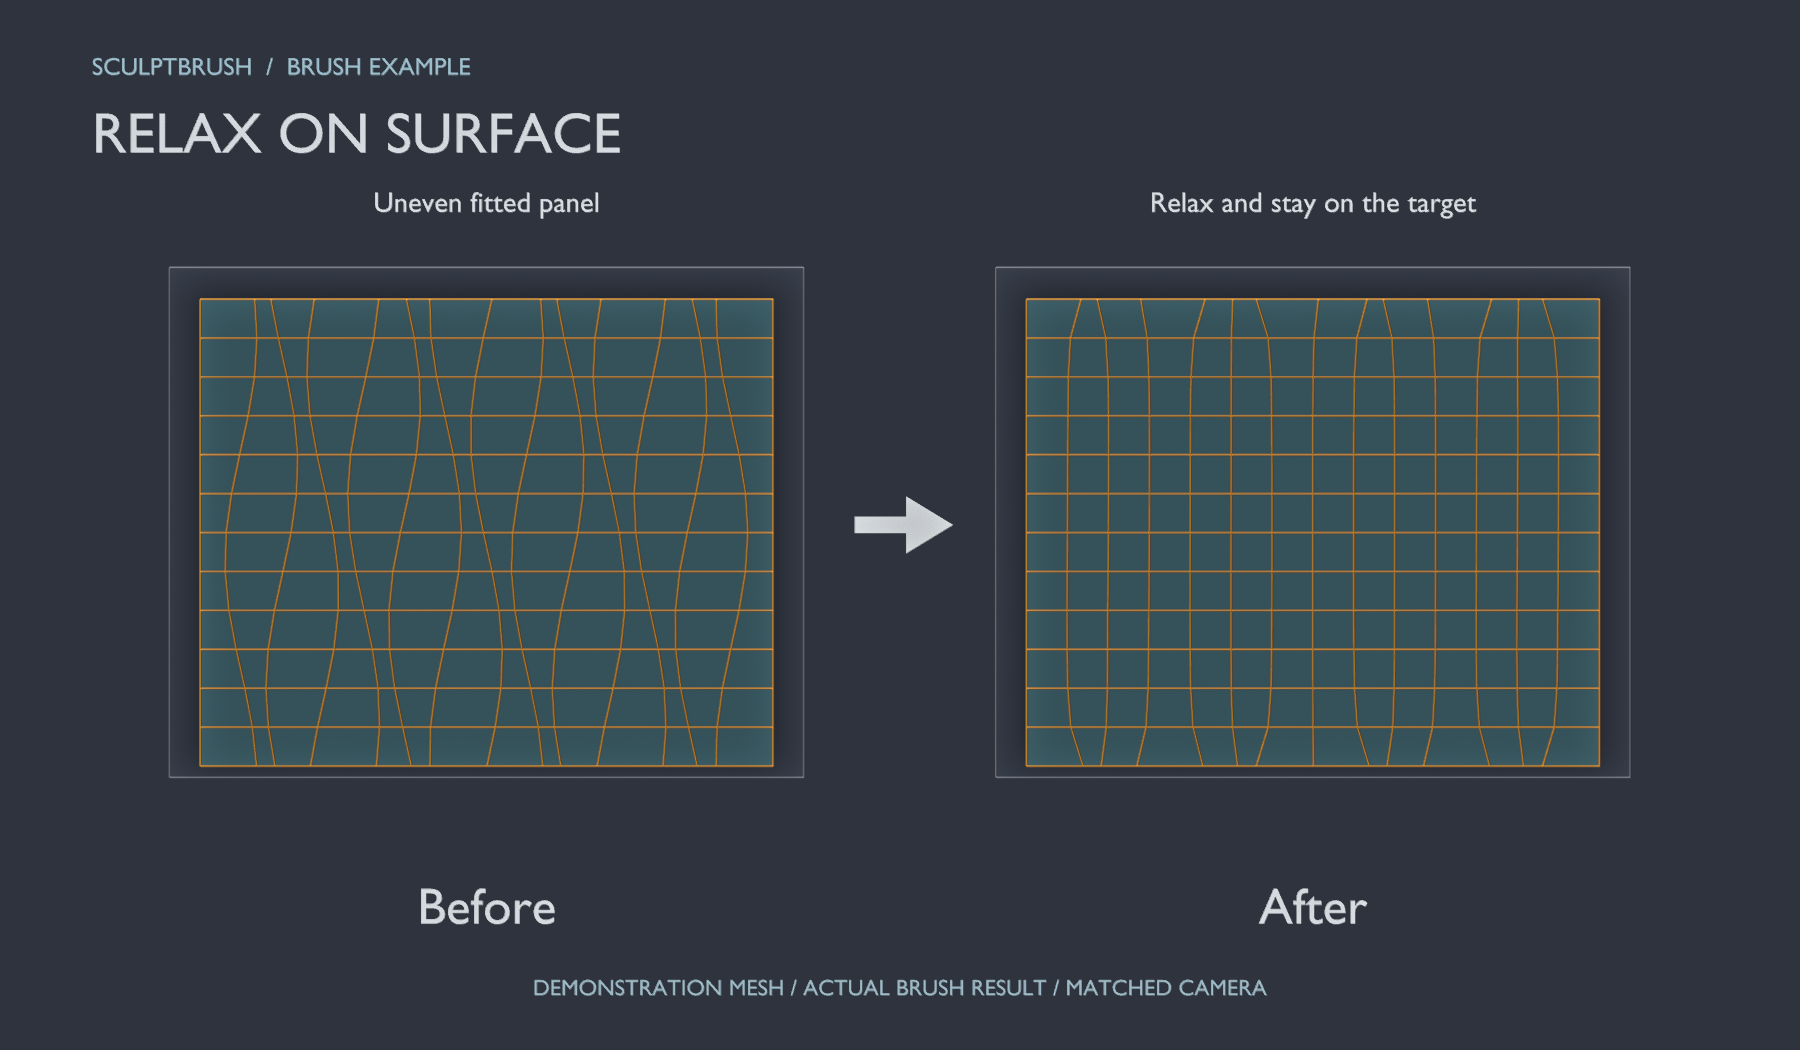
Shell Fit Relax
Relax fitted cloth without leaving its target surface
Choose the Shell Fit Relax brush. For a flat panel like the example, start with Preserve Shape off and Boundary on.
Make a few passes over the bunched region using the same target and offset as the fit.
Left: before. Right: actual result. Demonstration mesh captured through Blender MCP.
Vertices relax while retaining the surface offset. Preserve Shape can retain decorative depth, but reduces relaxation. Use Space when a specific row must become evenly spaced.
Flatten
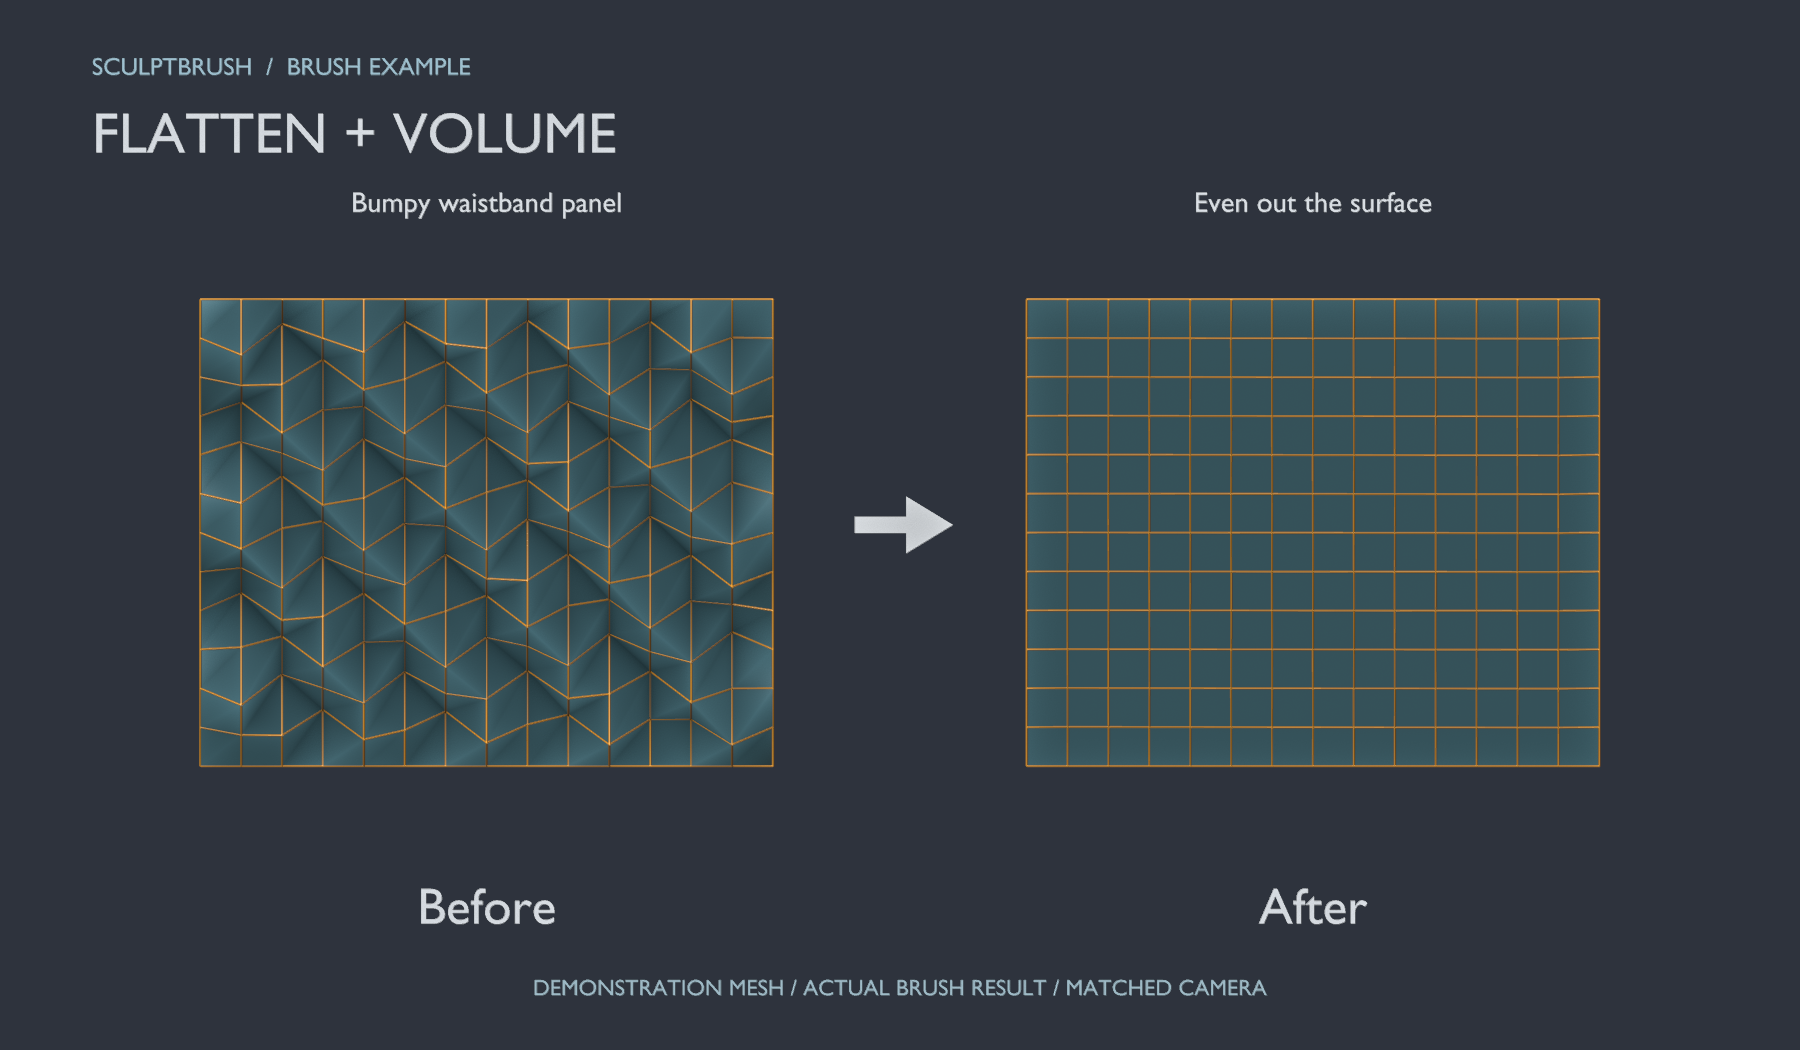
Flatten a bumpy waistband or cloth panel
Choose Flatten, direction Both, with Preserve Volume on. Start at strength 0.3–0.5 with a circle covering several rows.
Make short passes across the bumps. Hold Starting Plane uses one plane for the stroke; Follow Local Plane follows the original local curvature.
Left: before. Right: actual result. Demonstration mesh captured through Blender MCP.
Success means a flatter, more even patch. Preservation balances displaced volume; an open cloth has no enclosed solid volume to lock. Use a smaller footprint to retain intentional creases.
Space
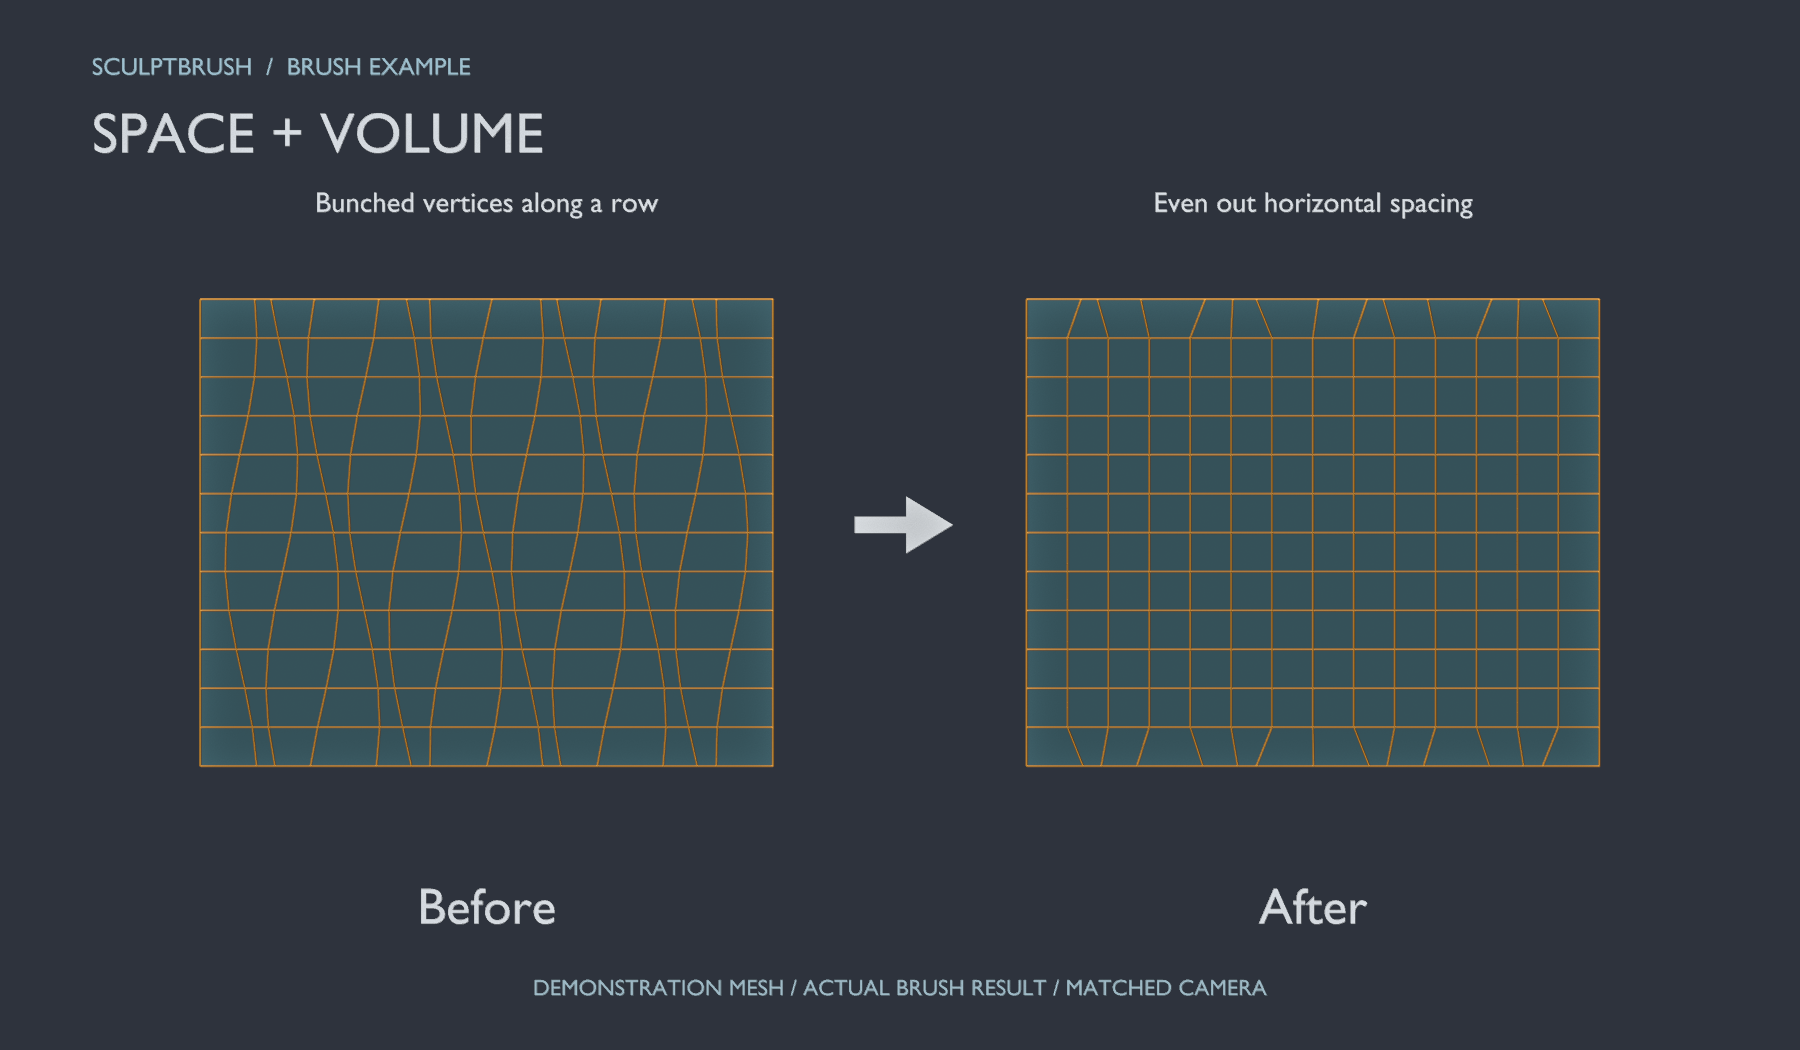
Even out bunched vertices along a row
Choose Space, direction Horizontal, with Preserve Volume on. If detection chooses the wrong rows, pick a Reference Edge. The example fixes the horizontal family with a reference edge.
Brush across the uneven rows. Follow Original retains curvature, Smooth Row also reduces waviness, and Straight Row tends toward straight intervals between endpoints.
Left: before. Right: actual result. Demonstration mesh captured through Blender MCP.
The horizontal gaps become even while the row count stays unchanged. Quad flow is required; triangles, poles and protected sharp edges can stop propagation. Vertex count stays unchanged.
Horizontal/Vertical refers to mesh flow near the initial screen position, not fixed world axes. Cross Flow switches to the other family of a reference edge.
Restore Shape
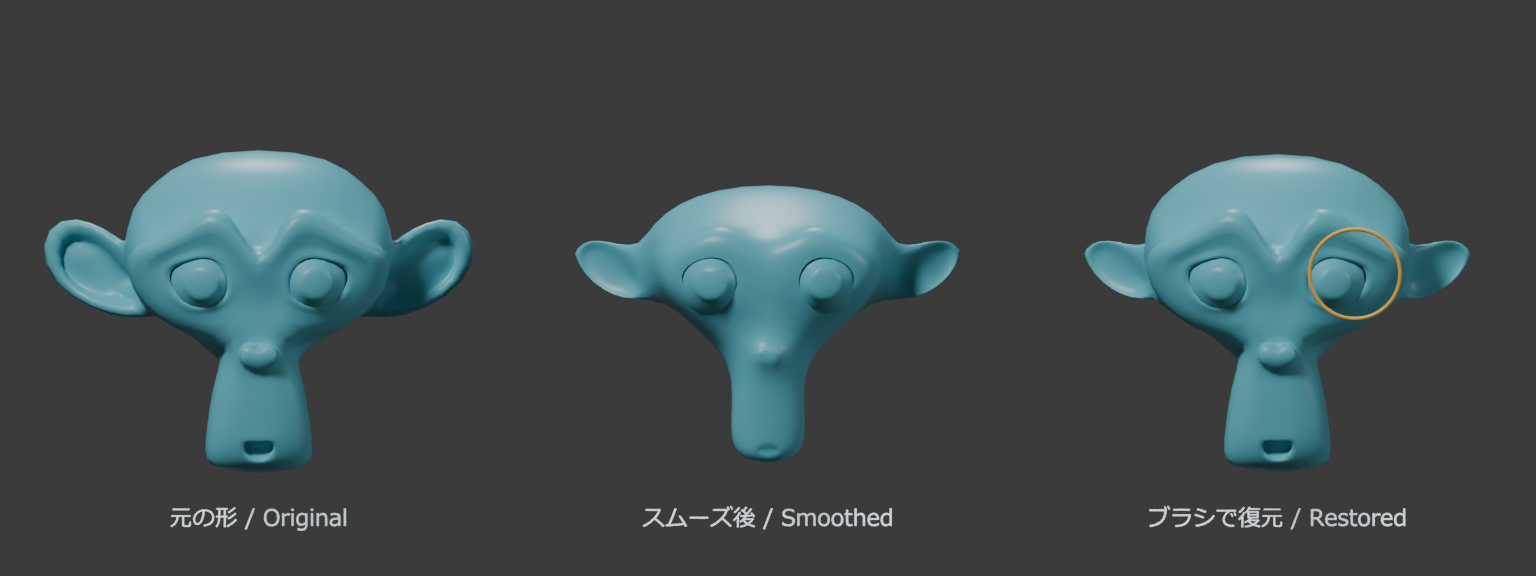
Brush regions back toward the remembered model’s shape and dimensions. Match Original Shape is enabled by default. A reference copy placed elsewhere is aligned to the working mesh’s position and orientation.
Left: original Suzanne. Center: smoothed head. Right: the actual restoration-brush result across the face. Compare the brows, nose and mouth. Match Original Shape is enabled, with Strength 1, 1 iteration and Keep Current Form 0, over 20 dabs. Eyeballs and vertices outside the brush remain unchanged. The yellow ring illustrates the brush cursor.
Remember the current shape
Click Remember Shape before deforming. Without a backup, this captures only the shape as it is now. After editing, brush back toward that remembered shape. If you start using this tool without a memory, it automatically captures the shape before the first deformation. Ordinary strokes never overwrite it.
Optionally include a backup
Assign a duplicate backup or another matching mesh and click Remember Shape to capture both it and the current shape as a set. Under Restore Toward, choose Remembered Shape or Backup Shape. Switching does not move geometry; brushing then brings the painted region toward that choice. Assigning or editing the backup alone does not change the memory.
Brush after fitting or editing
Use Edit Mode with Match Original Shape enabled. For firm restoration, use Strength 1, 1 iteration and Keep Current Form 0. Cover the damaged region, drag briefly and release to commit. The brush edge restores gently; repeated passes bring it closer to the original. The standard input is left-drag; if customized, check the shortcut beside the brush name.
Compare and adjust
Esc cancels the current stroke; Ctrl+Z undoes a committed stroke. Lower Strength or raise Keep Current Form for a gentler result. Disable Match Original Shape to recover local details while retaining the broad fitted shape and size. Inspect the result from the side and check body intersections.
The N-panel follows preparation, brush activation, size and strength, then restoration settings. Selection-mask controls are grouped at the very bottom.
The original must have matching edit-cage vertex count, vertex order and connectivity. Remeshed or generated modifier topology is not matched. Exact recovery and removal of intersections are not guaranteed. This brush does not enforce body clearance; use Shell Fit as needed. Switch to Edit Mode from weight, vertex or texture paint.
If nothing moves, check selection masks, boundary pins, Sharp/Crease protection and visibility. Click Remember Shape again to replace the set. Clearing the backup field and remembering again creates a current-only set. Remembering and switching support Undo. Captured shapes and the selected target persist with normal .blend saves.
Scope and isolation
If neighboring parts move, try Connected Only. Island membership is fixed at the press; release before targeting another group.
Control
Behavior
All Within Radius
Nearby vertices in the footprint, including separate islands.
Connected Only
Vertices linked by edges to the touched face. Falloff uses edge-path distance, so folded surfaces do not join merely because they are close.
Intersecting Islands
Islands linked by surface intersections: A–B and B–C joins A through C. Proximity or containment without surface intersections is insufficient.
Use Selection as Mask / Boundary
Restrict movement to selected vertices or pin open edges. Paint face masks and the Weight Paint vertex mask also apply.
Scope operates inside the edited mesh. Brush radius, falloff and masks still apply; it does not move entire islands unconditionally. Enabled symmetry can affect the corresponding opposite side.
Show just the selected region
Click Isolate Selection in the lower-right Pie group, beside No Wire. Click again to restore visibility. Shift-click narrows the selection further; Alt-click returns one level. Shape changes remain when isolation ends.
Paint modes use their active selection mask, otherwise selected objects. Leave faces in the isolated region so the brush can pick a surface. Bodies visible before isolation remain available as fitting targets.
Settings and shortcuts
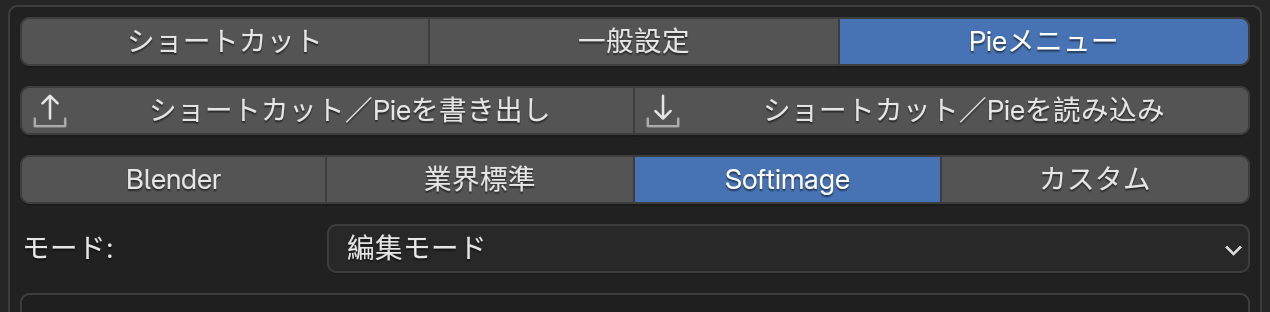
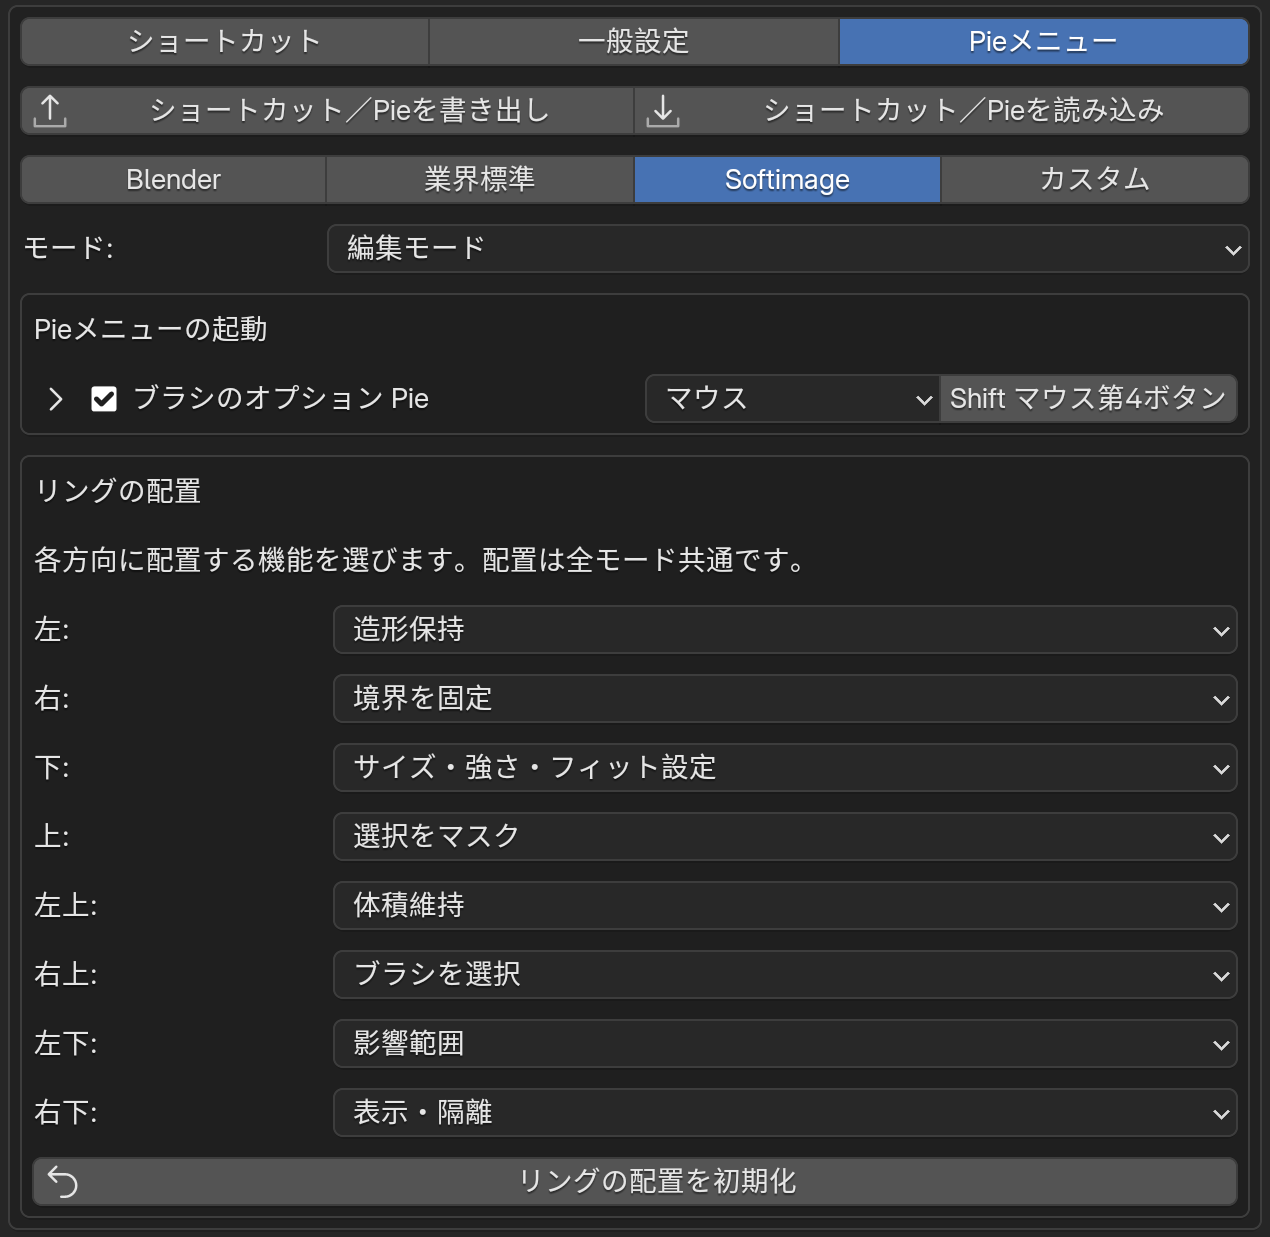
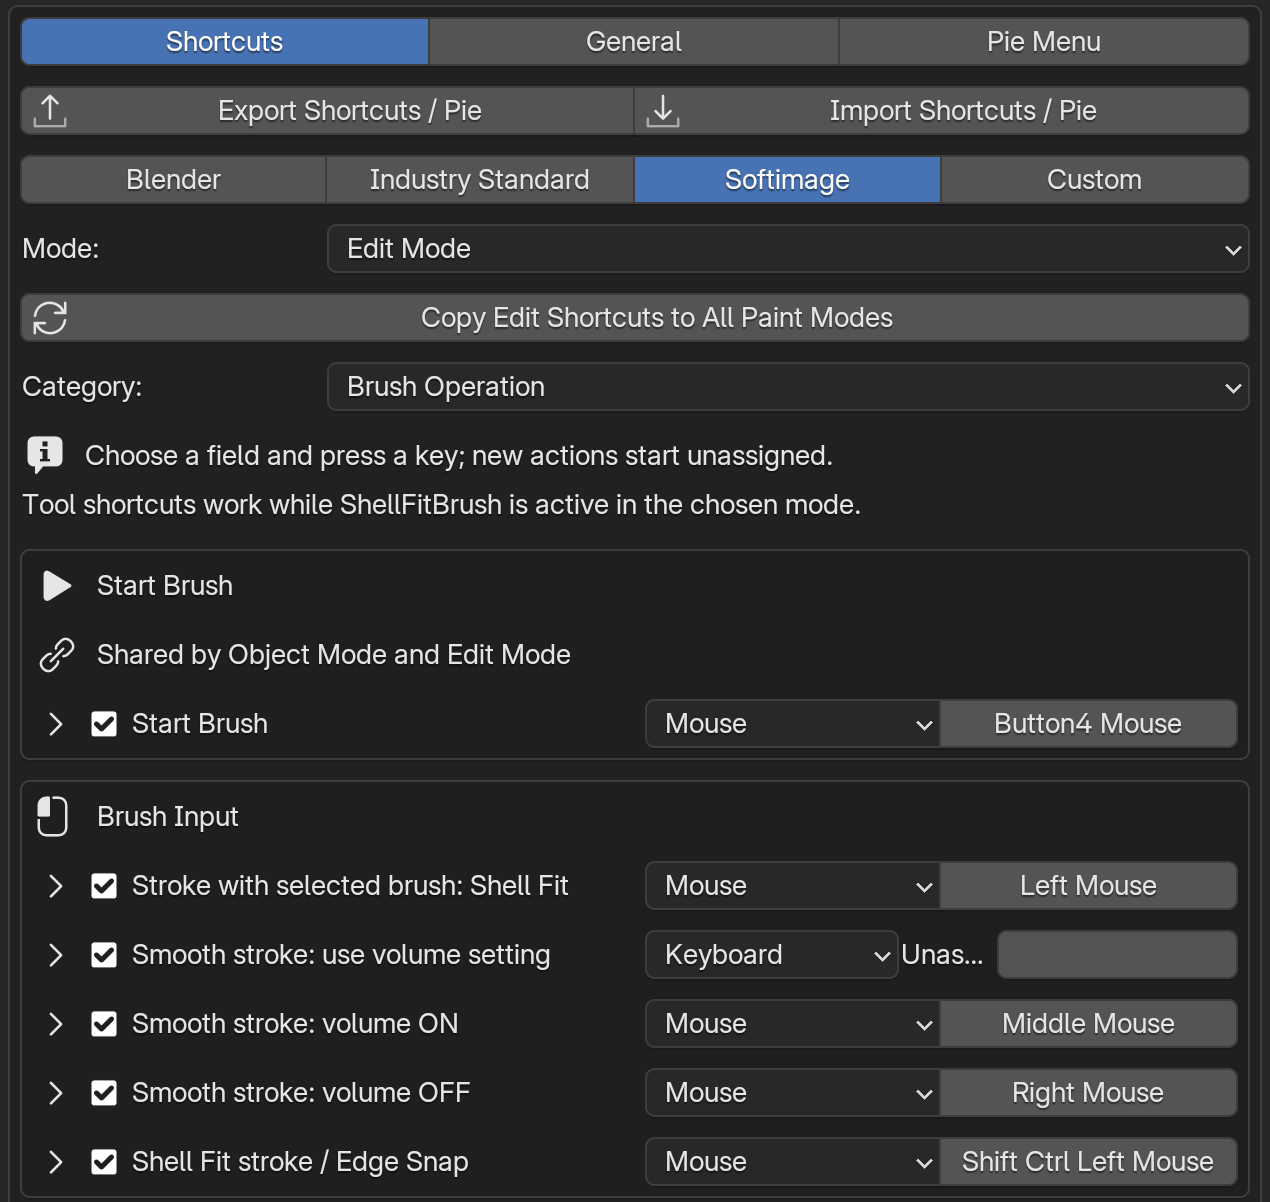
Open Shortcut Settings from the leftmost header button. The four presets belong to this tool; they do not switch Blender’s global keymap. Each retains its edits. These are initial bindings; Preferences shows your current customized bindings.
Same brush and Pie mouse actions as Blender. S: size; U: strength. Alt+Left: orbit; Alt+Middle: pan; Alt+Right: zoom.
Softimage
Keeps the original bindings for your customization. Initially Left: selected brush; Middle: volume-preserving Smooth; Right: ordinary Smooth; Ctrl+Shift+Left: Shell Fit; Shift+Button4: Pie. F: size; Shift+F: strength.
Custom
All commands start unassigned. Assign activation, strokes, geometry selection, Pie and other commands you intend to use.
Non-Custom presets initially use Button4 to activate the brush. Middle-drag smoothing applies while the Shell Fit Brush tool is active. Esc cancels a stroke; Ctrl+Z undoes a confirmed stroke.
Choose a mode and category, then click a key field to assign it. Copy Edit Mode keys to all Paint modes copies the current preset’s Edit Mode bindings into Weight, Texture and Vertex Paint, overwriting their corresponding bindings.
Four presets, mode copying and settings backup. Softimage is selected in this capture.
Stroke, falloff and pressure
Control
Behavior
Size / Strength
Screen-space radius in pixels and the amount applied per dab.
Dots / Space / Airbrush
Apply on movement / at distance intervals / at time intervals. Spacing is a percentage of brush diameter; Airbrush Rate is in seconds.
Jitter / Stabilization
Scatter dab positions or smooth cursor motion. Grab and Shell Fit Move freeze the initial footprint and do not use these options.
Falloff
Shape center-to-edge influence with presets or a custom curve.
Pressure
Toggle size and strength independently; both start off. 4.5 uses linear pressure; 5.2 also provides editable pressure curves. Physical pen hardware was not tested.
Cursor
Control ring visibility, color, falloff preview and opacity.
Flatten, Space and Repair resample by movement distance even under Dots. Pressure, falloff, spacing and cursor settings live in a scene-owned Brush and do not modify the native paint brush. Brush choice and base size use add-on settings. Parameter Scale rescales radius, offset and reach together, leaving strength unchanged.
Paint data and shape keys
Weights, UVs, images and vertex colors are retained, though deformation can stretch the appearance of a pattern. In paint modes, the same displacement is added to the base and each shape key, retaining their differences. The original mesh is edited; generated Mirror/Subdivision vertices are not independent brush targets. Modifiers remain unapplied.
Customize the Pie menu
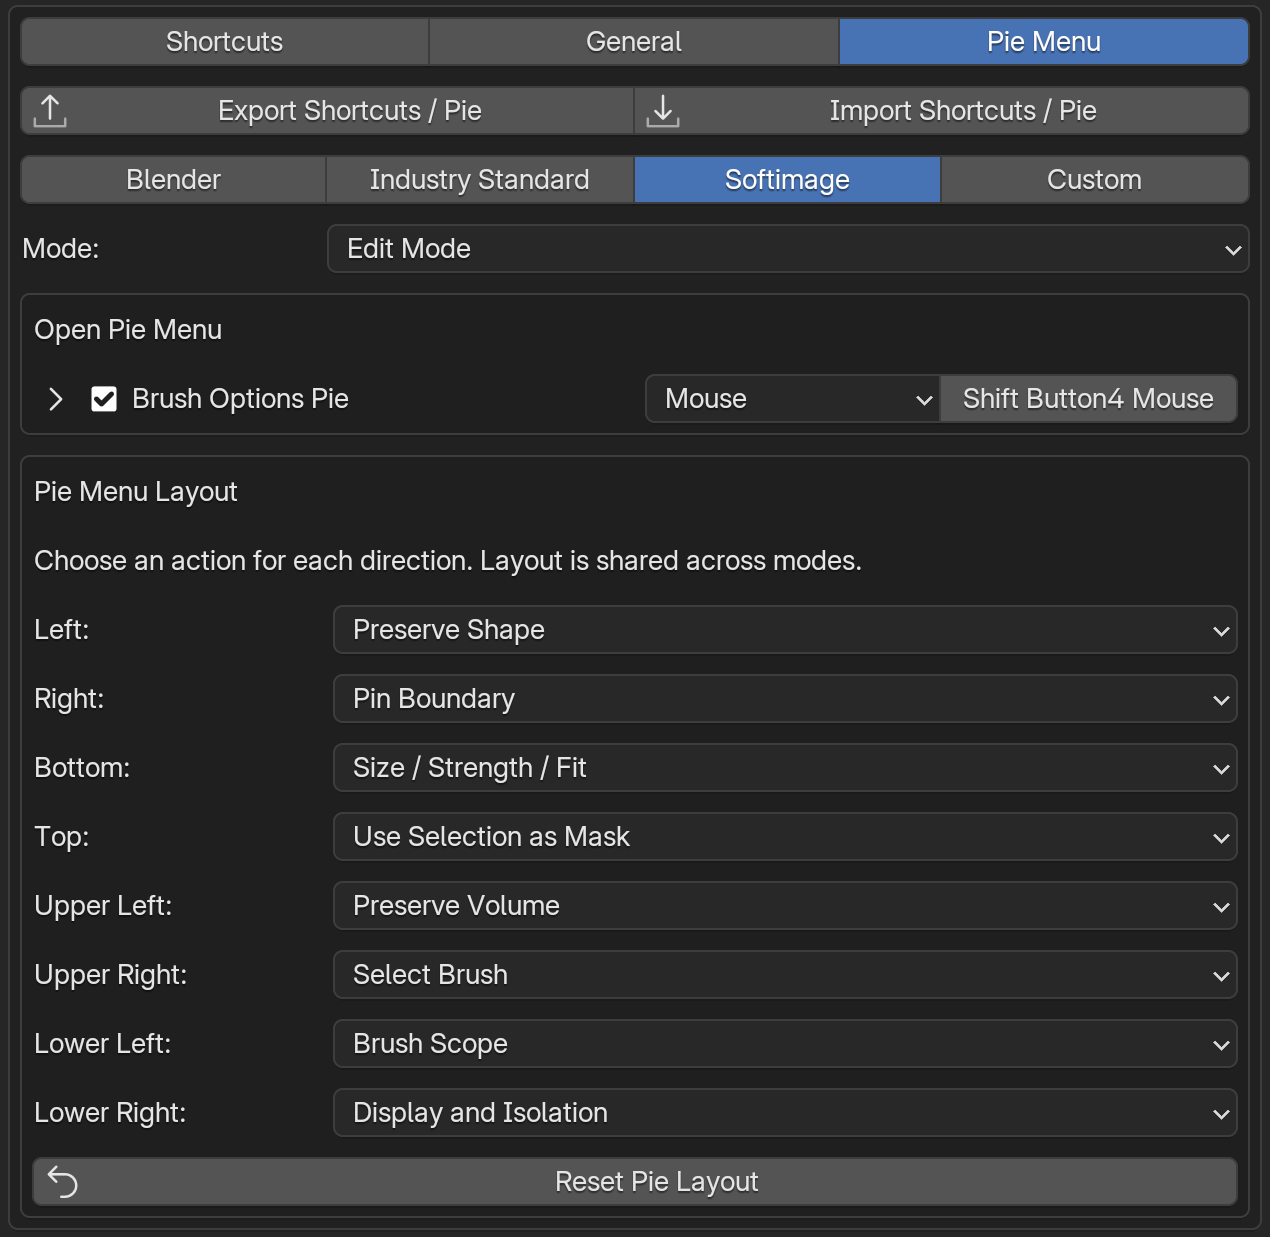
Open with Right Mouse in Blender/Industry Standard or Shift+Button4 in Softimage. Select a single action by moving in its direction and releasing, or by clicking. For directions containing a group of buttons or fields, click the specific button or edit the field.
Control
Effect / use
Top / upper left / upper right
Use Selection as Mask / Preserve Volume / brush picker
Left / right
Preserve Shape / Pin Boundary
Lower left / lower right
Three brush scopes / Wire, No Wire and isolation
Bottom
Size, Strength, Offset, Fit Reach and fitting target
Preferences → Pie Menu edits the opening shortcut and all eight directions. Empty leaves a direction unused. Layout is shared across modes and presets; opening shortcuts are per mode and preset. Reset Pie Layout resets only the directions. Unsupported features remain in place but are disabled.
Dedicated Pie Menu tab: opening shortcut and all eight directions.
Back up and restore settings
In Preferences → Shortcuts or Pie Menu, click Export Shortcuts / Pie.
Choose a JSON file. It stores all four preset banks, the active preset and the eight Pie assignments.
On the destination, click Import Shortcuts / Pie and choose the JSON. Export the current setup first if you want to retain it.
Commands missing from an older backup retain their current settings. Brush strength, offset, target objects and geometry are not part of this JSON. Import does not force-save Preferences. If automatic preference saving is disabled, use Blender’s Save Preferences to retain the imported setup after restarting.
Troubleshooting
Viewport notices explain blocked actions in the configured Blender language for about four seconds. Repeating the action refreshes the notice.
Control
Effect / use
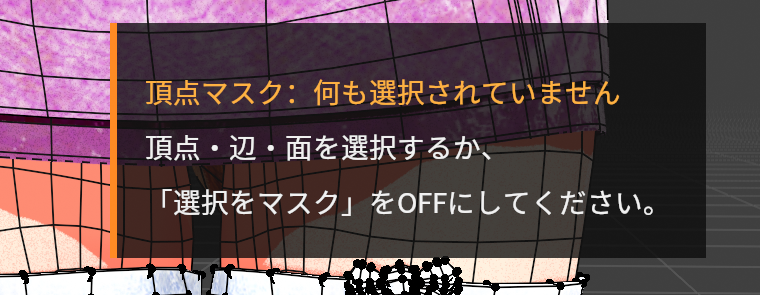
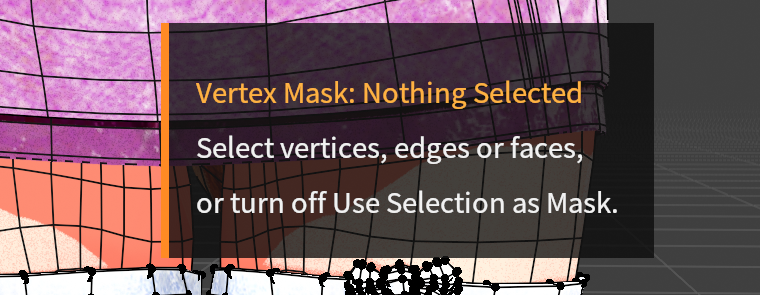
Vertex mask: nothing selected
Select vertices, edges or faces, or turn off Use Selection as Mask. In paint modes, also check the enabled face/vertex mask.
All affected vertices are pinned
Only boundary vertices are available. Disable Pin Boundary or include interior vertices.
No fitting surface within reach
Increase Fit Reach, move closer to the target, or check the eyedropper target. Increasing Offset does not increase the search range.
No fitting target found
Show a target mesh with faces or pick another target. An invalid explicit target does not silently fall back to a different object.
Example empty-mask notice, displayed explicitly for this MCP documentation capture.
Control
Behavior
Nothing moves
Check the active clothing mesh and a face under the cursor. Review Use Selection as Mask, paint masks, Boundary, Visible Surface Only and Protect Sharp Edges. Try a slightly larger radius or strength.
Fit selects the wrong surface
Pick the intended target explicitly. Offset and Fit Reach are separate controls.
A decoration freezes or flattens
Cover the whole piece and enable Preserve Shape. Narrow spaces may require smaller moves or a different offset.
Space follows the wrong direction
Change Horizontal/Vertical or pick a reference edge. Where quad flow breaks, consider Smooth or Shell Fit Relax.
No ring or catalog
Check that the ShellFitBrush tool, cursor display and catalog display are enabled. The ring is not shown over popups.
An error appears
Dismiss Blender’s error popup before retrying. Report Blender version, brush, mode, settings and reproduction steps if it recurs.
Part Repair (experimental)
Use the experimental repair category in the brush picker to access width, section, border, detail and spacing repair. Match Nearby Shape uses surrounding geometry; Restore Saved Shape needs a stored reference or a corresponding original mesh.
Contact protection, topology and missing references can limit or block an effect. Start general cleanup with the main brushes above. Part Repair is not a guaranteed automatic repair system.
Geometry Selection Brush
In Edit Mode, choose Geometry Selection Brush from the brush picker or catalog. The arrow button or C also switches between geometry selection and the previous shaping brush. Left-drag to select, release to confirm, and Esc to cancel the stroke. Uses vertex, edge or face selection and viewport X-Ray; hidden geometry stays unchanged.
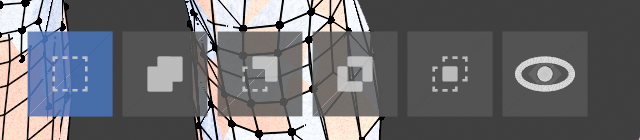
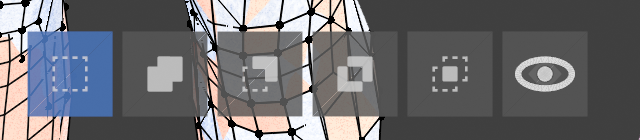
The standard icons below the view are Set, Extend, Subtract, Invert and Intersect. Click one or press Shift+1 through Shift+5. Invert toggles each touched element once per stroke. Intersect retains the initially selected elements touched during the stroke.
Choose a preset in the header or Shortcut Settings. Edit bindings in the Geometry Selection Brush category. Custom starts unassigned; each preset retains its edits. C and Shift+1 through Shift+5 are add-on defaults.
The eye: Show Selected Geometry Only
It sits immediately after the five selection-operation buttons in both the header and viewport GUI. Select vertices, edges or faces, then click the eye to isolate them. Click again to restore prior visibility. Previously hidden elements stay hidden; geometry edits made during isolation remain.
Coincident vertices can be selected together. Hidden elements remain excluded. A tiny vertex-only selection may leave no face for a brush hit, so include the faces you intend to edit.
Header: the eye after the five selection operations isolates selection. Isolation is off.Viewport GUI: the rightmost eye provides the same action.
Changes
1.0.1: Faster repeated searches, selection and picker loading; JSON backup for shortcuts and Pie layout, viewport notices and selection-isolation buttons. 1.0.0: Release with UI catalogs for English, Japanese, Simplified Chinese, Traditional Chinese, Korean, Spanish, French and German. Uses Blender language preferences and the Interface / Tooltips translation switches. Manuals remain English/Japanese. 0.2.1: Blender 4.5 falloff, pressure and Undo compatibility; full/quick manuals and nine actual-result comparisons. 0.2.0: Integrated preservation, surface movement, scopes and Preferences; release preparation.