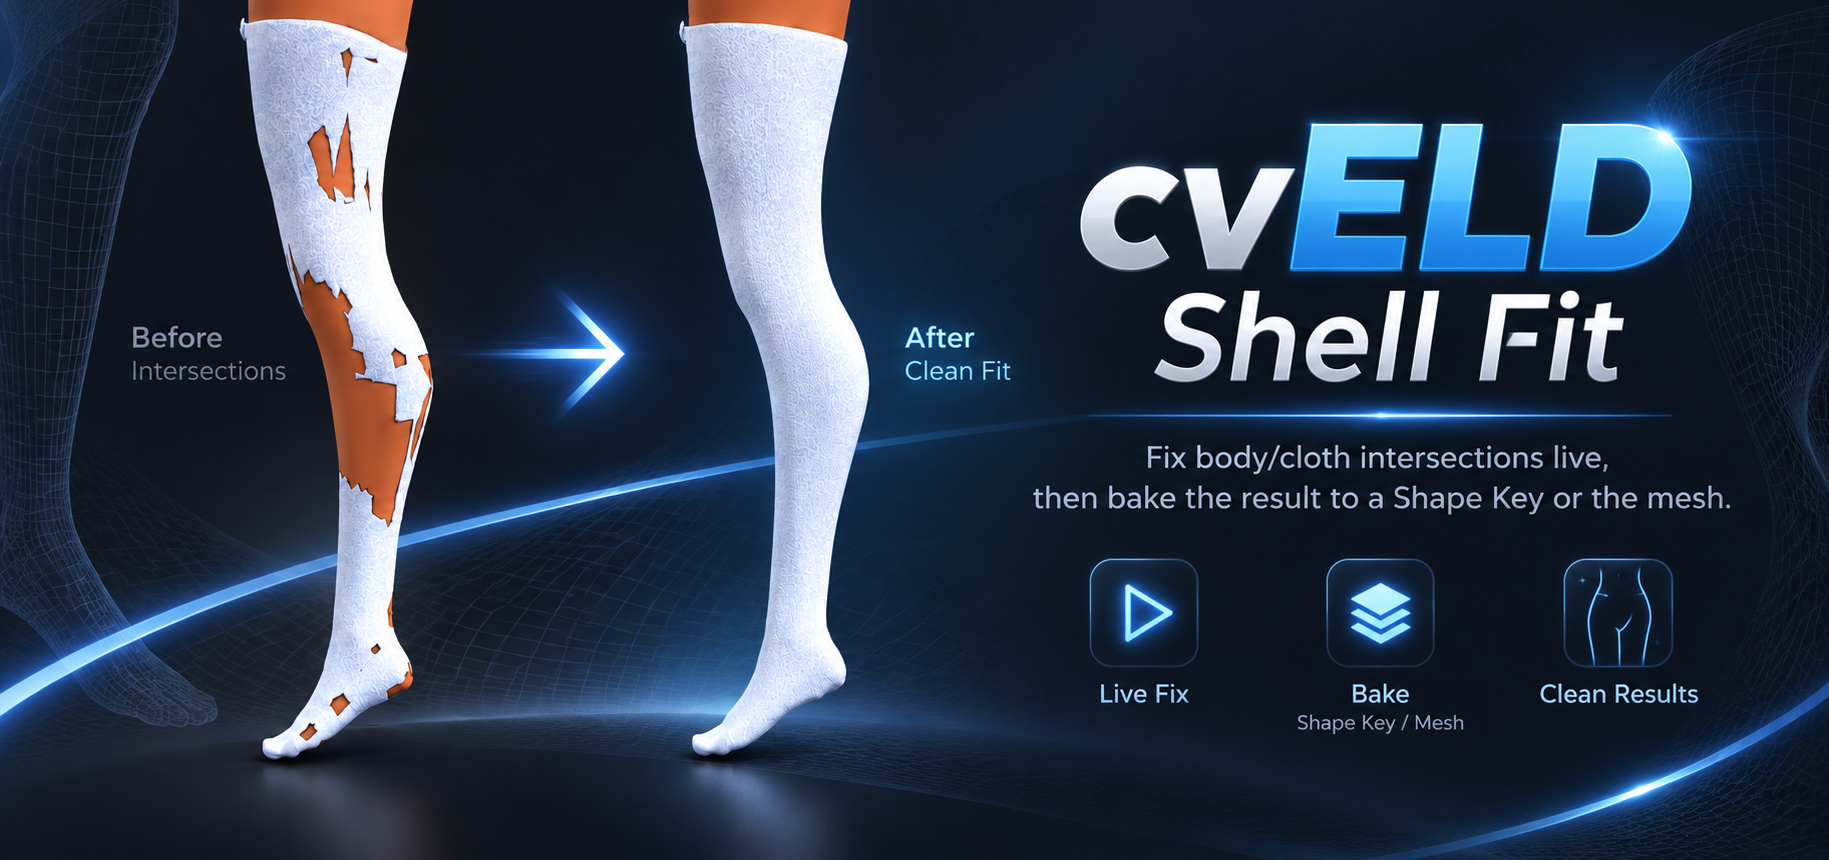
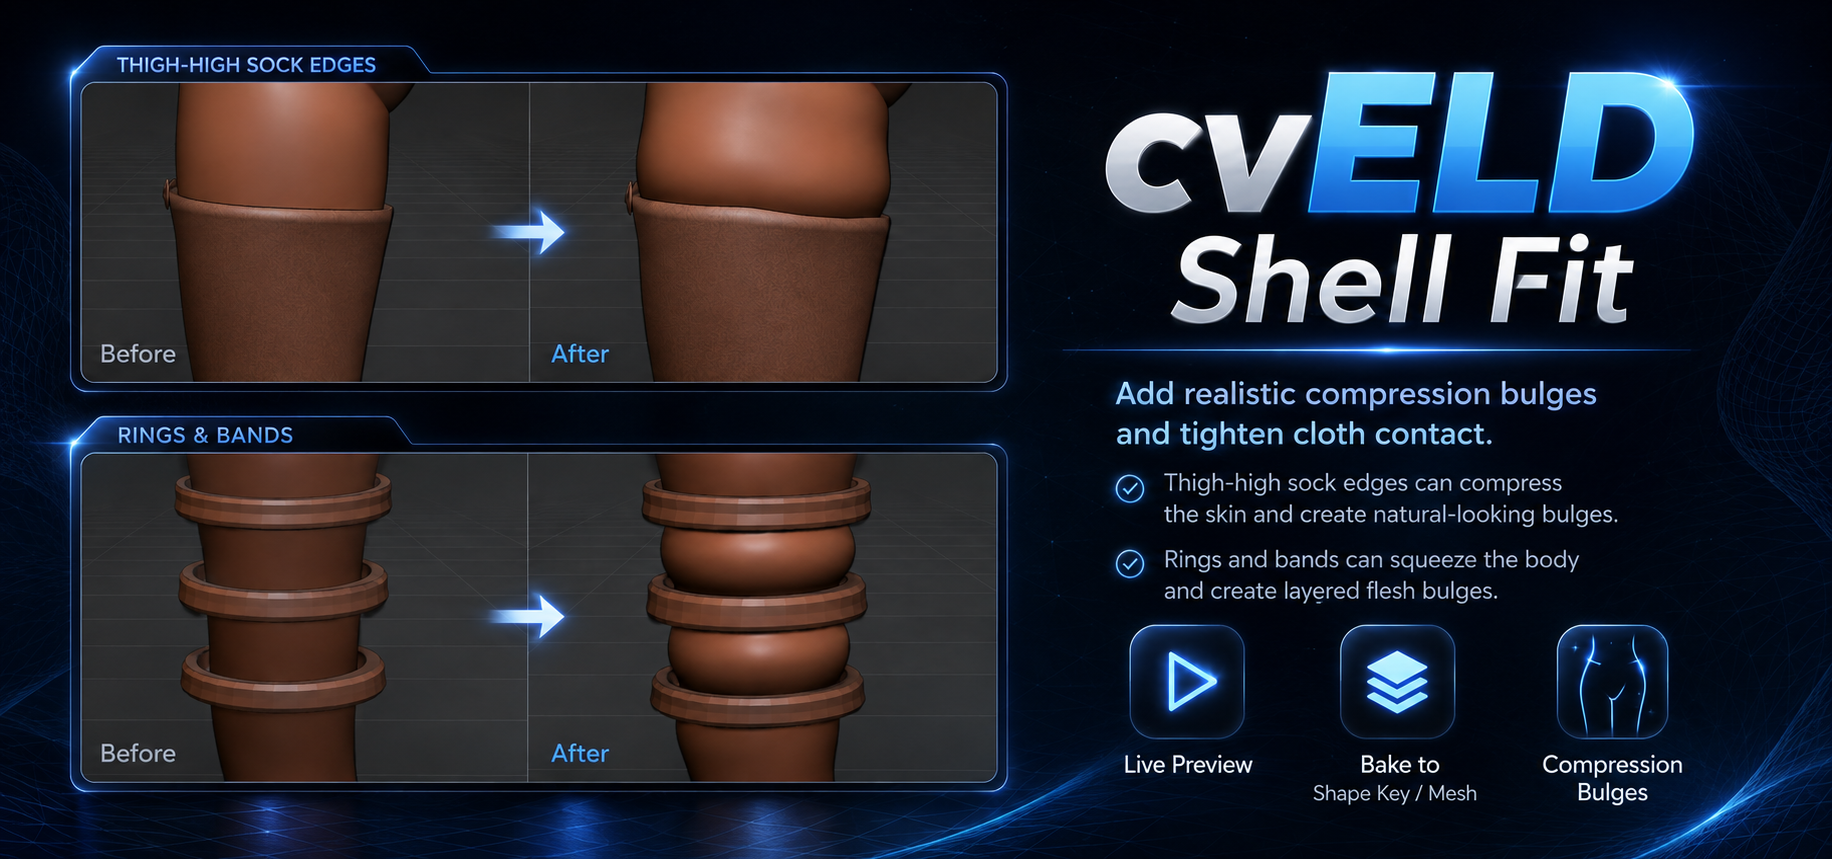
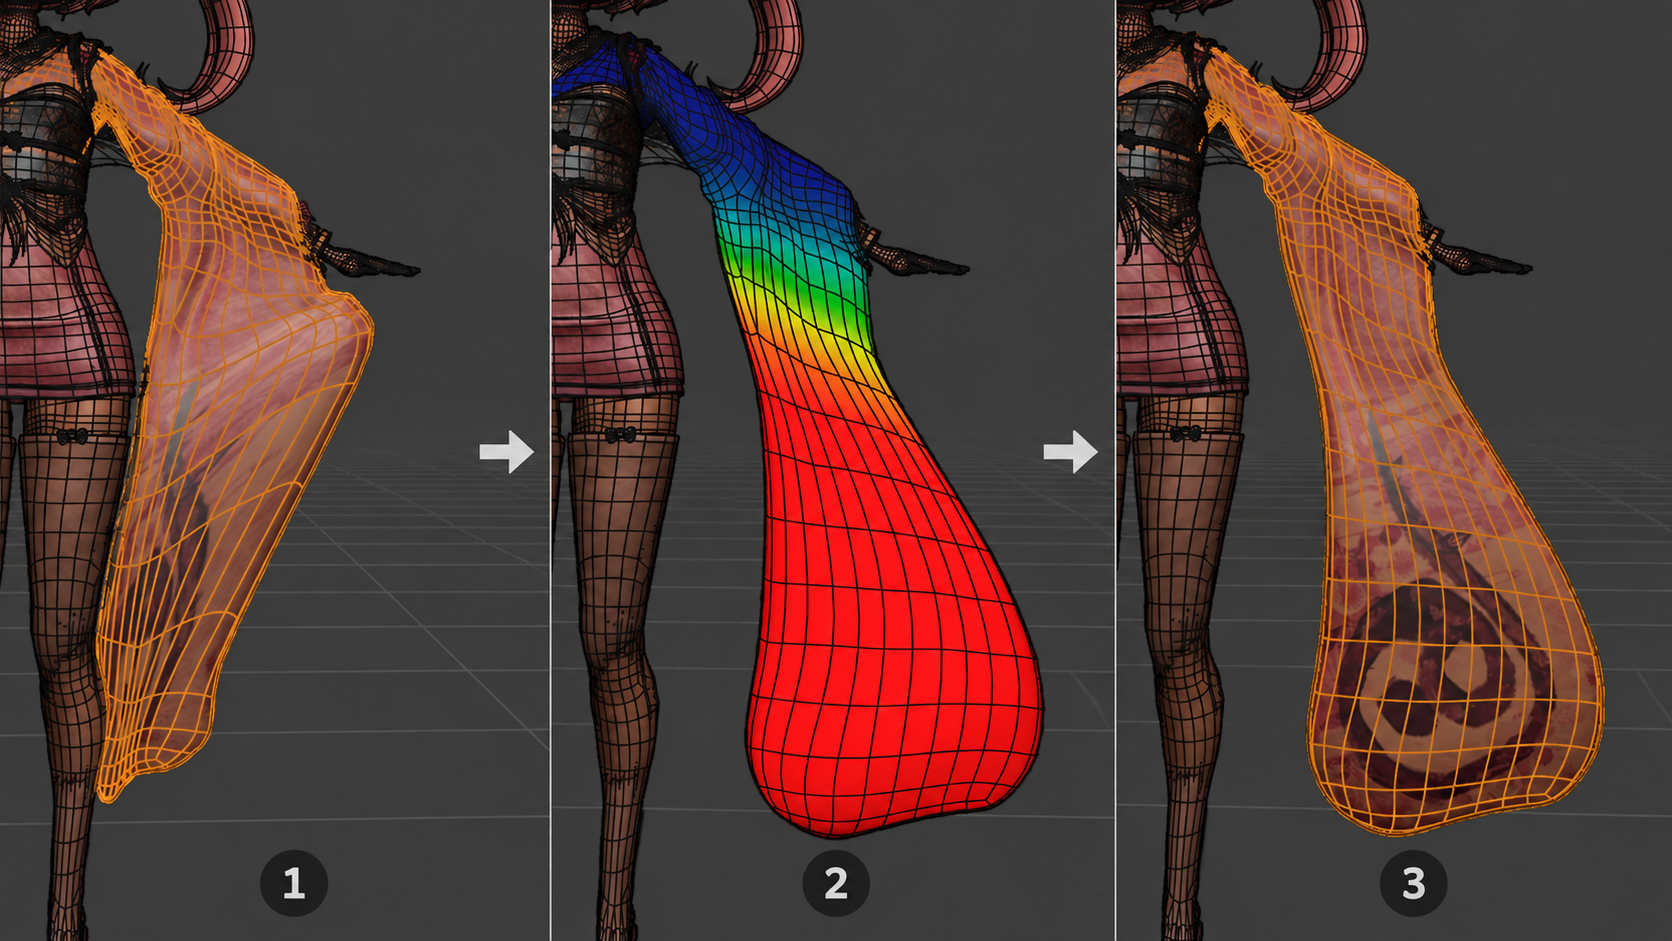
When skin pokes through clothing or a garment sinks into the body, use ShellFit to bring the shapes together. Adjust the result on screen, then save the fit as a Shape Key or directly to the mesh.
cvELD_ShellFit · Version 1.3.4 · Blender 4.5.0 to <5.3.0 (5.2.1 recommended) · SDF requires 5.2+ · GPL-3.0-or-later
大まかな輪郭を合わせたいのか、肌が飛び出した部分まで詰めたいのかで、フィット精度を選びましょう。「粗い」〜「高精細」は全体の形合わせ、「MAX」は細かな接触の補正に向いています。現在の初期値は従来の詳細接触処理である MAX です。既存ファイルに保存された設定値もそのまま保持されます。
表示
内部の目安
用途と制限
粗い
格子 64 点
大きな形だけを短時間で合わせる。
中間
格子 216 点
中程度の形合わせ。
細かい
格子 512 点
通常の広域形合わせ。
高精細
格子 4096 点
細かいより高密度の形合わせ。小さな接触まで直したいときは MAX へ切り替えましょう。
MAX
従来の詳細接触処理
細かい接触まで補正。モデルによっては計算時間が増えます。
SDFグリッド
ボリューム方式
閉じたボディ向け。Blender 5.2 以降、衣装が変形側のときだけ利用できます。
SDFグリッド
衣装を変形側にしたときに、自動・シェル・ソリッドで利用できます。SDF解像度は32〜256、初期値128です。値を上げると時間とメモリを多く使います。ボディに穴がある場合や、面の表裏を表す法線が不揃いな場合は、先にメッシュを整えてください。そのまま表面を基準に調整したいときは MAX を選びましょう。
活用例:ベイク前にハイポリをローポリへ合わせる
Substance 3D Painterでハイポリのディテールをローポリへベイクするとき、制作途中の修正によって両者の造形が少しずつずれてしまうことがあります。「完成したローポリは変えず、ハイポリの形を寄せたい」——そんな位置合わせにも、フィット精度のラフ合わせを活用できます。
ここでいうケージは、形を動かすためのShellFit内部の格子です。元のメッシュの細かさを保ったまま全体を変形します。Painterのベイク用ケージが必要な場合は、ベイク工程で別途用意してください。仕上げに細部の歪みや突き抜けを確認し、残った箇所は MAX や手動編集で整えましょう。10万という規模は負荷が大きくなる一例です。重く感じたら精度を下げて試してください。操作の軽さはモデル・設定・PC環境によって変わります。
この方式は、凹凸を記録する法線マップのベイク前など、大まかな形を合わせたい場面に向いています。細かな貫通、メッシュ同士の交差、部品の厚みまで整える段階では MAX や手動編集へ進みましょう。ラフ合わせはその細かな補正を省いて計算を軽くしています。近くの部品が一緒に動くときは範囲マスクで対象を絞ってください。固定・保護・非表示にした点はその位置に残せます。
Use Shell Fit to correct skin poking through clothing or clothing sinking into the body. Body and Cloth define the reference and the object that moves, so you can preserve either side.
Deform: Body
Use Cloth as the Reference and move the penetrating Body inward. The internal behavior name is Body Moves.
Deform: Cloth
Use Body as the Reference and move the garment outward. The internal behavior name is Cloth Moves.
Fit Type
Shell is for thin surfaces, Solid for thick closed bands, and Auto detects the suitable treatment.
Five entry points
Specified Objects → Surface Fit: fit Body or Cloth as a whole and tune surface contact.
Specified Objects → Squeeze Bulge: create a separate groove and surrounding bulge for rings, belts and hems.
Selected Geometry → Selection Follow Fit: use selected Cloth vertices, edges or faces as anchors for local fitting.
Selected Geometry → Quick Shell fit: snap mesh vertices or curve control points and optionally copy weights, Shape Keys and Armature Modifiers.
Selected Geometry → Lattice: manually refine a fitted region with an Adjustment Lattice.
Core sequence: assign Body and Cloth → set the Deform / Reference roles → check Fit Type and Bake To → Setup Live → tune the result → Confirm Fit, or Cancel Fit to restore the starting state.
Surface Fit example: the skin is brought inside the sock.
Installation
Supported languages and settings
ShellFit's UI supports 10 languages: English, Japanese, Simplified Chinese, Spanish, French, German, Russian, Brazilian Portuguese, Korean and Italian.
Choose your language in Blender Preferences → Interface, then enable translation for Interface and Tooltips. ShellFit's menus and descriptions will follow your selected language.
Items without a translation appear in English. Product names, data names and shortcut notation may retain their original form. Some translations may contain awkward wording; if a description is unclear, refer to the English UI or the full manual. The full manual is available in Japanese and English.
English, Japanese, Simplified Chinese and Spanish are shown as examples of the ten supported languages. The other supported languages use the same setup. Text ellipses reflect the panel width.
Supported range
Blender 4.5.0 or later, below 5.3.0; development and validation use Blender 5.2.1.
Standard qualities, selection fit, baking, save/reopen and Undo/Redo are validated on Blender 4.5.0 / 4.5.6 / 4.5.8. SDF requires Blender 5.2+ and its grid nodes. Its controls are disabled on 4.5; saved settings and output are retained. Select MAX or another quality to recompute.
Assign editable Mesh objects in the same scene as Body and Cloth. Curves, armatures and the same object in both fields are rejected.
Using ShellFit on Linux
Development and hands-on testing are performed on Windows. Linux Blender packages can use different Python versions and libraries depending on their source. A user has reported a compatibility issue with a Linux build using Python 3.14. We have not reproduced it; its cause and scope remain unconfirmed. This is not confirmation that the entire add-on requires Python 3.13 or is incompatible with every Python 3.14 build.
If a distribution-provided Blender package fails, first try an official Blender download within the supported version range above.
Flatpak Blender has also been suggested by a user as a possible workaround. We have not independently verified it or confirmed that it resolves the issue. Use a Blender version within ShellFit's supported range; the latest version may be outside it.
Check the Python used inside Blender, not your system Python. In Blender's Python Console, run import sys; print(sys.version). Replacing your operating system's Python is not required as a troubleshooting step for this report.
The bundled native acceleration is an optional Windows x64 / CPython 3.13 feature. Linux is designed to use the Python fallback; this alone does not establish verified Linux compatibility. When reporting an issue, include your Linux distribution, Blender and ShellFit versions, Blender installation source, the Python version shown above, and the full error message.
Install
Prepare the distributed zip without extracting it.
Open Edit → Preferences → Add-ons → Install… and select the zip. If the package is distributed as an Extension, use Blender’s Extensions workflow.
Enable cvELD Shell Fit and confirm that the tab appears in the 3D View sidebar opened with N.
Position and size Body and Cloth appropriately before fitting. End live sessions with Confirm or Cancel before updating the add-on.
Customize Pie Menus
Open Preferences → cvELD Shell Fit → Pie Menus to add, duplicate, rename or remove pies. Choose a category, then click a direction in the eight-slot compass to search commands. Assign Surface Fit, Selection Follow Fit, Lattice, Bulge, Data Transfer and Protection commands alongside QuickShellFit. Each pie has its own native shortcut row; use Save Preferences to persist menus and bindings.
The original pie retains its layout and customized edit-mode shortcuts. Object Mode also defaults to Ctrl+Shift+1. New pies start without a key and can open in different 3D View modes. Each command keeps its normal mode, object and live-session requirements. Internal operations requiring a specific list row or similar context are excluded.
Update checks
In add-on preferences, General → Updates controls automatic checks; Support contains documentation and product links. Online access is required. Checks run after startup and daily, send no model or scene data, and do not install updates automatically.
Penetration Inspector
Find clothing that sinks into the body or crosses its surface, then move into automatic correction or manual adjustment. In the sidebar, assign the body as Reference and the garment as Deform, then click Inspect Penetration.
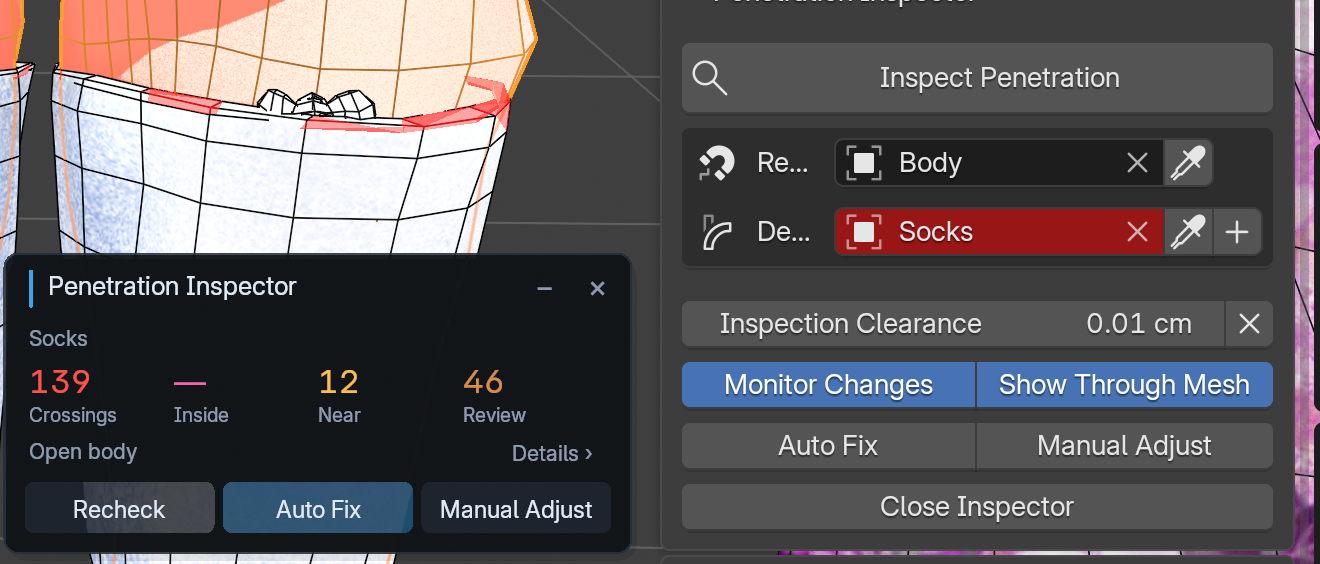
User-provided inspection example. With an open body, Inside shows “—” for unavailable, not zero.
Crossings (red): inspected cloth triangles crossing the reference.
Inside (pink): vertices estimated to be inside a closed body. An open body displays “—”.
Near (yellow): triangles containing samples within Inspection Clearance.
Review (amber): triangles needing visual review, including uncertain inside/outside results. These counts use different units and categories can overlap.
Inspection Clearance controls the near-distance threshold and the clearance used for repair. Monitor Changes rechecks after geometry or pose edits; Show Through Mesh reveals occluded marks. Recheck refreshes the result, and Details shows additional inspection information.
Confirm and cancel in Object Mode. Auto Fix, confirm, cancel and manual adjustment support Undo/Redo. History changes close the inspector; reopen it when needed. Cancel preserves intervening manual edits and restores the original mesh sharing when verified unchanged.
Assign Body and Cloth in the Penetration Inspector panel and click Inspect Penetration to open the GPU viewport card. Use Selected Pair makes the active mesh the Body. Red marks crossing faces, pink estimated containment in a closed body, and amber near or uncertain samples. Monitor Changes rechecks after edits.
Auto Fix starts existing ShellFit live correction on the cloth object and rechecks the result. Confirm Fix or Cancel Fix before using Manual Adjust to select problem control vertices for ShellFit selection fitting or ordinary move tools. Control selection is approximate when modifiers change the displayed surface. Closing the inspector does not confirm a live correction.
Checks cover one pair in the current pose. Detection uses CPU and drawing uses GPU. Open-body containment, self-intersections and all-pose collision freedom are not guaranteed. Auto Fix uses rest shape; use manual adjustment with posed Armatures.
Basic workflow (Surface Fit)
Recorded examples: socks and skirt
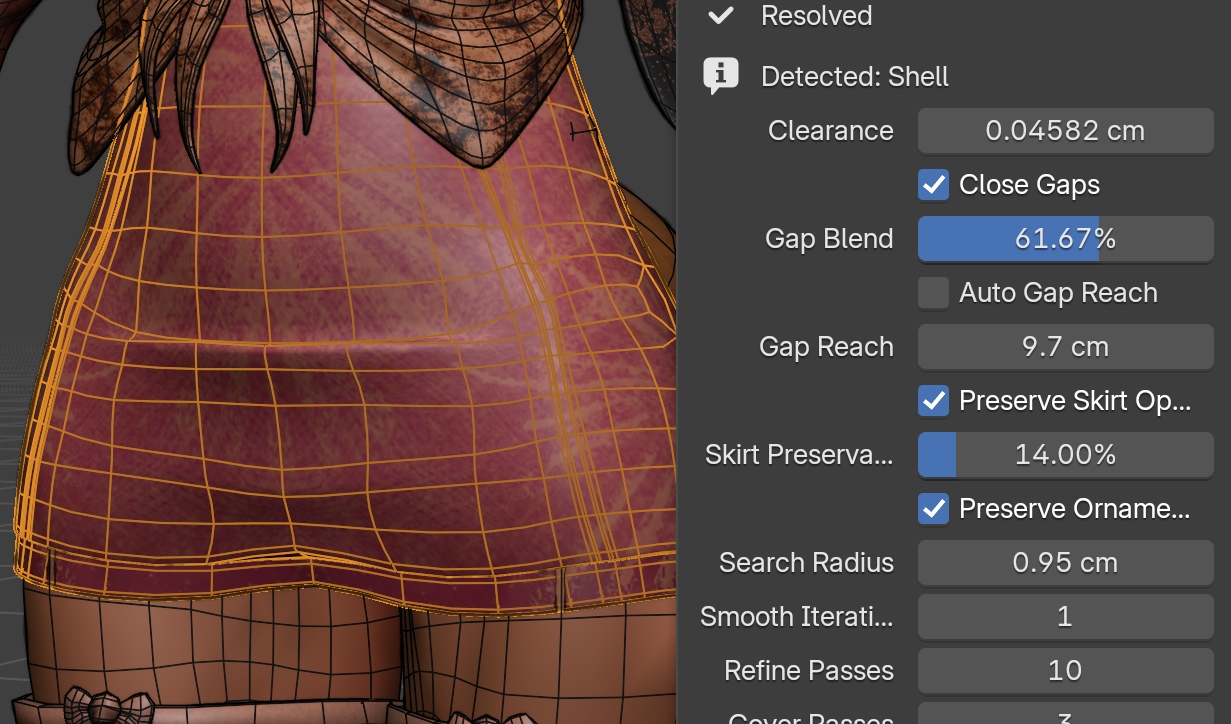
Fit the socks to the legs while retaining the attached ribbon details.Fit the skirt, then use Preserve Skirt Opening and Skirt Preservation to adjust the hem fit.
Start with one garment. This workflow helps you adjust skin poking through fabric or clothing sinking into the body while watching the result. Save your file first so you have a clear starting point to compare against.
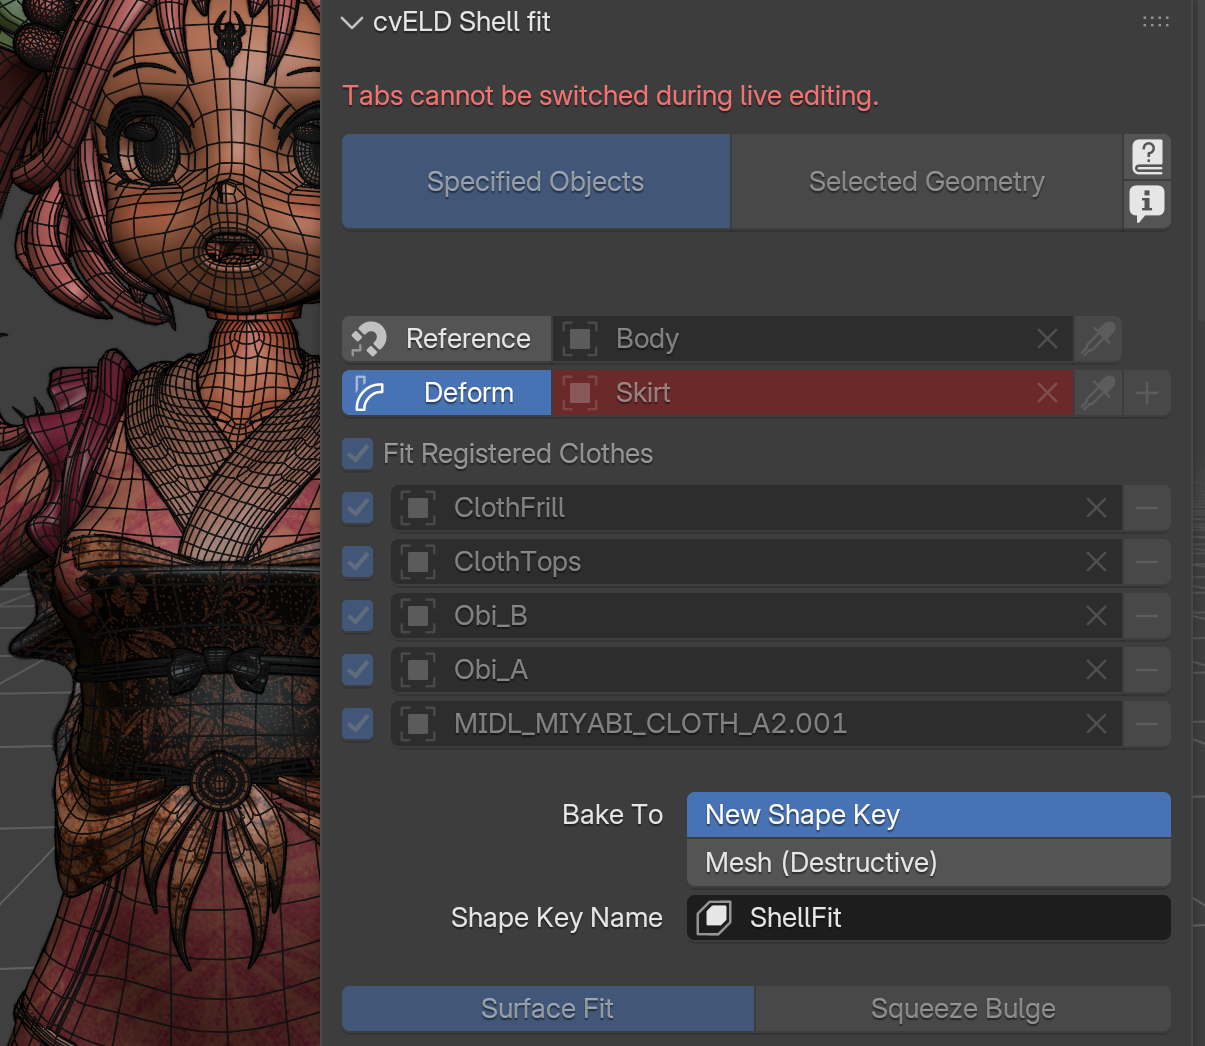
Assign objects: set Mesh objects in Body and Cloth. The eyedropper assigns the selected Mesh; + adds another Cloth entry.
Choose the moving side: set one object to Deform and the other to Reference. The panel shows Moves: object name; the internal behavior names are Body Moves and Cloth Moves.
Choose scope: open Specified Objects → Surface Fit. For selected components, use the Selected Geometry pages described below. Surface Fit batch processing uses the included Cloth list when Cloth is Deform and Fit Registered Clothes is enabled.
Choose Fit Type and Fit Quality: Shell for thin cloth, Solid for thick closed parts, Auto when unsure. Use Coarse through High Detail for broad Rough Align matching and MAX when detailed contact correction is needed.
Choose Bake To:New Shape Key is non-destructive; Mesh (Destructive) writes directly to the mesh. The default Shape Key name is ShellFit.
Setup Live: with Auto Parameters on Setup enabled, starting values are chosen for the model and live correction begins. Changing a visible setting updates the preview.
Finish: Confirm Fit bakes to the selected output. Use Cancel Fit to discard the current live correction and try again. After confirming, adjust the shape key value or use Undo or your saved file to return to an earlier state; Cancel Fit applies to the unconfirmed live correction.
Keep your starting shape: choose New Shape Key and turn off Overwrite Same Name to create a numbered key instead of replacing an existing one. Before using Mesh (Destructive), duplicate the object or save the file. Confirm or Cancel before changing the live target.
Fit Quality
Choose Fit Quality by the adjustment you need: Coarse through High Detail for the overall silhouette, or MAX for finer contact correction where skin still pokes through. The current default is MAX, while settings saved in existing files are preserved.
Display
Internal guide
Use and limits
Coarse
64 lattice controls
Fast large-scale alignment.
Medium
216 lattice controls
Intermediate broad alignment.
Fine
512 lattice controls
Normal broad shape matching.
High Detail
4096 lattice controls
Finer broad alignment than Fine; switch to MAX when you need fine contact correction.
MAX
Established detailed contact processing
Corrects fine contacts and can take longer depending on the model.
SDF Grid
Volume-based fitting
For closed Bodies; available on Blender 5.2+ in Cloth Moves.
SDF Grid
Available with Cloth as Deform in Auto, Shell and Solid. SDF Resolution ranges from 32 to 256 (default 128); higher values use more memory and time. For bodies with holes or inconsistent face normals, repair the mesh first, or choose MAX to work from the surface instead.
Use case: align the high-poly mesh to the low-poly before baking
When baking high-poly detail onto a low-poly mesh in Substance 3D Painter, revisions during production can gradually change their shapes. If you want to keep the finished low-poly unchanged and bring the high-poly closer to it, use the Rough Align options in Fit Quality.
On dense meshes with counts above 100,000, repeated detailed contact correction can become too slow for interactive adjustment. Coarse and Medium solve an internal deformation cage from a small set of representative points, then apply its broad displacement to the original dense mesh. Instead of pressing every detail against the target, this reduces the fitting workload by aligning the overall silhouette and curvature.
Assign the high-poly as Deform and the low-poly as Reference. Work on a duplicate or use New Shape Key to retain the original sculpt.
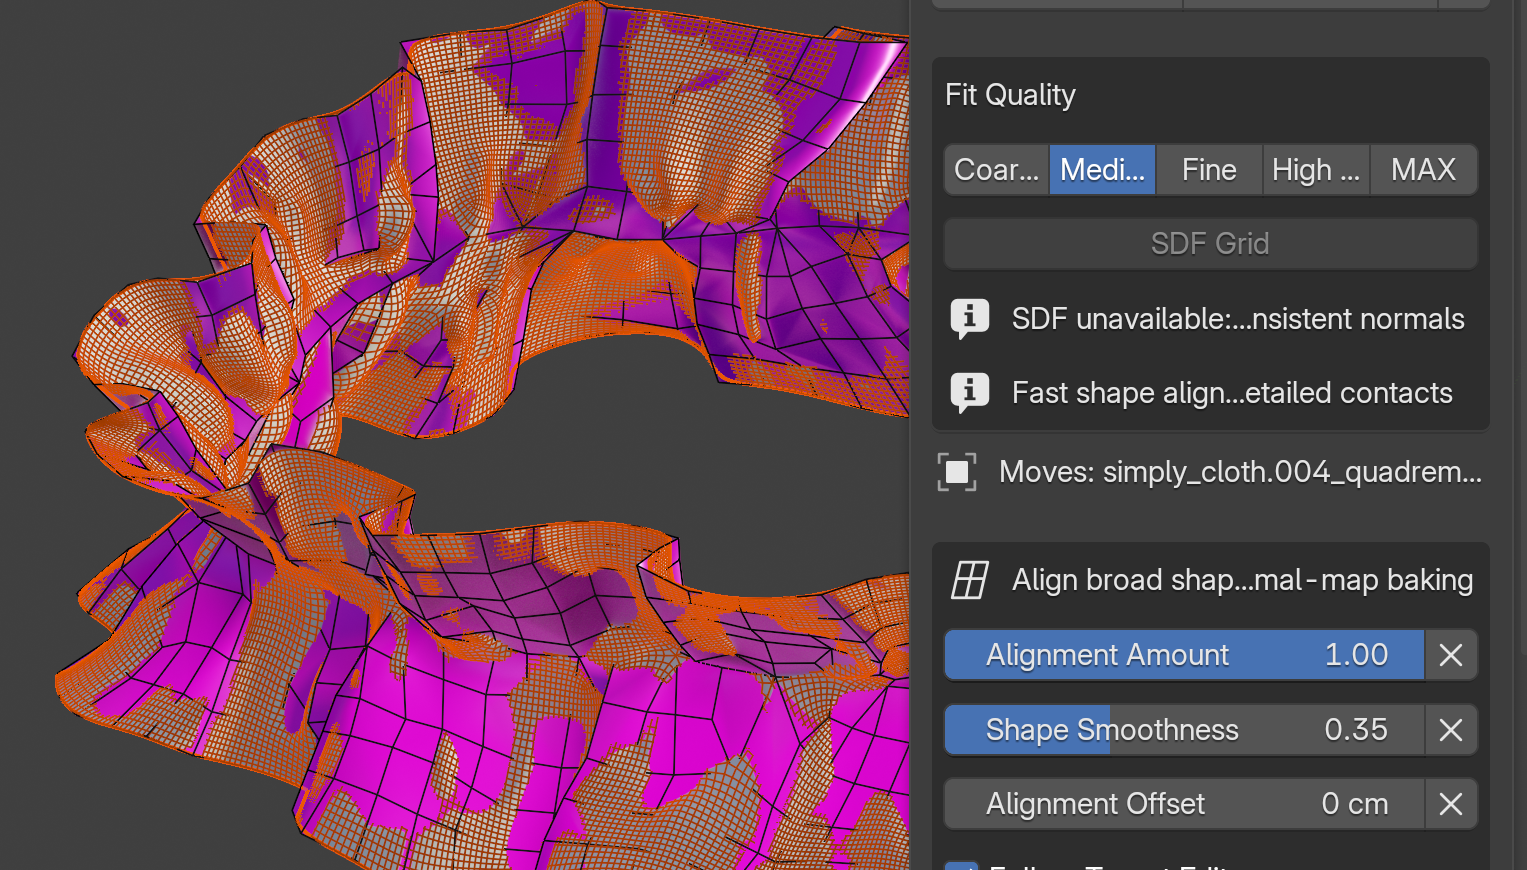
Choose Coarse or Medium, start live fitting, and adjust Alignment Amount, Shape Smoothness and Alignment Offset for broad alignment.
Increase to Fine or High Detail if needed. Check detail distortion and nearby parts moving together, confirm the fit, then inspect your bake in Painter.
Pre-bake shape alignment using Medium Fit Quality. Click for the full-size image.
The cage here is ShellFit's internal deformation grid: it moves the original mesh without reducing its polygon count. Prepare a separate baking cage during your Painter workflow if needed. Inspect fine details and remaining intersections, then refine them with MAX or manual editing. The 100,000-plus scale is an example of a heavy workload, not a fixed threshold. Try a lower quality if adjustment feels slow; speed depends on the model, settings and hardware.
Rough Align controls
Select Coarse, Medium, Fine or High Detail in Fit Quality to use Rough Align; these four quality buttons are the entry points for Rough Align. Adjust Alignment Amount, Shape Smoothness, Alignment Offset, Follow Target Edits and Alignment Reach, then use Recompute. Representative points drive a smooth internal lattice displacement.
Use Rough Align for the overall shape before baking normal maps. It skips fine contact, self-intersection and per-part thickness correction to keep the fitting workload lighter. Refine those details with MAX or manual editing afterward. If nearby parts move together, narrow the affected region with masks. Fixed, protected and hidden points remain in place.
Surface Fit
Fit Type and detection
Shell pushes against a surface, Solid handles the inside/outside relationship of a closed thick target, and Auto detects Shell, Solid or Hybrid. Live status can show Detected: Shell, Solid or Hybrid (both).
Main live settings
Clearance: the space left between skin and fabric. The property default is 0.001; automatic setup measures a starting value for the model. Increase it for more room or lower it if the result floats too far away. Negative values move slightly past the reference surface.
Strength: how strongly Shell pushes embedded areas out. Start at 1.0, lower it for a weaker push, or increase it while checking that the garment stays close enough.
Search Radius / Wrap Distance: search distance for Shell, or the distance used to bring floating parts toward the body for Solid.
Smooth Iterations: blends the moved region into its surroundings. Start at 4, increase for angular boundaries, or reduce it if small details become too rounded.
Refine Passes / Cover Passes: additional Cloth Moves corrections for remaining contact or exposed skin.
Rigid First: for Solid, tries whole-object movement and rotation before deforming what remains.
Limit Group / Invert: scales the effect by source vertex-group weight. Empty affects everything; weight 0 leaves a point still and weight 1 applies the normal effect. Invert can exclude the painted area. Use Protection Mask when you want to paint areas that stay fixed; it is managed separately from the Limit Group.
Shape Options and output
Auto Parameters on Setup fills starting values automatically. Disable Target Solidify disables the target Solidify only during setup. Shape Key output uses the named key: with Overwrite Same Name enabled, a same-named key is replaced; when disabled, a numbered new key is created.
Mesh (Destructive) writes the deformation directly to the mesh. Save or create an Undo point before either output, especially before destructive baking.
Before saving the result: turn off Overwrite Same Name to keep an existing shape key. Save the file before a direct mesh bake. Comparing a shape key result first gives you a chance to inspect the fit before choosing the final output.
Gaps, hems and batch processing
Multiple garments
Set Cloth to Deform and use + to register multiple Mesh objects in the Deform-side Cloth list. Enable Fit Registered Clothes and choose Include to make them part of Surface Fit live updates, Confirm and Clear. This is useful when a skirt, belt and accessories are separate objects in the same area and you want to inspect that area together.
Quality-first workflow: each part needs its own spacing and thickness. For a careful finish, start with one object in the primary Cloth field, disable Fit Registered Clothes, and tune that part carefully. Confirm or cancel before assigning the next garment. Multiple registration is useful for fitting a local area containing separate skirt, belt and accessory objects together. Settings are shared, so inspect and refine individual parts afterward.
Target list: the primary Cloth object is always included. Each additional row's Include checkbox controls only that additional object; checking one row does not exclude the primary Cloth. Confirm or cancel live fitting before changing assignments, registrations or checkboxes.
Example of registering separate skirt and accessory objects on the Deform side.
Close Gaps
For Cloth Moves with a non-Solid Fit Type, enable Close Gaps to close gaps live. Solid uses Wrap Distance for the equivalent enclosure behavior and exposes Fit Gaps as a recompute action.
Gap Blend: how strongly floating fabric is pulled toward the body. Increase it for a closer fit or lower it for more room. At 0%, correction still pushes out areas embedded in the body.
Preserve Shell Thickness: 100% retains detected thickness, 50% retains half, and 0% or disabling preservation pulls both layers toward the body surface. Start at 100% for a thick part; 0% removes its layer spacing.
A cylinder indents only in the middle: set Shell Thickness Search to 0 (automatic) and recompute the fit. On closed thick parts, thickness detected at rims or elsewhere also guides the search for the inner wall in densely divided areas. A manual search limit below the actual thickness prevents detection. This does not flatten relief already present in the original mesh.
Auto Gap Reach / Gap Reach: how far the attraction can reach. Start with automatic measurement, then reduce the manual distance if unrelated parts are pulled along.
Preserve Skirt Opening / Skirt Preservation: use this when the hem is drawn too close to the legs. Increase preservation to retain more of the skirt opening.
Auto Preserve Details: fits fabric first, then carries small independent parts with the fabric motion and rotation while retaining their shape. This independent-part correction needs separate vertices and suitable fabric to follow. Use Protection Mask or a lattice for decorations joined to the fabric or lacking a suitable carrier.
The presets are Socks / Skin Fit, Clothes / Skirt Hem, Rings and Loose / Keep Shape. Start live fitting after choosing a preset, then inspect and adjust the result.
Clothes / Skirt Hem starts with Skirt Preservation at 70%; Loose / Keep Shape starts with Gap Blend at 30% and Skirt Preservation at 100%. Presets change settings and update a running preview. Preserve Shell Thickness retains existing inner/outer spacing; to add new thickness to single-sided fabric, use Blender's Solidify or another modeling step.
Closing a skirt or hem gap.
Selection Follow Fit
Use this to bring a collar edge toward the neck or fit a cuff around an arm. Your selection acts as the attachment area, with nearby geometry following it, so you can adjust one region without refitting the entire garment.
Selected Geometry → Selection Follow Fit attaches selected vertices, edges or faces to the reference and lets surrounding geometry follow. Cloth moves toward Body by default; click Reference to reverse the roles.
Assign separate moving and reference meshes. Use Enter Edit Mode and select attachment components on the moving mesh.
Choose Fit Algorithm, then press Live Adjust. Adjust Surface Offset, Fit Amount and follow settings during the preview.
Confirm writes to the shared Bake To output; Cancel discards the preview. Use Ctrl+Z / Ctrl+Shift+Z for live setting history.
Live role switching requires selected vertices on the new moving mesh in Edit Mode. Finish adjustment lattices before switching roles. Changing the mesh, selection or mode through another operation stops the preview to preserve those edits. Since this can prevent automatic restoration of the starting shape, confirm or cancel the preview before moving on to another edit.
Fast Attachment and follow
Fast Attachment is the default. With Preserve Connected Parts off, selected-point attachment and bending of the surroundings take priority. Proportional Follow offers Connected Only, Nearby Vertices and Intersecting Islands (the default). Follow Range 0 moves only the selection; Follow Strength controls surrounding influence.
Preserve Connected Parts overrides proportional follow. Rigid movement without distance falloff retains part shape, thickness and volume, but may leave selected anchors off the target surface. Distance falloff bends transition areas, so inspect their thickness and volume. Fast Attachment prioritizes positioning; use Legacy Precision Fit or Surface Fit for a separate contact-correction pass.
Projection Options selects target Faces / Edges / Vertices, All / Selected Only and Maximum Distance (0 is unlimited). Hidden and protected points affect the result.
Legacy Precision Fit
Choose Legacy Precision Fit in Fit Algorithm to expose detailed controls; switch methods within the same page. Enable Preserve Connected Parts to adjust surrounding shape and contact correction. Standard, Green Lattice (Experimental) and Volume Controls (Experimental) are available. Parameter changes can take several seconds. Use Fast Attachment for the initial placement, then switch for detailed refinement.
Adjustment Lattice
To reshape a hem's volume or a sleeve's curve, move a few points on the surrounding grid rather than selecting every mesh vertex. An island here means a connected group of vertices forming one part.
Confirm or cancel the selection preview, then open Lattice. You can also start from the current shape without refitting. Choose Whole Object, Per Island, Selected Components or Intersecting Islands and press Create Adjustment Lattice. Intersecting Islands groups intersecting surfaces, not merely nearby separate parts.
Use Edit Lattice Points and move controls with G.
Select controls and press Live Fit Lattice to fit them to the reference. Bend Lattice bends the surroundings; Keep Lattice Shape only moves and rotates the lattice. Each participating lattice must have at most 512 control points.
Confirm Lattice Fit keeps the fitted controls and ends that preview, leaving the lattice available for further editing.
After changing Target Range or Move Fitted Selection, press Update Lattice Range. Earlier adjustments are retained; a running lattice fit also ends with its current result retained.
Confirm Lattice Deformation commits to the mesh and removes the lattices. This writes directly to the mesh even when the shared output is New Shape Key. Save your file before committing if you need a separate original. Before committing, use Remove Lattice Adjustments to discard the lattice adjustments.
Native lattices are used when needed to preserve existing shape keys or bindings; compatible cvELD Lattice integration is optional. Follow recovery messages after topology changes or missing cages. Force Release (Keep Mesh Edits) ends a recovery state while retaining mesh edits already made. To save the visible lattice deformation, use the normal Confirm Lattice Deformation action.
Squeeze Bulge
Choose where to create the bulge
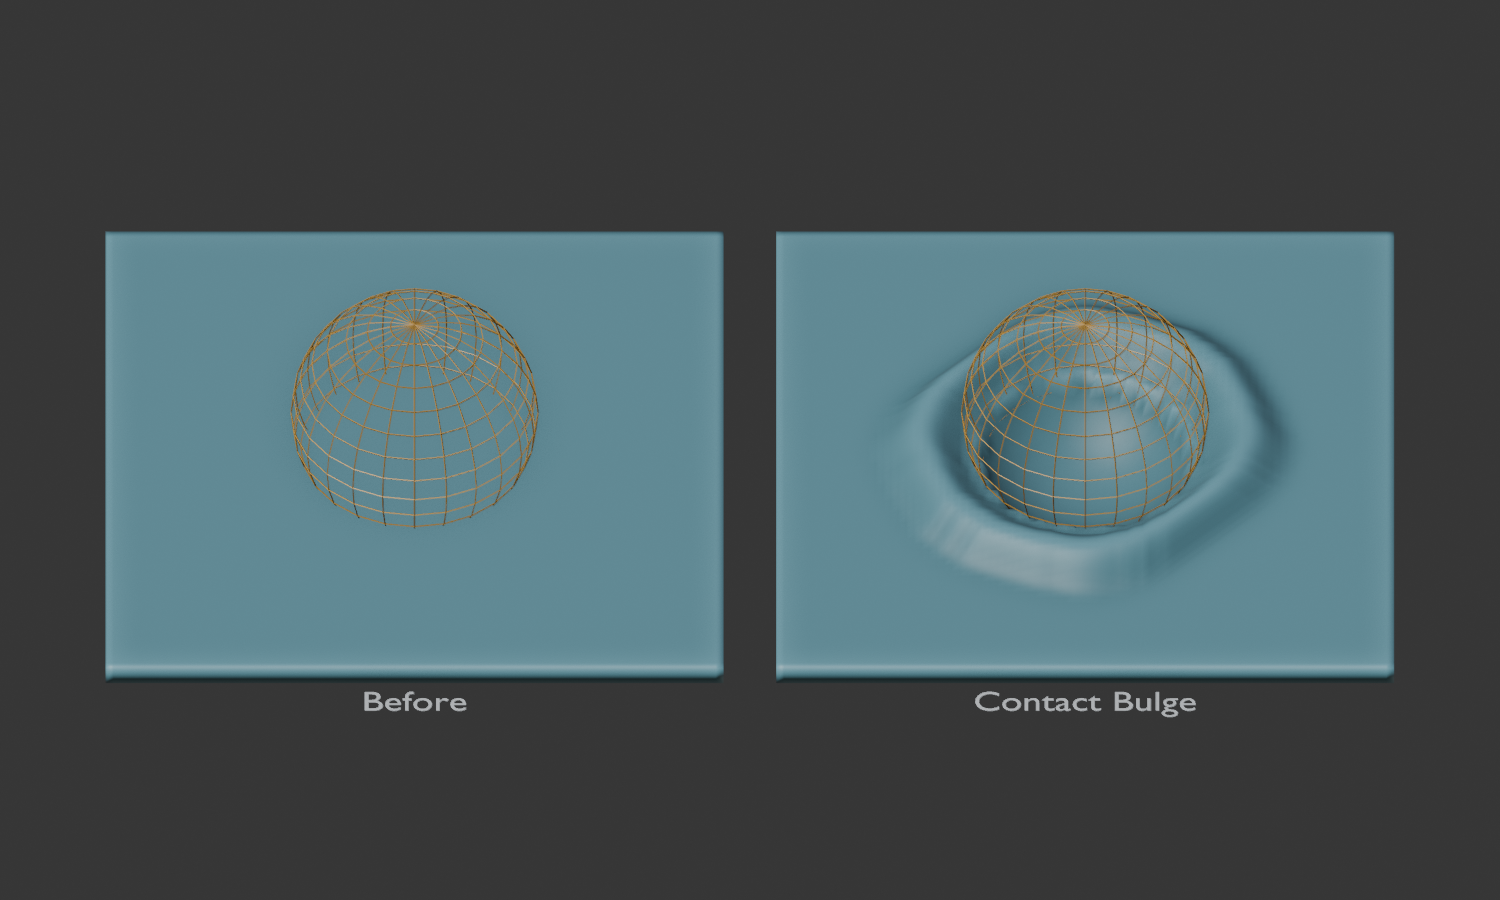
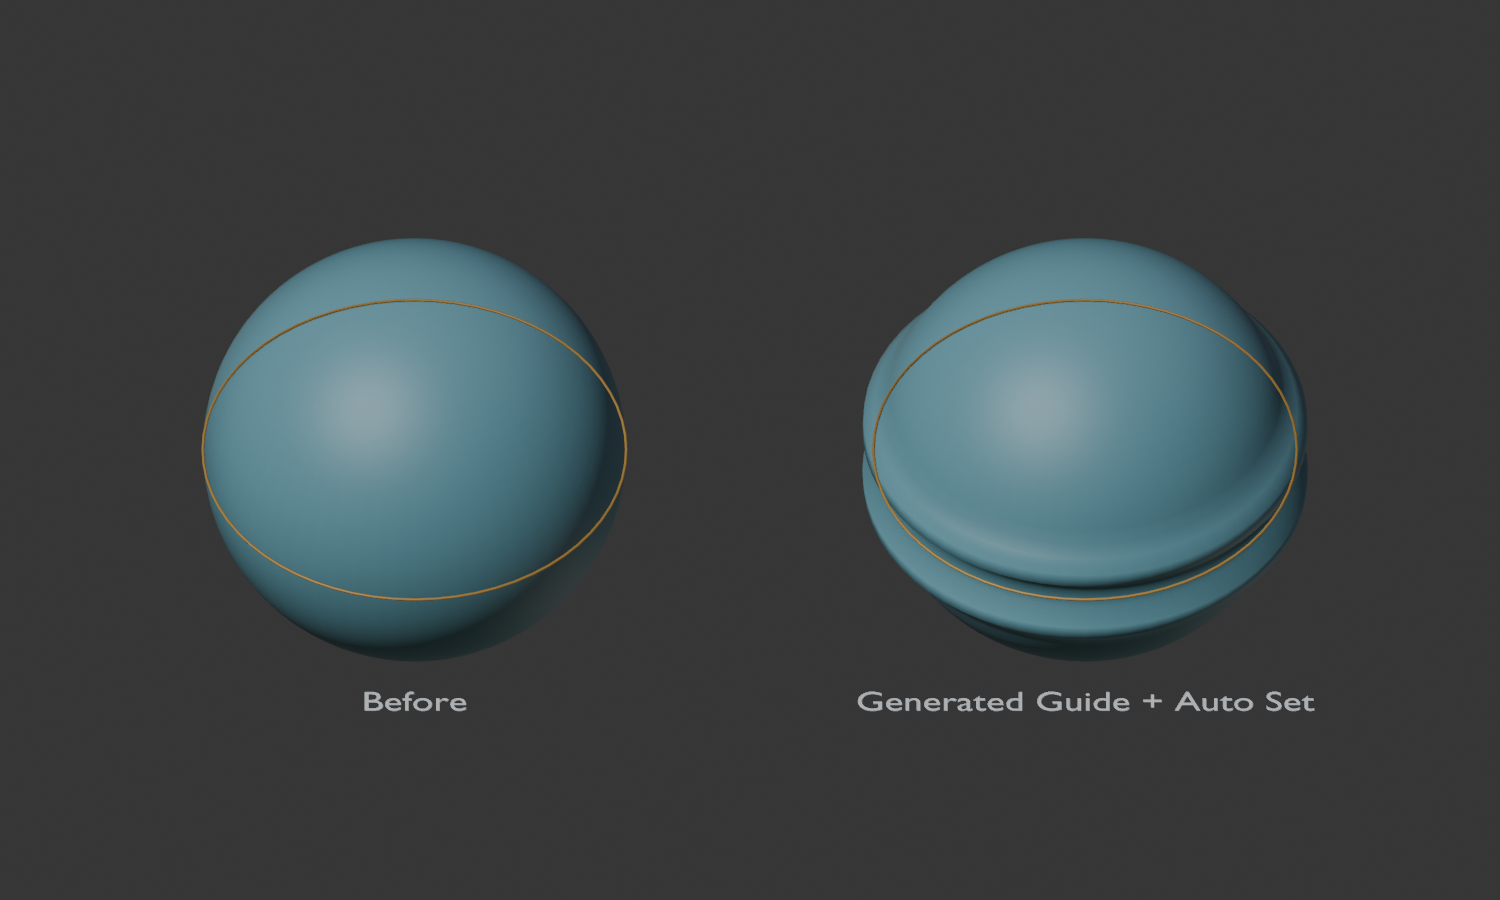
Computed and rendered in Blender. Left: before. Right: indentation and a ridge around contact. Orange wire: reference sphere.
Where to Create Bulge selects how the location is determined. From Contact Areas and Dent with an Object are separate modes. Both use the single shared Reference slot.
Option
Input
When to use it
From Garment Edges
Openings such as cuffs and waistbands
Indentation around garment edges. Previously “Garment Edges (Compatible)”.
From Contact Areas
Where a reference touches the body
Adjust contact detection and the indentation/ridge profile yourself. Previously “Contact Boundary”.
Dent with an Object
The pressing object surface
Fit an indentation to a sphere or box and raise its rim. Start estimates dimensions automatically.
Choose the Location
A line you place, or a vertex group
When automatic detection misses the desired location, or you want an effect away from the garment edge. Previously “Guide”.
From Contact Areas
Find the area where the shared reference touches the body and raise its boundary. Adjust detection, distance, indentation, height and width. Start preserves adjusted values. Additional references are retired; both contact modes use only the shared Reference slot.
Dent with an Object
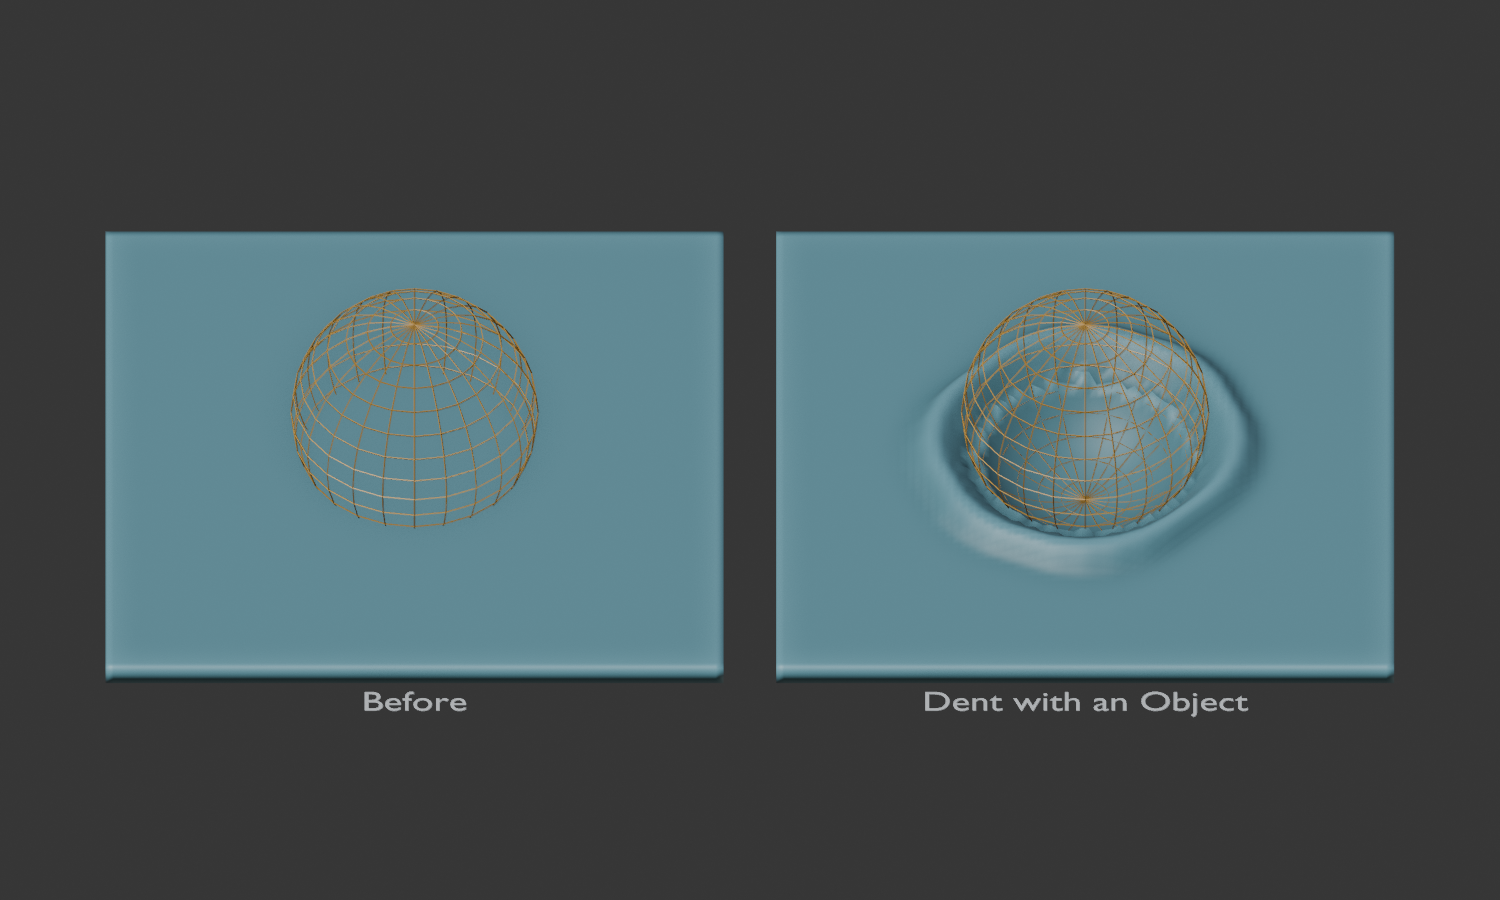
Actual Blender output using automatic starting settings. Before on the left; preview on the right.
Assign the body as the deformation target and a sphere, box or other pressing mesh as the shared Reference. Choose Dent with an Object.
Press Start Bulge. Reference dimensions and body edge spacing set reaction distance, maximum dent, rim height and width automatically. Switching to this mode during preview also sets these values.
Move the reference closer. Intersecting vertices move to its surface and the surrounding area rises. Move away to restore the shape. Updates run after confirming the move.
Adjust values as needed. Auto Set and Preview replaces them with estimated values. Smoothing affects the rim while preserving the fitted indentation.
Confirm saves the result; Cancel removes this preview. Output uses the shared Bake To setting.
Vertex counts remain unchanged. Coarse faces and downstream Subdivision can leave gaps or intersections between vertices or in the final display. Subdivide a body copy first when finer detail is needed. Maximum dent and range masks also constrain fitting.
Leftover Bulge attributes: a new preview can start even when an old attribute remains without its modifier. The existing attribute is preserved and the new preview uses a separate one. Confirm and Cancel act on the current preview.
Choose the location yourself: using a guide
Generated loop with Auto Set and Preview: the line marks the crease and the neighboring surface rises.
A guide is a line that marks where you want an indentation. The surface near the line dents and the area on either side bulges. Use it when garment openings cannot be detected or when you want to place the effect yourself. It does not move the garment or replace the body with the line's shape.
Example: an indentation around a stocking opening. Place a loop along the thigh at the opening. This lets you choose the location independently of ribbons or other garment details. The garment may remain visible, but this method does not detect contact with it.
Assign the body as the deformation target. Choose Where to Create Bulge → Choose the Location.
In Object Mode, press Create Loops at Clothing Top. This creates loops along the body section at the reference garment's highest point. Stockings can produce separate loops on both thighs. This slices the body rather than extracting garment edges.
The new ShellFit Guide is selected and assigned automatically under Guide Line Object; the region group is cleared. Immediately press F9 to adjust Position Offset or Section Direction. Directions use world X, Y or Z.
Press Auto Set and Preview. Width, height, indentation depth and smoothing are set from the line size and nearby body mesh spacing, then the preview is created or updated immediately. Volume Compensation is set to zero and Automatic Indentation is turned off. This replaces previously adjusted profile values. Keep the line close to the body. For a vertex-group region instead of a line, adjust values manually and use Start Bulge.
Start with Automatic Indentation off. Adjust Indentation Depth for the dent, Bulge Height for the ridge and Bulge Width for the spread from the line. Moving the line changes the location. Recalculate if the preview does not update after editing.
Confirm when finished. The field's × unlinks the guide without deleting the line or removing the current preview. Use Cancel Bulge to remove the deformation preview.
Choose another height: place the 3D cursor at the desired height and press Create Loops at 3D Cursor. No clothing reference is required. This creates all closed body sections at that height, not only the limb nearest the cursor. For an arm, change Section Direction with F9.
The result is an editable, unbeveled curve. Delete unwanted loops or adjust points in Edit Mode. Creating another guide keeps previous guides and leaves the original body and clothing meshes unchanged. Open or branching sections are skipped; change the height or direction if no loop can be created. The guide follows the body shape-key mix before modifiers.
Using mesh edges: select only the desired edges on a separate mesh in Edit Mode, return to Object Mode and assign that mesh as the guide. A plane or sphere used as a guide supplies its selected edges, not surface contact. To press an object against the body, use “Dent with an Object”.
Using a vertex group: paint a region on the body and select it under “Use a Vertex Group Instead”. A ridge forms around that region. The group takes priority over the line. The separate Limit Group only restricts where deformation is allowed; it does not define the bulge location.
Guides do not automatically detect garment contact or penetration. Keep the garment visible and inspect overlaps while adjusting height and depth.
Diagnostics and limits: no contact, undersampled contact, no boundary, ambiguous side and full weight exclusion have separate messages. For small references inside large target faces, subdivide a copy; original topology is preserved. Safety compares vertices and affected face centers before and after deformation and reduces offsets that worsen penetration. It does not guarantee removal of all triangle intersections or self-intersections. Edge distances do not jump to disconnected surfaces, but coarse triangulation introduces boundary and width approximation. Analysis is limited to 300,000 target vertices and 600,000 triangles.
The target uses its shape-key mix before modifiers; references use evaluated rest-pose geometry, retaining Solidify thickness in contact mode. Object transforms and mesh edits refresh the preview; after changing reference modifier settings, use Recalculate Bulge. Current-pose inverse mapping, Heat Method and automatic inside/outside completion of arbitrary open shapes are not implemented.
Important for From Garment Edges: an edge here means an open mesh boundary where polygon faces end, not a visible seam, fold or step. Applying Solidify connects the front, back and rim faces. A garment may still look open at the cuff while its mesh has no open boundary, so detection can fail. Use a reference copy from before thickness was added, or choose “From Contact Areas” or “Choose the Location”. You do not need to remove thickness from the original garment.
When thickness can work: an unapplied Solidify modifier is temporarily disabled during calculation to inspect the original edges. Some applied thin shells with identifiable paired layers and connecting rim faces also allow opening recovery from a temporary skin. This does not support every closed mesh, including remeshed garments with lost pairing. Source geometry, UVs and thickness are preserved. “No usable rings or garment openings were found” concerns reference topology, not Bake To.
Recorded thigh bulge adjustment using a knee-high sock as the reference.
If Bulge has no effect: when no vertices move, advice asks you to check the deformation/reference sides, Wrap Distance and Limit Group. For socks, deform the body using the socks as the reference. A skirt hem far from the body may be outside the contact range; use Preserve Skirt Opening to adjust its fit.
Use this when a belt or sock elastic should look as though it presses into the skin. Adjust the indentation and the soft rise around it to control how tight the contact looks.
Use Specified Objects → Squeeze Bulge to create indentation and surrounding bulge at garment openings or rings. Body is the default moving side; the role buttons can reverse it. Confirm or cancel any Surface Fit preview before switching pages.
Set the body to Deform and the garment to Reference. Find the shared Bake To setting below the object assignments and above the Surface Fit / Squeeze Bulge selector, choose New Shape Key for a non-destructive output, then press Start Bulge. Bake To controls how Confirm saves the result; it does not affect opening detection. Starting values are estimated from the contact dimensions.
On Shape, choose Subtle, Standard, Pronounced or Narrow and adjust Bulge Amount, Squeeze Depth, Asymmetry and Reach. For uneven results on triangulated meshes, increase Bulge Smoothing and, if needed, Smoothing Passes. This smooths only the added deformation; zero restores the original result. It adds no vertices and stronger smoothing can soften grooves and ridges, so inspect contact before confirming. Preset and smoothing edits update the preview.
On Range, adjust Clearance, Wrap Distance, Ignore Nearby Legs and Limit Group / Invert.
Confirm bakes to the shared Bake To / Shape Key Name and removes the live bulge. Cancel Bulge removes this bulge preview.
Use Shape for the bulge profile and Range for the affected area. Calculations include existing shape keys and use the rest shape without modifiers. Inspect final contacts and thin parts before confirming.
Indentation at a sock hem and the surrounding bulge.
A useful adjustment order: start with a preset, use Squeeze Depth for the indentation and Bulge Amount for the surrounding rise. Reach changes how far the rise spreads from the edge; Asymmetry shifts its balance between the sides. Reduce Reach when the effect spreads too far, or Squeeze Depth when the groove looks too deep.
1.3.1: For nearly planar closed openings, contact directions are derived from the opening shape even when a folded rim faces upward. This reduces isolated deformation and spikes. Very narrow seam-like slits with almost coincident sides are excluded from opening detection. No vertices are added or welded; curved hems and open edge chains retain their local calculation. This does not eliminate faceting from coarse meshes or guarantee an intersection-free final shape.
Quick Shell fit
Select, fit, and optionally copy data. QuickShellFit is a handy tool for fitting selected points wherever you need them. Select a garment detail or an accessory contact area and fit it directly to a target surface, edge or vertex. For meshes, you can also copy weights and shape keys during fitting, combining alignment and data transfer. Use it for everyday local adjustments alongside Surface Fit for whole-garment finishing.
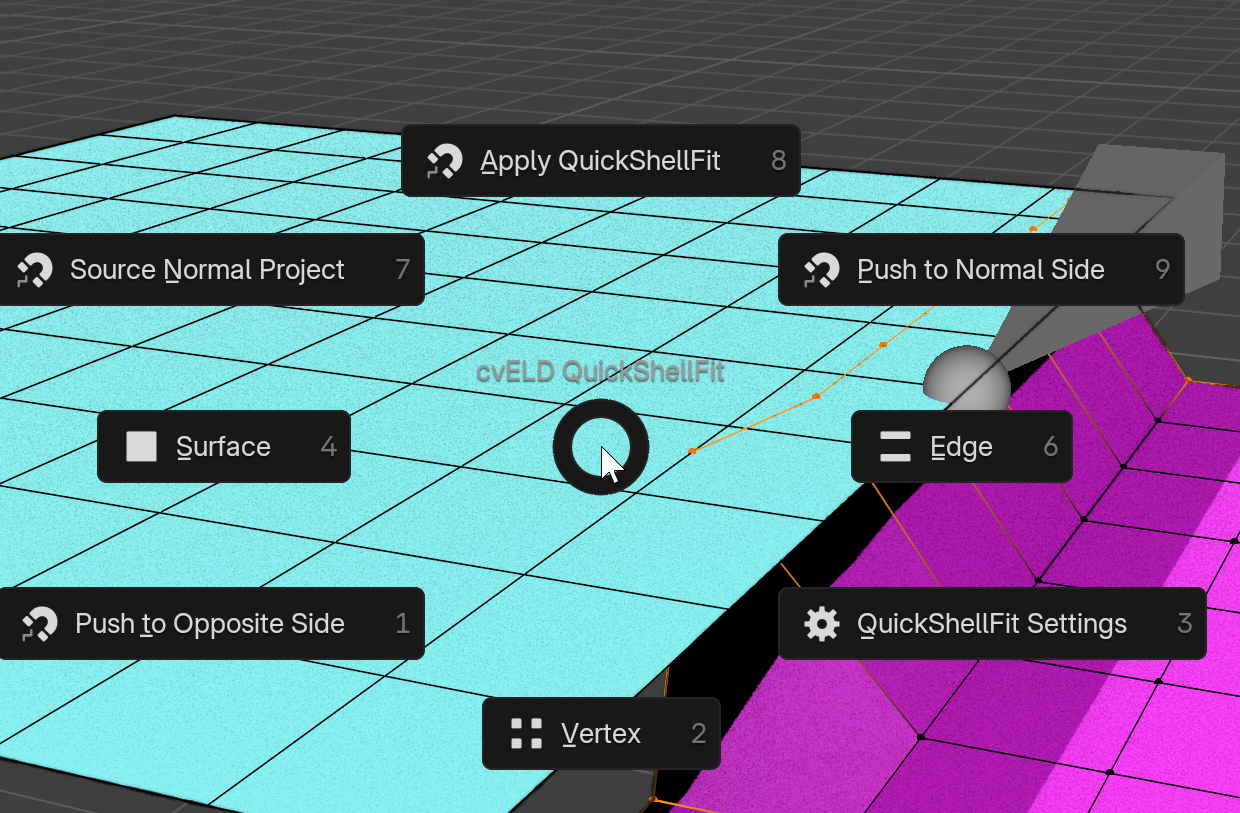
Select points in Edit Mode and press the default shortcut Ctrl+Shift+1 (top-row 1). Choose Surface, Edge or Vertex to fit immediately, or open QuickShellFit Settings to adjust the options. If you customized the shortcut, use your configured binding.
Ctrl+Shift+1 opens the pie menu by default, giving quick access to fitting actions. Click for the full-size image.
Quick Shell fit is the page under Selected Geometry. It works on mesh vertices and curve control points in Edit Mode. Use Apply QuickShellFit to execute. Ctrl+Shift+1 opens the cvELD QuickShellFit pie menu in Mesh or Curve Edit Mode. Actions are also available in the right-click and Edit Mode menus.
Detail Fit for gloves and socks (development build)
For local corrections to roughly aligned fingertips, finger webs or heels, choose Detail Fit as the fit algorithm. Select garment vertices in Mesh Edit Mode, assign a fixed Body, and click Preview Detail Fit. An empty Body field uses the shared Body assignment. Choose Follow Fingers for gloves/toe socks or Wrap Together for socks/mittens. Wrap Together builds a temporary convex envelope of nearby reference faces; keep each selection local to the toes or fingers.
Review the cyan result wire and red-orange unresolved vertices. Adjust Detail Clearance, Fit Amount, Local Shape Preservation and Detail Follow Range. Finish with the panel's Confirm / Cancel; Esc also cancels. Enter in a number field does not confirm. Preview leaves the original mesh untouched and recomputes after settings or Body changes. After confirmation, use Undo or F9.
A zero follow range moves only selected vertices. Surrounding movement fades along mesh connections; hidden and fully protected vertices stay fixed. To restrict reference faces, enter multi-object Edit Mode with Body and garment, select the Body faces, keep the garment active, and enable Reference Faces Only. Detail Fit moves one single-user garment mesh. Data transfer, thickness preservation and accessory following do not run alongside it. It preserves topology and does not create finger pockets. Checks suppress moves that introduce detected intersections or collapsed faces, but do not guarantee removal of existing penetration or self-intersections. For unresolved areas, narrow the selection, restrict reference faces or adjust manually.
Snap and presets
In multi-object Edit Mode with Visible Meshes and Fit Selected Objects Together off, if no separate valid reference exists, only the active mesh moves; other edited meshes remain fixed references. With a separate valid reference, all selected sources can still fit independently to it. Choose Selected Meshes to always move only the active mesh.
Targets are Visible Meshes, Specified Object or Selected Meshes. Specified Object can be chosen with the eyedropper.
Snap Element is Surface, Edge or Vertex. Projection is Closest Point or Source Normal Project.
Direction filters, normal-side selection, Surface Offset, Search Limit, Snap Strength, Surrounding Falloff and Include Nearby Hits are available.
Fit Preset is Custom, Float (+3 mm), Inset (-3 mm) or Flush (0). Scene unit scale is considered; the preset changes settings and execution performs the move.
Proportional Follow is available for Mesh. Preserve Part Shape, Preserve Thickness and Thickness Search Limit are optional.
Preview and convenience tools
Preview Fit shows cyan movement lines and orange samples. Enter or click confirms; Esc cancels. Adjust Gap changes target-normal distance by horizontal drag, uses Shift for precision, confirms on click and restores on Esc.
Force Unmatched Points is used only when no target satisfies the normal restrictions; it uses the nearest target without avoiding intervening surfaces. If points jump to the wrong side, disable it and narrow the target and search distance. Accessories Follow Cloth moves small disconnected parts in the same Mesh. This follows position. Use rotation, scaling and object editing separately when the accessory also needs a different angle, size or attachment.
Mutual Fit
Enable Fit Selected Objects Together to fit selected edited Mesh objects to one another. F9 selects At A / At B / Middle; A is the active object and Middle averages corresponding positions. One-to-one original world positions are used, unmatched points stay in place, and the operation aligns positions without welding them. To create a connected mesh afterward, inspect the result and use Blender's join and merge tools as needed. Mutual fitting ignores surface projection, direction and offset, but uses Search Limit, Strength, fixed weights and falloff.
Copy data
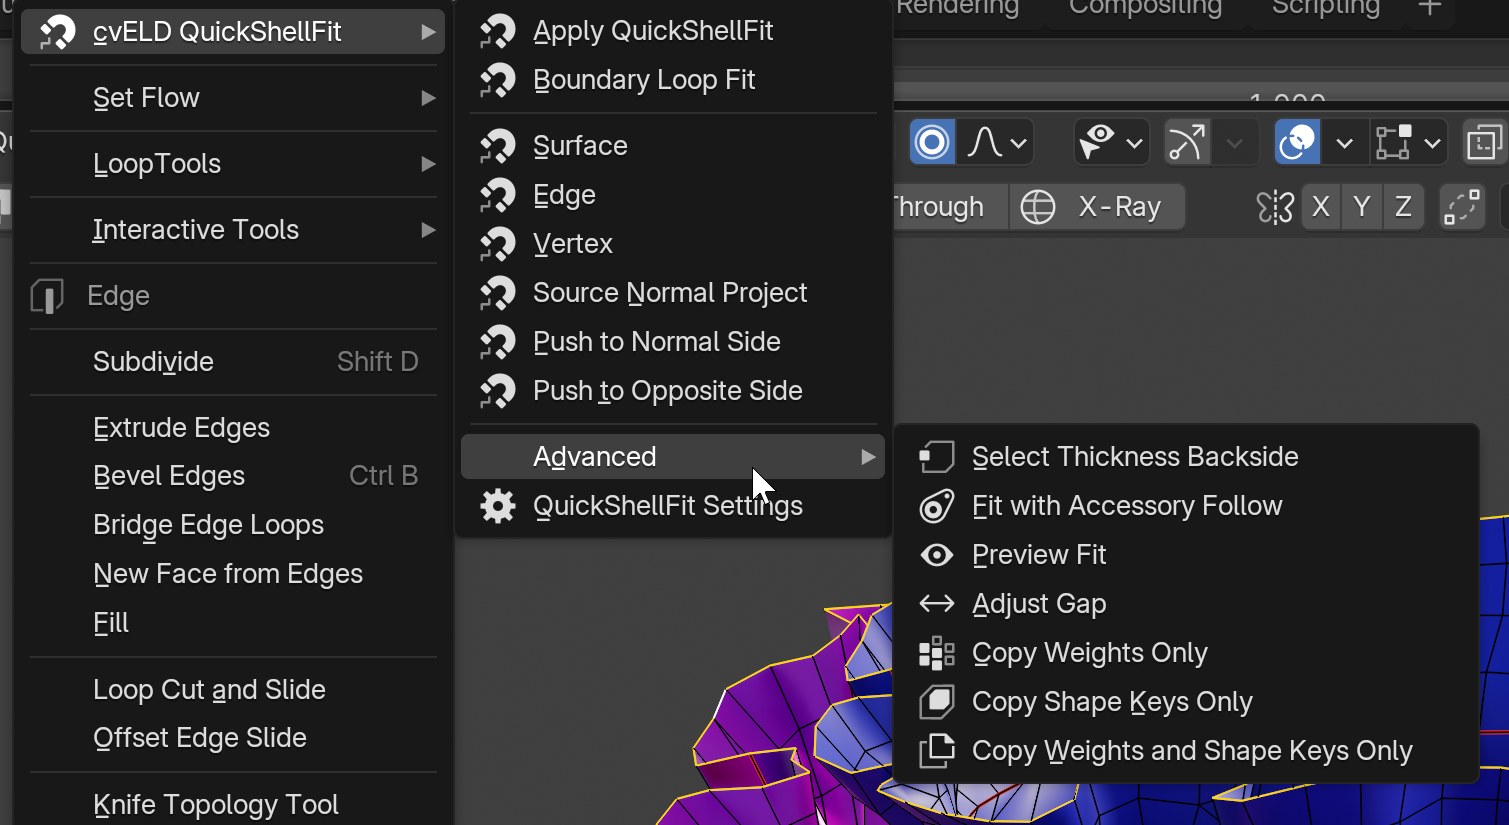
Enable Copy Weights or Copy Shape Keys to transfer data while fitting. To copy without moving geometry, use the right-click menu → cvELD QuickShellFit → Advanced and choose Copy Weights Only, Copy Shape Keys Only, or Copy Weights and Shape Keys Only. Copying requires matching source points and transferable data.
Use the context menu or sidebar for quick fitting. Advanced contains the copy-only actions. Click for the full-size image.
The primary transfer options are Weights, Shape Keys and Custom Normals. Open Advanced for UV maps, color attributes, seam/sharp edges, crease/bevel weights, face smoothing, named numeric/boolean attributes and Armature modifiers. Additional options default to off.
Custom normals and UVs interpolate per face corner. Edge and face attributes change only when all their vertices are in the copy range; other corners and components remain intact. Conflicting attribute types/domains are skipped with a warning. Internal attributes and material assignments are excluded. Nearby faces are matched approximately using face orientation and interior direction; inspect complex seams after copying. Copy Data Only leaves positions unchanged and also supports boundaries with different vertex counts.
Copy Weights / Copy Shape Keys transfers only to directly fitted selected points, interpolating from face triangles or edge endpoints. To copy to points moved only by falloff, select those points directly and run the copy action. Weight memberships are replaced; Shape Keys copy non-zero relative offsets while preserving other keys. Edit Basis, the starting shape, when copying shape keys. The operation stops for absolute or locked keys; use relative keys and check the relevant locks before retrying.
Copy Armature Modifiers requires weight copying and appends modifiers from the dominant donor. Existing modifiers for the same rig are retained rather than duplicated or overwritten. Set up rig parenting and animation drivers separately in Blender when needed.
Force Unmatched Points and Fit Selected Objects Together are enabled by default. Disable forced fitting to enforce the search limit. Mutual fitting requires Visible Meshes or Selected Meshes and selected points on multiple edited meshes. Disable mutual fitting for ordinary snapping with fixed targets.
Boundary Loop Fit: close gaps between garment parts
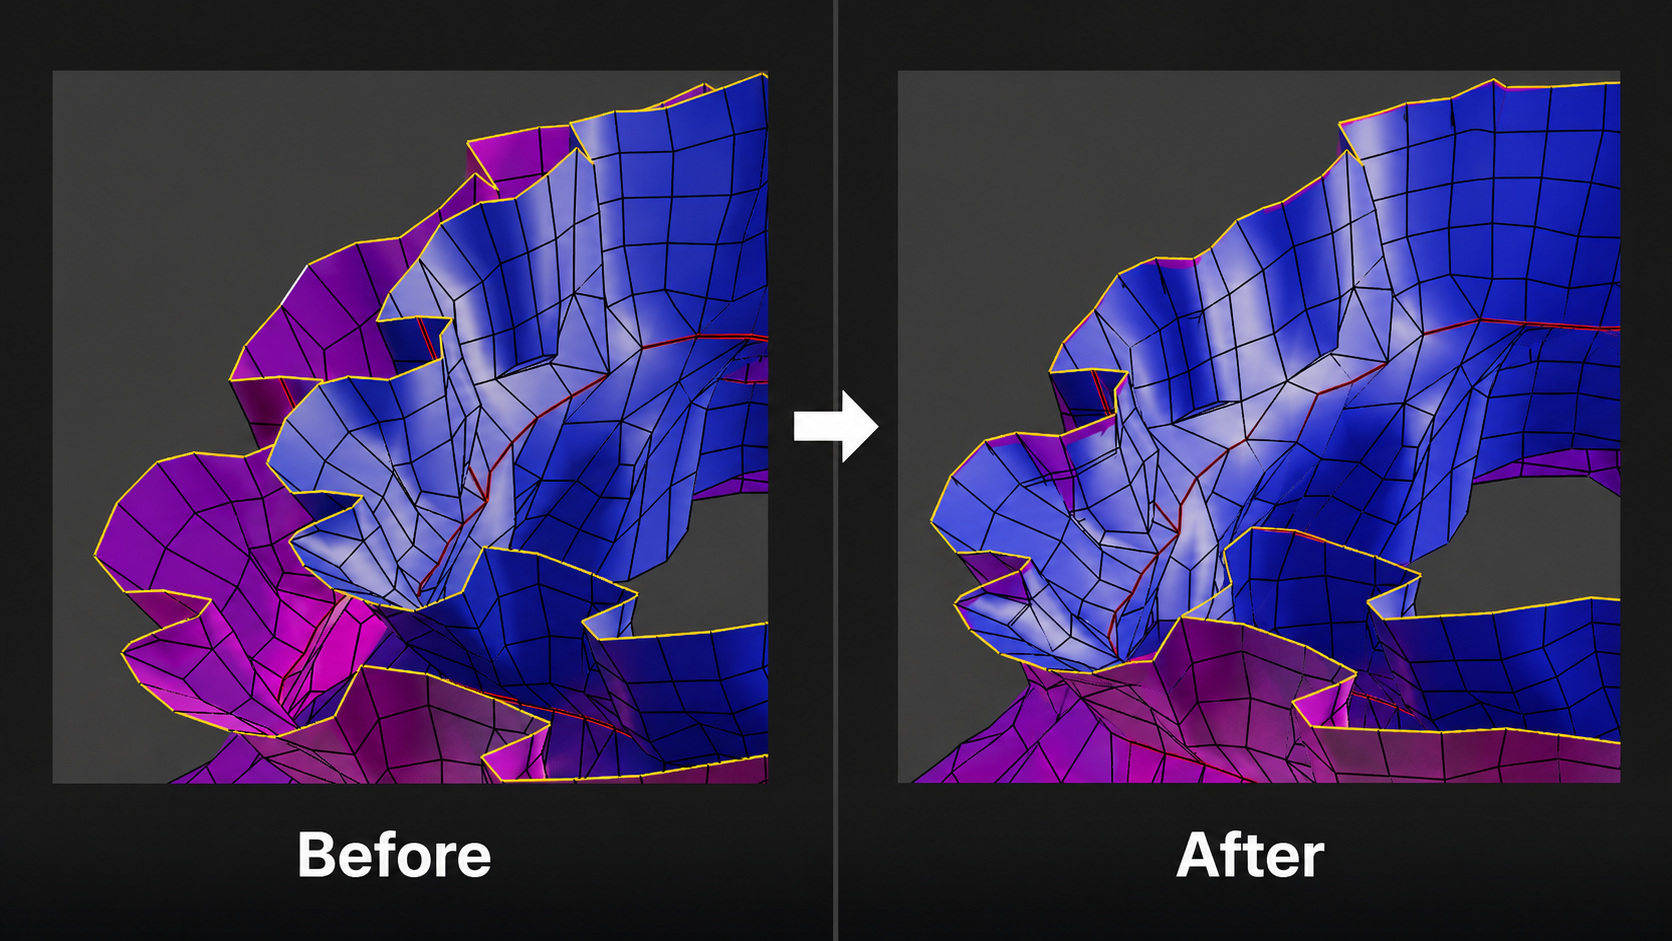
Use Boundary Loop Fit to align garment boundaries. In mesh Edit Mode, select a corresponding boundary loop or connected boundary chain on each mesh, then run Boundary Loop Fit. Missing A/B references are assigned from the current selection. Unequal counts use ordered arc-length interpolation onto points along the other boundary's edges. Mixed open chains and closed loops are approximated with a warning. Vertices, edges, faces and closing edges are retained: this does not weld objects, and differing tessellations can leave small residual gaps.
Before on the left, after Boundary Loop Fit on the right. This AI-edited illustration, based on the supplied screenshots, explains closing gaps between garment parts. Mesh details differ from the originals; refer to the source screenshots for the exact result. Source screenshots: Before / After
Data transfer and protection
Data Transfer — Body to Cloth
The collapsed Data Transfer panel under Specified Objects → Surface Fit transfers data from the fitted Body to Cloth, independently of the selected moving role. The panel is headed Body to Cloth and the action is Copy Body Data to Cloth. Enable Copy Weights, Copy Shape Keys and Copy Custom Normals. Additional attributes and Armature modifiers are in the panel’s Advanced foldout.
Sampling is Surface Interpolation, Edge Interpolation or Nearest Vertex.
Copy Range Group is a Cloth vertex group. Empty means the non-hidden range; a name selects positive-weight vertices.
Copy using the baked fitted positions. The Data Transfer panel is hidden during live editing, so confirm the fit first.
New Shape Keys start at value 0. Existing values and the active key remain; drivers and animation are not copied. Existing modifiers for the same rig remain.
The destination is the primary Cloth. To copy to several garments, assign and transfer to each one in turn. Transfer runs only when requested, so setup and rebuild leave the copied data alone. If Cloth shares mesh data with other objects, make its data single-user first. If Body vertex or face changes invalidate the transfer correspondence, repair that correspondence before retrying. Object Mode and Mesh Edit Mode are supported, with mode and selection restored.
Protection Mask
Paint areas such as a sleeve's volume or a decoration that you want to leave in place. Use a gradual weight transition at the boundary to blend the protected area into the surrounding deformation.
Protection Mask excludes painted vertices from deformation. Normally weight 1 is fixed; unassigned vertices and weight 0 deform normally. Intermediate weights proportionally reduce deformation. Invert changes the effect without changing painted values: Weight 0 is fixed and Weight 1 deforms normally. The mask is used by Surface Fit, Selection Follow Fit and Quick Shell fit output.
Left: select the area; center: paint the Weight Paint mask; right: the protected vertices remain excluded from deformation. Use intermediate weights at the boundary to blend between the protected and moving areas.
Use Protect Selection, Unprotect Selection and Smooth Mask in Edit Mode. Paint Mask enters Weight Paint. Finish with the checkmark in the panel header (Finish Painting); fit updates wait during painting and resume afterward. The trash icon deletes the protection mask. End a Selection Follow Fit preview first. Use editable mesh data belonging to this object alone (single-user). If duplicates share its data, make the mesh single-user before painting.
Limit Group limits the processing range and effect amount; Protection Mask fixes points. They are separate controls and can be used together.
Settings
Look up the result you want to change, such as more spacing or less movement in nearby areas. Defaults are starting points; automatic setup and presets can change them. Check the values currently shown, then adjust one at a time to see its effect.
Distances use Blender scene units. Visible fields change with Specified Objects / Selected Geometry, Fit Quality, Fit Type and the Deform / Reference roles.
Item
Range / default
What it changes
Deform / Reference
Body / Cloth role buttons
Deform is the object that moves; Reference is the target. The internal behavior names are Body Moves / Cloth Moves. First decide whether to move the garment or the skin. If the wrong side moves, check these roles.
Fit Type
Auto / Shell / Solid Auto default
Thin surface, thick closed shape or automatic detection. Start with Auto if unsure. Try Shell for thin fabric or Solid for a thick, closed part.
Clearance
Default 0.001
Distance left from the reference surface. Start with the automatically measured value. Increase it for more space from the surface, or reduce it if the result floats too far away.
Strength
0.0–5.0, default 1.0
Shell push multiplier. Start at 1.0. Lower values reduce the push; higher values increase it. Reduce it if the result moves too far.
Search Radius / Wrap Distance
0 or higher, default 0.03
Shell search distance or Solid enclosure distance. Increase it to find surfaces farther away. Reduce it if the fit catches a nearby unrelated part.
Smooth Iterations
0–32, default 4
Boundary smoothing steps. Increase this when the corrected boundary looks angular. Reduce it if small details become too rounded.
Refine Passes / Cover Passes
0–10, defaults 3 / 4
Additional Cloth Moves corrections. Start at 3 / 4 and increase for remaining contacts or exposed skin. More passes take longer to recompute.
Close Gaps
Off by default
Closes gaps for Cloth Moves when Fit Type is not Solid. Enable this for fabric floating away from the body. Reduce Gap Blend as well when you want to retain looseness.
Broad Rough Align displacement. Lower Alignment Amount to stay closer to the original shape. Higher Shape Smoothness blends movement more broadly and can soften small bends. Alignment Offset changes the target distance. Start at 1 / 0.35 / 0.
Follow Target Edits / Alignment Reach
On / 0 (unlimited) by default
Follow target edits and limit search reach. Leave follow enabled while editing the reference. If distant surfaces attract the fit, replace 0 (unlimited) with a smaller reach.
Shape Key Name
Default ShellFit
Name for Shape Key output; ignored for mesh output. Use a recognizable result name. Turn off Overwrite Same Name to retain an existing key.
Fit Amount / Follow Range
1.0 / 0.1 by default
Selection Follow Fit attachment and surrounding follow. Lower Fit Amount for less movement at the selection. Increase Follow Range to blend farther out, or reduce it when unrelated areas move. Range 0 affects only the selection.
Bulge Amount / Asymmetry / Reach
1.0 / 0.3 / 1.5 by default
Standalone bulge property defaults; Start Bulge chooses actual starting values from the preset. Start with a preset: Amount controls the rise, Asymmetry shifts its balance, and Reach sets how far it spreads from the edge. Lower Reach if the bulge extends too far.
Protection Mask
ShellFit_Protect
Weight Paint mask for excluding vertices from deformation; Invert reverses the effect. Weight 1 fixes an area, 0 allows normal movement, and intermediate values blend the effect. Lower weights when too much of the mesh stays fixed.
Auto Parameters on Setup
On by default
Automatic starting values during Setup. Start with this enabled on a new model. Disable it when you want to use manually chosen starting values.
Disable Target Solidify
On by default
Disables target Solidify during setup only. This temporarily omits the thickness added by Solidify when taking the reference. Compare with this disabled if you want to fit to the thickened shape.
Troubleshooting
Mixed tight and loose parts, and layered clothing
Use Close Gaps to pull tight-fitting areas toward the body. Reduce Gap Blend for loose areas while correcting body penetration; correction remains active at 0% attraction. For skirts, also adjust Preserve Skirt Opening. The intended tightness is not detected automatically, so adjust garments or regions separately. Batch fitting shares settings: fit garments with different intended results, such as underwear and outerwear, separately.
For layered clothing, inspect underwear against outerwear as well as skin against fabric. Garment-to-garment collisions need a separate finishing pass with a lattice or manual editing. Fully fixed vertices also stay still during penetration correction, so start by reducing attraction rather than fixing vertices when you only want more looseness. View the result from several angles to find hidden intersections before finishing.
Symptom
Check this
Body / Cloth cannot be assigned
1. Choose two different Mesh objects. 2. Check that both are editable. 3. If duplicates share mesh data, make the target object's data single-user before continuing.
Penetrating is 0 or the result is not visible
1. Check the Deform / Reference roles. 2. Review Fit Type and the actual overlap between skin and fabric. 3. Check Search Radius and the weighted area of any Limit Group.
Rough Align does not fix small contacts
Use Rough Align for the overall silhouette, then choose MAX for small contact corrections. SDF Grid is another option for closed-body volume fitting when its requirements are met.
SDF is unavailable
1. Check Blender 5.2 or later. 2. Set Cloth to Deform. 3. Check that Body is closed with consistent outward normals. On 4.5 or another setup without SDF, continue with MAX or Rough Align.
Selection Follow Fit will not start
1. Enter Edit Mode on the Deform mesh. 2. Select the vertices, edges or faces to fit. 3. Assign a separate reference mesh, then press Live Adjust.
Quick Shell fit has no matching points
1. Check target scope and Snap Element. 2. Review direction and Search Limit. 3. If you still want to use the nearest target, try Force Unmatched Points. Disable it and narrow the scope if points jump to another surface.
Processing is slow
Try Coarse or Medium for the initial placement, and narrow the affected region with a vertex group or Selection. MAX, SDF and dense models can take longer, so leave fine correction until the broad adjustment is ready.
The baked result is not visible
1. Check the saved Shape Key value. 2. Inspect other active keys. 3. Check modifier order. Before retrying with Mesh (Destructive), save your file and check the stage you can return to with Undo.
If you are still stuck, include the exact Blender version, OS, GPU, vertex counts, settings, steps leading to the issue and complete error text in your report. A screenshot of the problem helps show where the workflow went off track.
Changelog
Unreleased
Added Show in Right-Click Menu under Preferences → General. Disable it to hide QuickShellFit from mesh and curve Edit Mode context menus. It defaults to enabled and takes effect the next time a menu opens. Use Save Preferences to retain the setting after restarting Blender.
1.3.4 — Bulge placement and automatic setup
From Contact Areas remains available alongside the separate Dent with an Object mode. This update adds generated guides, automatic starting values and deformation smoothing, improves guide unlinking and avoids redundant idle calculations. Leftover attributes are preserved when starting a new preview. Additional references are retired in favor of the shared Reference slot.
Selected numeric operations use the bundled native backend on Windows x64 / CPython 3.13, with a Python fallback on other supported environments. Save and finish or cancel previews before updating. Restart Blender when updating the native binary.
1.3.3 — Preserve thickness through dense cuff walls
Penetration Inspector documentation: added highlight meanings, the unavailable Inside result for open bodies, change monitoring, and automatic/manual correction steps. Recorded sock, skirt and bulge demonstrations and no-effect Bulge advice are also documented.
Fixed the reproduced case where a densely divided closed part kept its rim thickness but collapsed in the middle. Automatic search now uses thickness already detected within the same closed part to search again for an actual inner-wall hit. Protected vertices, separate parts and manually specified search ranges remain respected.
Enable Preserve Shell Thickness at 100%, set Shell Thickness Search to 0 (automatic), and recompute. 50% retains half the detected thickness; 0% or disabling preservation brings both layers toward the surface and removes their spacing. Existing relief is not flattened. Cuff, Subdivision and Undo/Redo checks passed on Blender 4.5.0 and 5.2.1; SDF and save/reopen/recompute checks passed on 5.2.1. Existing open-seam and negative-scale limitations remain.
Updating: save your working file, cancel unfinished fitting and install 1.3.3. Re-run the fit and inspect the result. Existing baked shape keys are not repaired automatically. The marketplace HTML is now an English-only sales body; the full manual remains English/Japanese.
1.3.2 — Preserve Mirror seams
Fixed seams opening and nearby vertices crossing toward the mirror plane or merging unexpectedly when Surface Fit or Bulge deforms a half mesh. Protection remains active when Strength changes, and Bulge confirmation uses the protected displacement. Switching to or recomputing Rough Align refreshes the deformation method and Mirror settings.
Updating: save your working file and cancel unconfirmed fitting before installing 1.3.2. Then run Surface Fit or Bulge again and inspect the seam. Previously baked shape keys are not repaired automatically.
Recompute after changing Mirror axes, merge distance, merge enablement, assigned Mirror Object, visibility or stack configuration. Transforms of an already assigned Mirror Object remain live. Push evaluates before Mirror and Armature. If an older file contains both Surface Fit and Bulge previews, use the order Bulge → Push → Mirror. If confirmation stops after manually reversing the order, recalculate Bulge to restore the order and inspect its preview.
Validated scope: one merging Mirror, including combinations of X/Y/Z and a Mirror Object, with no intervening deformation before Mirror. Arbitrary multiple oriented Mirrors, Bisect and removal of all self-intersections or body penetration are not guaranteed. Tested on Blender 4.5.0 and 5.2.1; support remains 4.5.0 to below 5.3.0.
1.3.1
Local glove and sock fitting: Added QuickShellFit Detail Fit with Follow Fingers and Wrap Together modes for selected areas. Preview the result wire and unresolved vertices, then confirm or cancel from the panel. This preserves topology and does not guarantee removal of existing intersections or preservation of thickness.
Automatic references and target detection fixes: Missing QuickShellFit target and A/B references are assigned from the current selection. In multi-object Edit Mode with Visible Meshes, mutual fitting off and no separate valid reference, only the active mesh moves; the other edited meshes become fixed references. Fixed cases where valid references were rejected with No valid target geometry.
Boundaries with unequal vertex counts: Extended the boundary fitting introduced in 1.3.0 to interpolate onto the other boundary along its arc length when vertex counts differ. Mixed open chains and closed loops are approximated with a warning. No vertices or faces are added or removed, and objects are not welded; different tessellations may leave small gaps.
Custom normals and attribute transfer: Added custom normals to QuickShellFit and Body-to-Cloth data transfer. The three primary options are Weights, Shape Keys and Custom Normals. UV maps, color attributes, seam/sharp edges, crease/bevel weights, face smoothing, named numeric/boolean attributes and Armature copying are grouped in a collapsed Advanced section. Additional transfer options default to off.
Multiple pie menus for the whole tool: Assign Surface Fit, Selection Follow Fit, Lattice, Bulge, Data Transfer, Protection and other commands alongside QuickShellFit. Preferences now provides add, duplicate, rename and remove controls, category-based command search, an eight-direction layout and a shortcut for each pie. Existing pie and shortcut settings are retained; new pies start without an assigned key.
Automatic thickness and clearance fixes: Improved thickness detection to avoid treating sleeve or sock cavities, disconnected parts and isolated folds as the thickness of the whole garment. Edge length is no longer used as a thickness fallback. Measurements avoid the live fit deformation, and solid fitting with no penetration no longer retains an outdated clearance.
Modifier warnings and bulk actions: Added a display for modifiers affecting shape, thickness or topology and for unfinished live work in Surface Fit and Bulge. Apply All / Discard All processes the listed items, excluding Subdivision Surface and Armature. Ordinary warnings allow fitting to continue; conflicting unfinished live work on a participant requires confirmation or cancellation.
Bulge spike fixes
For nearly planar closed openings, contact directions are derived from the opening shape even when a folded rim faces upward. This reduces isolated deformation and spikes. Very narrow seam-like slits with almost coincident sides are excluded from opening detection. No vertices are added or welded; curved hems and open edge chains retain their local calculation. This does not eliminate faceting from coarse meshes or guarantee an intersection-free final shape.
Confirm or cancel live work before installing the update. Existing baked shape keys are not changed automatically; start Bulge again to inspect the updated result.
1.3.0
Added QuickShellFit Boundary Loop Fit to align garment boundaries and close gaps. Use corresponding boundaries with equal vertex counts, both closed loops or both open chains.
Expanded the UI to ten languages, selected through Blender's language settings. Untranslated items appear in English.
Added support for Blender 4.5.0 and later. Use MAX or Rough Align on 4.5; SDF Grid is available on Blender 5.2 or later when the required nodes are available.
Added illustrated guides for the QuickShellFit pie menu (default Ctrl+Shift+1), weight and shape key copying, and boundary fitting. Added a pre-bake example for aligning a high-poly mesh to a low-poly mesh for Painter.
Revised the Japanese and English full and quick manuals with task-oriented explanations, visible effects of parameter changes, adjustment tips, and ways to return to an earlier state before and after confirmation.
1.2.0
Documents object/selection workflows, role switching, selection follow, live lattice fitting and range updates, protection masks and multiple garment registration. Supports Blender 4.5.0 through versions below 5.3.0. Unsupported SDF settings are retained, with guidance to choose another quality for recalculation.
1.1.0
Added Coarse, Medium, Fine, High Detail and MAX Fit Quality choices with Rough Align.
Organized Specified Objects Surface Fit, Squeeze Bulge, batch garments, and gap, hem and ornament preservation.
Added Selected Geometry pages for Selection Follow Fit, Quick Shell fit and Adjustment Lattice, with confirm/cancel live editing and Proportional Follow.
Updated cvELD QuickShellFit snapping, Preview, Mutual Fit, forced matching and weight, Shape Key and Armature copying.
Added Body to Cloth Data Transfer and the Weight Paint Protection Mask with inversion and selection tools.