When a model curves away from you, selecting the whole loop should not mean selecting only the half you can see. cvELD X-Ray X-Loop lets you select through the model with box, circle, and lasso gestures, follow screen or world directions, pick loops by clicking, use paint masks, and move components with one consistent workflow.
髪の毛やチューブのように、同じ流れが長く続くメッシュでは、1本ずつループを追うより「この流れを全部」と選ぶほうが早いことがあります。Edit Meshでエッジへカーソルを置き、Ctrl + Shift + E を押すと、その場所から続くストランドの仲間をまとめて選びます。
Nパネルには Grow Along The Flow(選択済みの流れをさらに伸ばす)、Select The Mirror Too(オブジェクトのローカルX / Y / Zのどれかで鏡像側も選ぶ)、Thin The Loops(一定間隔で残す)の3つがあります。ストランドを横切る向きで選びたいときは、操作後の調整項目にある Cross を使います。
Isolate The Selection は Blender の Local View に似ていますが、初期設定では視点を動かさず、ライトとライトプローブを残します。選択を孤立表示したあと、追加・除去アイコンで対象を出し入れできます。ライトだけが選択されている状態では、モデルが消えるだけなので実行しません。動作は Keep The Lights While Isolated と Isolating Moves The View で変更できます。
The Pie Resets The Tool Settings は初期オフです。オフなら、パイで頂点・エッジ・面を切り替えても、貫通・方向・角度・間引き設定はそのままです。オンにすると、キーボードショートカットと同じくSelect X-Rayの既定値へ戻します。
Two core tools: select by direction, or detect and move
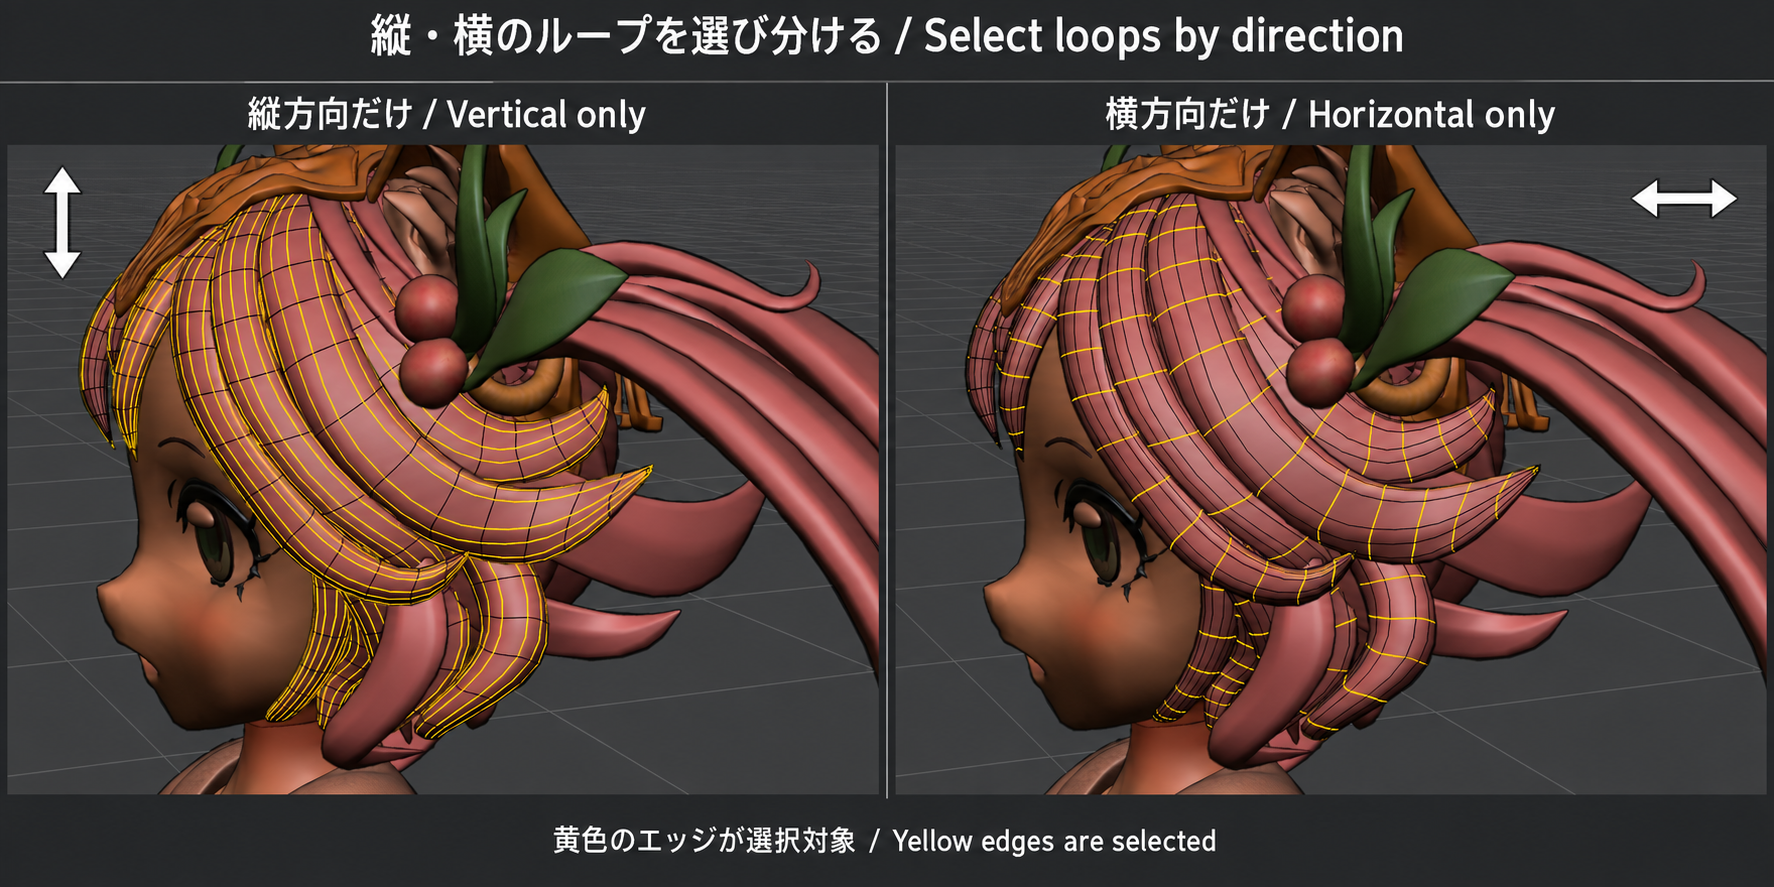
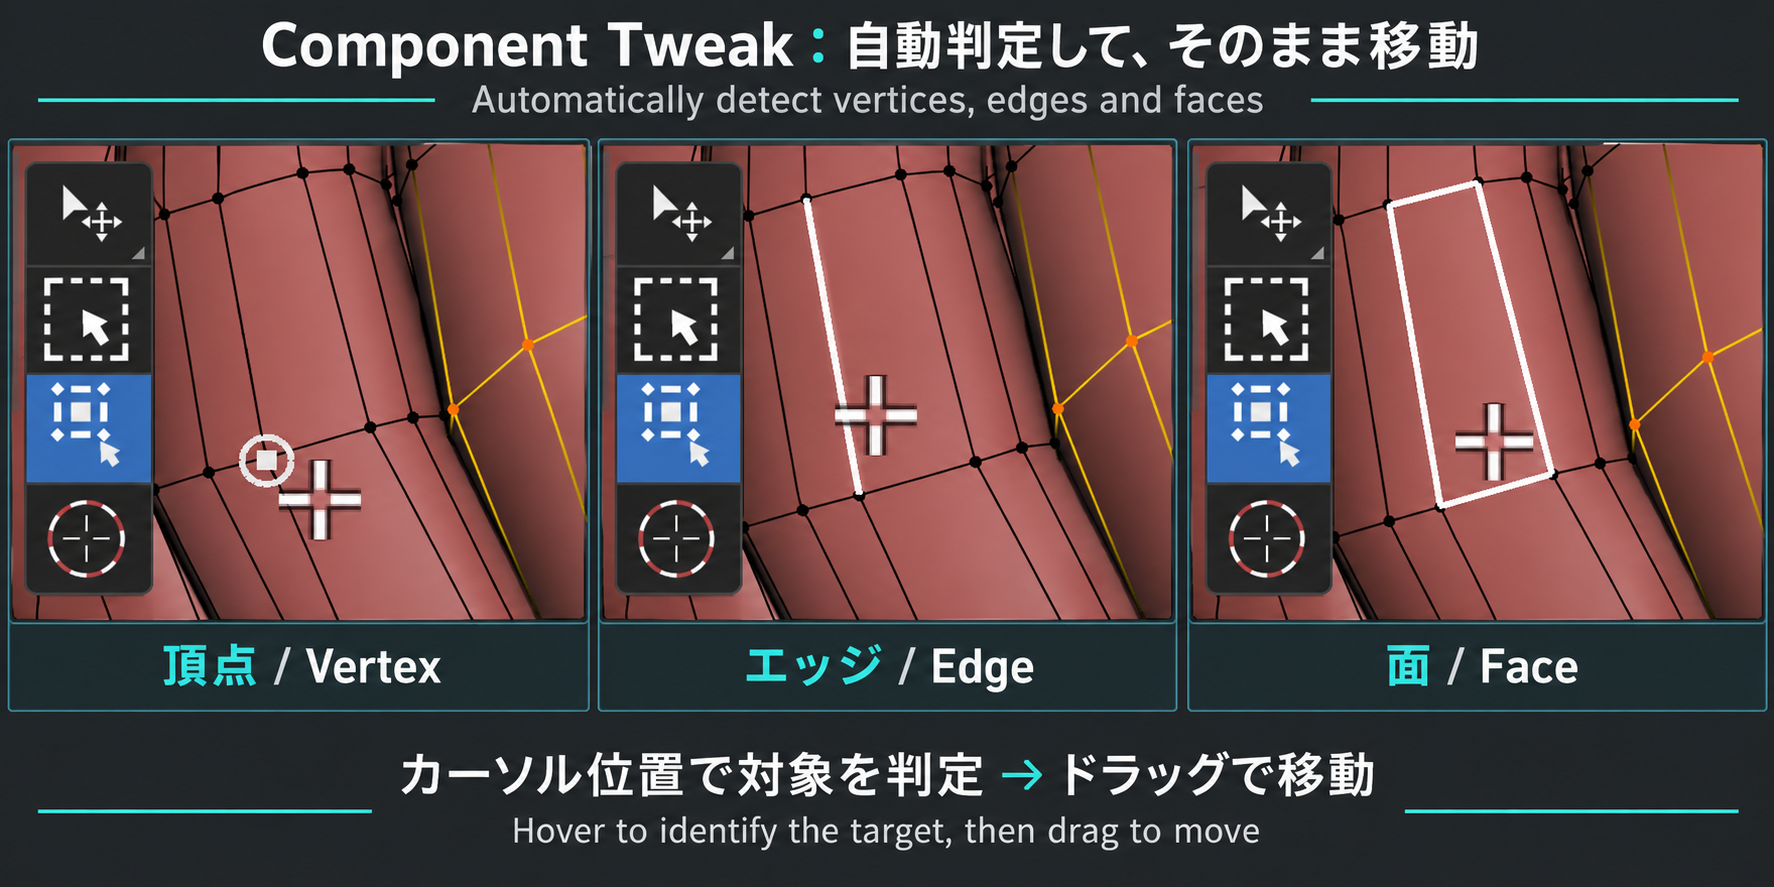
Select X-Ray separates vertical and horizontal loop selection. Component Tweak is equally central: it automatically detects vertices, edges, and faces beneath the cursor, then lets you drag to move the target. Refine components without repeatedly switching their type.
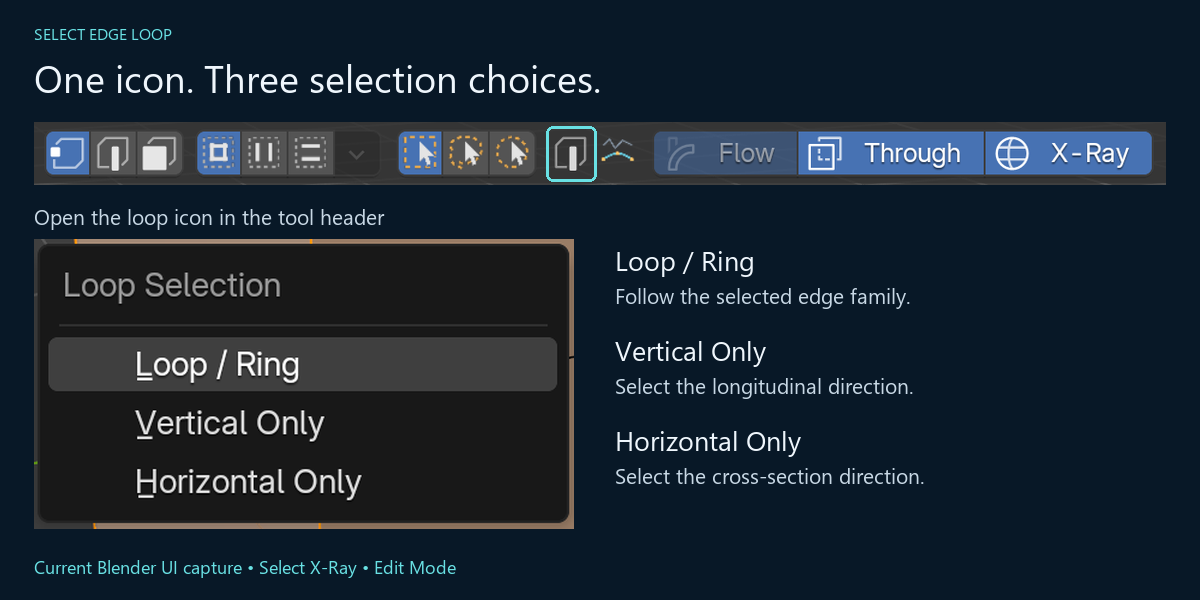
Select only vertical or horizontal loops. Yellow edges are selected.Automatic vertex, edge, and face detection. The white hover indicator identifies the target before dragging to move.Select Edge Loop: one loop-selection icon with three compact choices — Loop / Ring, Vertical Only, and Horizontal Only.
Component Tweak starts with Through and X-Ray both off. Enable them in its header when needed. These defaults are independent of Select X-Ray. Saved per-tool choices are preserved.
cvELD X-Ray X-Loop treats a mesh like fabric with a vertical and horizontal grain. It finds the connected flow you mean, even when the surface curves around the back of a character, tube, or strand of hair.
“X-Ray” has two separate meanings here. The selection calculation can reach the far side, while the viewport may or may not be made transparent so you can see that side. You can therefore select through a solid-looking model, or turn the visual aid on while dragging.
For a first test, select one loop with Select X-Ray, change its direction, and then try thinning it. Changing one idea at a time makes the result easy to read.
Supported modes
Blender mode
What you can do
Object Mode
Use object-region selection, isolation, and component keys that can take you into Edit Mode. Objects have no front/back surface for direction filtering.
Edit Mesh
Select vertices, edges, and faces by region or click; select loops, strands, and mirrored edges; thin loops; and move, rotate, or scale components.
Weight Paint / Vertex Paint
Keep the selection as a Blender mask for brushes and Weight Set, with an optional line overlay for selected loops.
Texture Paint
Pass the result to the face mask read by Texture Paint brushes.
Paint modes are about choosing the working area. The add-on does not directly write weights, vertex colors, or image pixels.
Tip for fitting clothing to a body: Keep the clothing and body topologies—how their vertices, edges, and faces are arranged—as similar as possible. When the two mesh road networks follow each other, loop selection and flow-based movement can follow the same places more reliably. Where their topology differs greatly, changing a parameter alone cannot make one surface automatically snap to the other.
Install, update, and open
Requirements
Blender 4.5.0 or later.
Development hardware check: Blender 5.2.0 LTS.
No extra Python packages are required.
Install
Zip the add-on folder as cvELD_XRay_XLoop.zip.
Open Edit > Preferences > Add-ons > Install from Disk.
Select the ZIP and enable cvELD X-Ray X-Loop.
Return to a 3D View and restart Blender if the old module is still in memory.
Before updating, save the working .blend and any shortcut JSON. Disable the old add-on, install the new ZIP, and enable it again. Blender stores the add-on preferences.
Open the panels
Move the pointer over a 3D View.
Press N.
Open the X-Ray X-Loop tab.
The sidebar has four tabs: Select X-Ray, Component Tweak, Display, and Pie Menu. Add-on Preferences also provide a Shortcuts tab for the preset selector, JSON import/export, and shortcut rows grouped by feature.
First use
Select a loop in Edit Mesh
Select a mesh and enter Edit Mode.
Press Ctrl + Alt + B.
Drag a region over the mesh. The default shape is a box.
Release the mouse button to commit the selection.
The default reaches the far side and follows the mesh flow. Use the header buttons for Vertical Loops, Horizontal Loops, or Whole Region.
Create a paint mask
Enter Weight Paint, Vertex Paint, or Texture Paint.
Make sure the required mask is active. With automatic masking on, the add-on enables it after the tool becomes active.
Press Ctrl + Alt + B and drag the region.
Use Blender’s brush after checking the selection.
Weight and Vertex Paint start with the Whole Edges domain. The selected edge ends also become the vertex mask that the brush can read. Texture Paint uses a face mask.
Select X-Ray
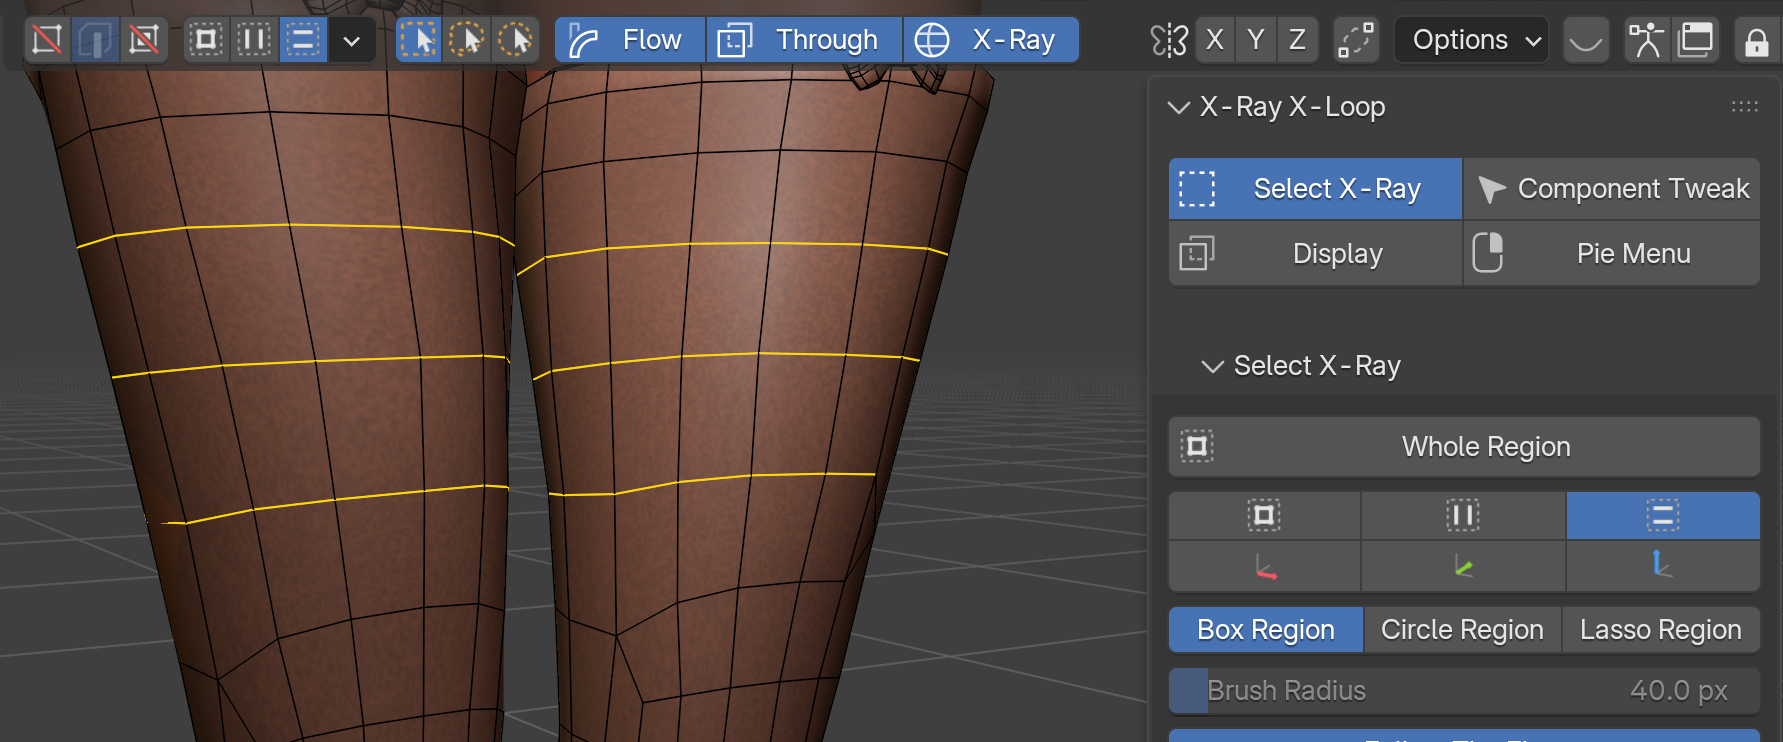
Horizontal loop selection with Flow, Through, and X-Ray controls in the header.
Select X-Ray combines a region shape, an optional direction filter, flow following, and through-selection in one tool.
Region shapes
Shape
Best for
How to choose it
Box Region
Fast, predictable selection across a straight area.
Default; box header button.
Circle Region
Painting over separate areas like a brush.
Circle header button; wheel changes the radius while dragging.
Lasso Region
Diagonal or irregular areas that a box cannot describe.
Lasso header button or L before the drag.
Direction, flow, and through-selection
Setting
What it means
Default
Whole Region
No direction filter; use the active Blender selection domain.
Default axis
Vertical / Horizontal Loops
Keep edges that read as vertical or horizontal on screen.
—
World X / Y / Z
Keep edges along a world axis, independent of the current view.
Header or sidebar choice
Follow The Flow
Follow topological connectivity instead of only the screen axis.
On
See Through
Include candidates on the far side of the model.
On
X-Ray While Dragging
Show transparency only for the gesture, then restore the starting view.
On
See Through changes what is selected. X-Ray While Dragging changes what is visible. Either can be used without the other, and the viewport state is restored after commit, cancel, errors, or add-on removal.
Angle Tolerance
Angle Tolerance is the allowed lean from a screen axis. It ranges from 1–45 degrees, with 35 degrees as the default. Lower values reject more diagonal edges; at 45 degrees, the two direction bands meet.
Stop the flow
When flow following is on, Seam, Sharp, and Border can act as walls. All three are off by default.
Gesture keys
Input
Action
Tab
Cycle Whole Region → Vertical → Horizontal, or World X → Y → Z.
L
Cycle Box → Circle → Lasso before the drag.
X
Toggle See Through.
F
Toggle Follow The Flow.
Wheel
Change the circle radius, from 4–500 px; default 40 px. Each wheel step uses a 1.15 multiplier.
Shift
Add to the existing selection.
Ctrl
Flip the selection state of what the region catches.
Shift + Alt
Subtract what the region catches.
Ctrl + Alt
Keep the intersection with the existing selection.
Esc or right mouse
Cancel the current gesture.
The no-modifier action is configurable as Set, Extend, Subtract, Difference, or Intersect; Set is the default. The held modifiers temporarily override that choice.
Preview and temporary transparency
Preview While Dragging is on by default. It draws the edges that would be selected before you release the mouse, so you can judge Angle Tolerance and Follow The Flow by eye.
Ctrl + Alt + X is the default hold-to-see-through shortcut. After about 0.2 seconds of holding it, the viewport becomes transparent; its check timer runs every 0.05 seconds. Release the key to restore the previous display. This is a short inspection key, separate from the drag-time X-Ray aid.
Thin loops
Setting
Meaning
Range / default
Skip Loops
How many loops to drop after each kept loop. 0 keeps all, 1 keeps every other, and 3 keeps 1st, 5th, 9th.
0–10000; default 0. The slider is easy to use near 10, while larger values can be typed.
Start From
Which position in that cycle is kept. With Skip Loops=3, 0 keeps 1st, 5th, 9th; 2 keeps 3rd, 7th, 11th.
0–10000; default 0.
The unit is a connected edge loop, not an individual edge. Order follows the screen, starting near the drag origin; a loop family wrapping around a cylinder is counted around the ring. Edit Mesh also has a Thin The Loops panel for applying the same operation to an existing selection.
Relax and loop shaping: 17 tools
1.0.6: Selection fixes
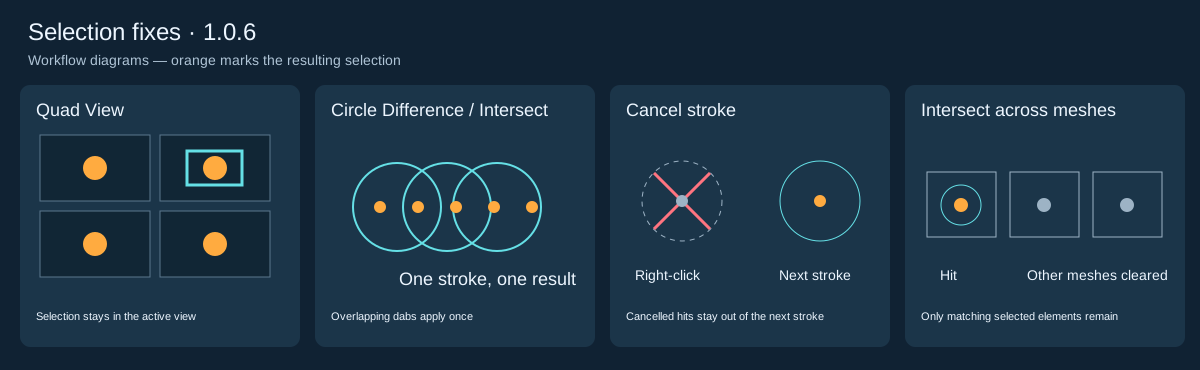
Select X-Ray targets the view you use in Quad View. Circle Difference and Intersect apply once to the whole stroke. Right-click cancels its pending hits. In multi-object Edit Mode, an Intersect click also clears nonmatching selection in other meshes; clicking empty space clears the selection.
Schematic overview of the corrected selection behavior.
1.0.3: Find Loop Shaping at a glance
Choose Select X-Ray in Edit Mode, then open the wide Loop Shaping button. Its icon and name make the menu easy to find.
Fixes misplaced or oversized header artwork and exposed coloured markers. The icon and label use a standard Blender button.
In Edit Mode, select vertices for Relax Plus or one edge direction for loop shaping. Use the N-panel or header Loop Shaping menu. Hover over an individual tool for a square three-second MP4; pointer movement or clicking dismisses it. Enable Blender tooltips. Division Count uses a numeric popup; adjust other operations with F9.
Preferences → Shortcuts includes Relax Plus / Loop Shaping. Standard Relax Plus defaults to Shift+R. Surface Relax and all fifteen shaping tools start unassigned. Assign each row independently and save Blender Preferences.
Press Ctrl+Alt+R for the dedicated pie: eight groups of icons give direct access to all seventeen tools. Hover over the cards below for three-second results.
Blender Smooth
Smooth all selected vertices with Blender’s standard smoothing.
Surface Relax
Spread clustered vertices over the original surface while protecting corners. This is surface redistribution, not exact volume preservation.
Directional Smooth
Smooth the selected loop direction to refine the flow.
Even Ring Spacing
Redistribute cross sections along the strip for more even spacing.
Curvature Density
Move existing sections toward stronger bends without changing their count.
Width
Adjust the width of selected sections.
Taper
Blend the section size from root to tip.
Section Shape
Reshape suitable sections into a circle, box or star. Use enough vertices for the profile.
Interpolate
Blend intermediate sections between the end shapes.
Follow Guide
Align the flow to a chosen curve or wire guide.
Twist
Rotate sections progressively along the flow.
Crease
Adjust the depth of longitudinal ridges and grooves.
Straighten
Straighten selected rows while retaining their endpoints.
Flatten
Bring selected rows onto a common plane.
Arc
Bend selected rows into an arc.
Division Count
Change the number of divisions on compatible strips. Adjust the count in the popup or redo panel.
Surface Align
Slide cross sections along existing edges to align their height without flattening thickness. Curved faces may change slightly.
Select the intended surface for Surface Relax. Corners, boundaries and connectivity constrain redistribution; exact volume or equal edge lengths are not guaranteed. Section Shape needs suitable section selections. Division reductions depend on topology; shape keys and Multires can prevent count changes. Best effort processes compatible parts and leaves the rest unchanged.
Surface Align
Select edges across hair strands or fingers. View Horizontal aligns their level without flattening thickness. In F9 choose Automatic Levels, Together, Per Island, Per Selected Loop or By Distance. Per Selected Loop separates fingers joined at a palm. Vertices slide only along their original longitudinal edges and stop before crossing the next row. Ambiguous junctions stay fixed. Curved faces may change; exact volume preservation is not guaranteed.
Select multiple cross-section rows at once. Selected neighbouring rows still provide sliding rails. Consecutive rows stay separate, with limited travel to prevent crossing. Unsupported vertices stay in place while compatible parts continue. A no-change result finishes normally so you can adjust the operation in F9.
Surface Align: multiple selected rows
A three-second demonstration on a real hair mesh with multiple cross-section rows selected. Uneven rows slide along the original longitudinal edges to align their levels. Hover to play.
Need a loop selection? Choose a direction.
Open Loop Shaping from the wide, labelled button in the tool header. If no compatible shaping changes are found, a dialog offers Vertical Loops or Horizontal Loops from the current selection. Choose a direction and confirm to change the selection only, then run shaping again. Cancel keeps the selection. Unsupported connectivity or missing seed edges can still prevent a loop selection.
Need a loop selection? Choose a direction.
Three-second edited comparison of initial, vertical and horizontal selections on an MCP-created sample. These are actual operator results, not a continuous mouse recording.
Whole Strands
For hair or tubes, one long flow can be more useful than a single loop. Point at an edge in Edit Mesh and press Ctrl + Shift + E to select the whole strand family that continues from it.
The N-panel offers Grow Along The Flow (extend the current selection), Select The Mirror Too (select the local X / Y / Z mirror), and Thin The Loops (keep a regular subset). Use Cross in the redo controls when the across-the-strand direction is what you need.
Component Tweak
Component Tweak resolves the component under the pointer. A white highlight shows the answer before you click.
Clicks, double-clicks, and paths
Input
Action
Click
Resolve the nearest vertex, edge, or polygon in that order. The optional setting can make Blender’s select mode follow the resolved kind.
Double-click
Select the connected loop through the clicked component.
Ctrl + double-click
Select the edge ring across the clicked component. The ring modifier is Ctrl by default.
Ctrl + Shift + click
Add the path between the previous valid click and this one.
Alt + click
With Emulate 3 Button Mouse off, select a loop; Alt + Ctrl selects a ring, and Shift extends the result.
Selection modifiers
Shift, Ctrl, Shift + Alt, and Ctrl + Alt use the same configurable selection modes as Select X-Ray.
Through-click is still a cursor-neighborhood resolution, not a scan that selects every hidden element. Concave or parallel overlapping surfaces can make a deeper component hard to reach. Hover and click share the same candidate resolution, so the highlighted answer and the selected answer stay together.
Loop stopping rules
The loop defaults let you mark meaningful boundaries in addition to topology.
Stop At
The walk stops at
Seam
A UV seam crossing the walk.
Sharp
An edge marked Sharp.
Crease
An edge crease.
Bevel Weight
An edge carrying bevel weight.
Material Border
A material change between faces.
Selected Edges
An already selected edge.
Outside Selected Faces
The walk leaving the selected faces.
Border
An open mesh border.
UV Island
An actual UV island split, whether or not a seam was marked.
Setting
Meaning
Range / default
N-gon Loop Select
Continue through poles and N-gons when the turn is reasonable.
On / off; default on.
Loop Turn Limit
Turn allowed at a pole or across an N-gon.
5–89 degrees; default 60.
Turn Limit / Maximum Turn
Stop when any step turns beyond this angle.
1–89 degrees; default 45; switch off.
Stop at Hard Edges / Hard Edge Angle
Stop at a surface fold even without a Sharp mark.
1–179 degrees; default 40; switch off.
Width
Add this many loops on each side of the clicked loop.
0–64; default 0.
Skip / Skip Offset
Thin the loops gathered by Width.
Skip 1–64, offset 0–64; defaults 1 / 0.
Move, rotate, and scale
Drag a Component Tweak target to move it. Drag a selected component and the selection moves together; drag an unselected one and it is selected before moving. A click without travel remains a selection click.
Gesture
Action
Default
Left drag
Move the component or selection.
Enabled
Middle drag
Scale around the grabbed component. Over empty space, normal view orbit remains.
Enabled; middle mouse
Manipulator
Show one of Move, Rotate, or Scale handles.
Hidden
Slide and snapping
The default slide modifier is Shift + Ctrl. Dragging with it moves along one connected edge instead of the view plane.
With the header magnet off, holding Ctrl enables the snap elements selected in Blender’s header. Pressing or releasing Ctrl during a drag updates snapping immediately.
With the magnet on, Ctrl disables snapping while held. The saved magnet setting stays unchanged.
Increment, vertex, edge, edge center/perpendicular, face snapping, and Auto Merge are supported. Enable Blender’s Include Non-Edited to snap to other objects. Vertices and edges use candidates near the cursor; faces use the frontmost surface under the cursor. Volume, face center, individual face projection/nearest, and switching the snap base are not supported. The grabbed component remains the snap base.
Symmetry and UVs
The add-on follows Blender’s symmetry settings. Matching partners are found in the object’s local coordinates. Exact mirrored topology works; roughly symmetric shapes may have no partner. Axis vertices and already-selected partners are not moved twice. Multiple axes produce the corresponding mirror images. Topology Mirror is not handled.
Keep The Texture Still is off by default and available in Edit Mesh. When on, the add-on re-reads UVs from the pre-transform surface so the texture stays in place. It is exact near the original surface and increasingly approximate as vertices leave it.
Paint-mode masks
The add-on chooses the work area first, then leaves Blender’s brush to paint it. It converts edge-loop selections to a domain that each paint mode can read.
Mode
Domain
What is written
Weight / Vertex Paint
Whole Edges
Edges are primary; their endpoints become the vertex mask, and a face is selected when all of its edges are selected.
Weight / Vertex Paint
Edge Ends
Vertices are primary; edges and faces are rebuilt when their endpoints or vertices are all selected.
Texture Paint
Faces
The result is converted to the face mask read by Texture Paint brushes.
Turn Masking On For Me is on by default. Draw The Selection is also on, drawing selected loops as lines because Blender’s vertex mask is otherwise only a set of dots. Multiple objects in the same paint mode are processed together.
With Mirror, Subdivision, Multires, or Array, the surface you see can contain evaluated vertices that have no one-to-one source vertex. The add-on works against the base mesh and does not guess a destructive write-back to the evaluated surface.
Pie menu
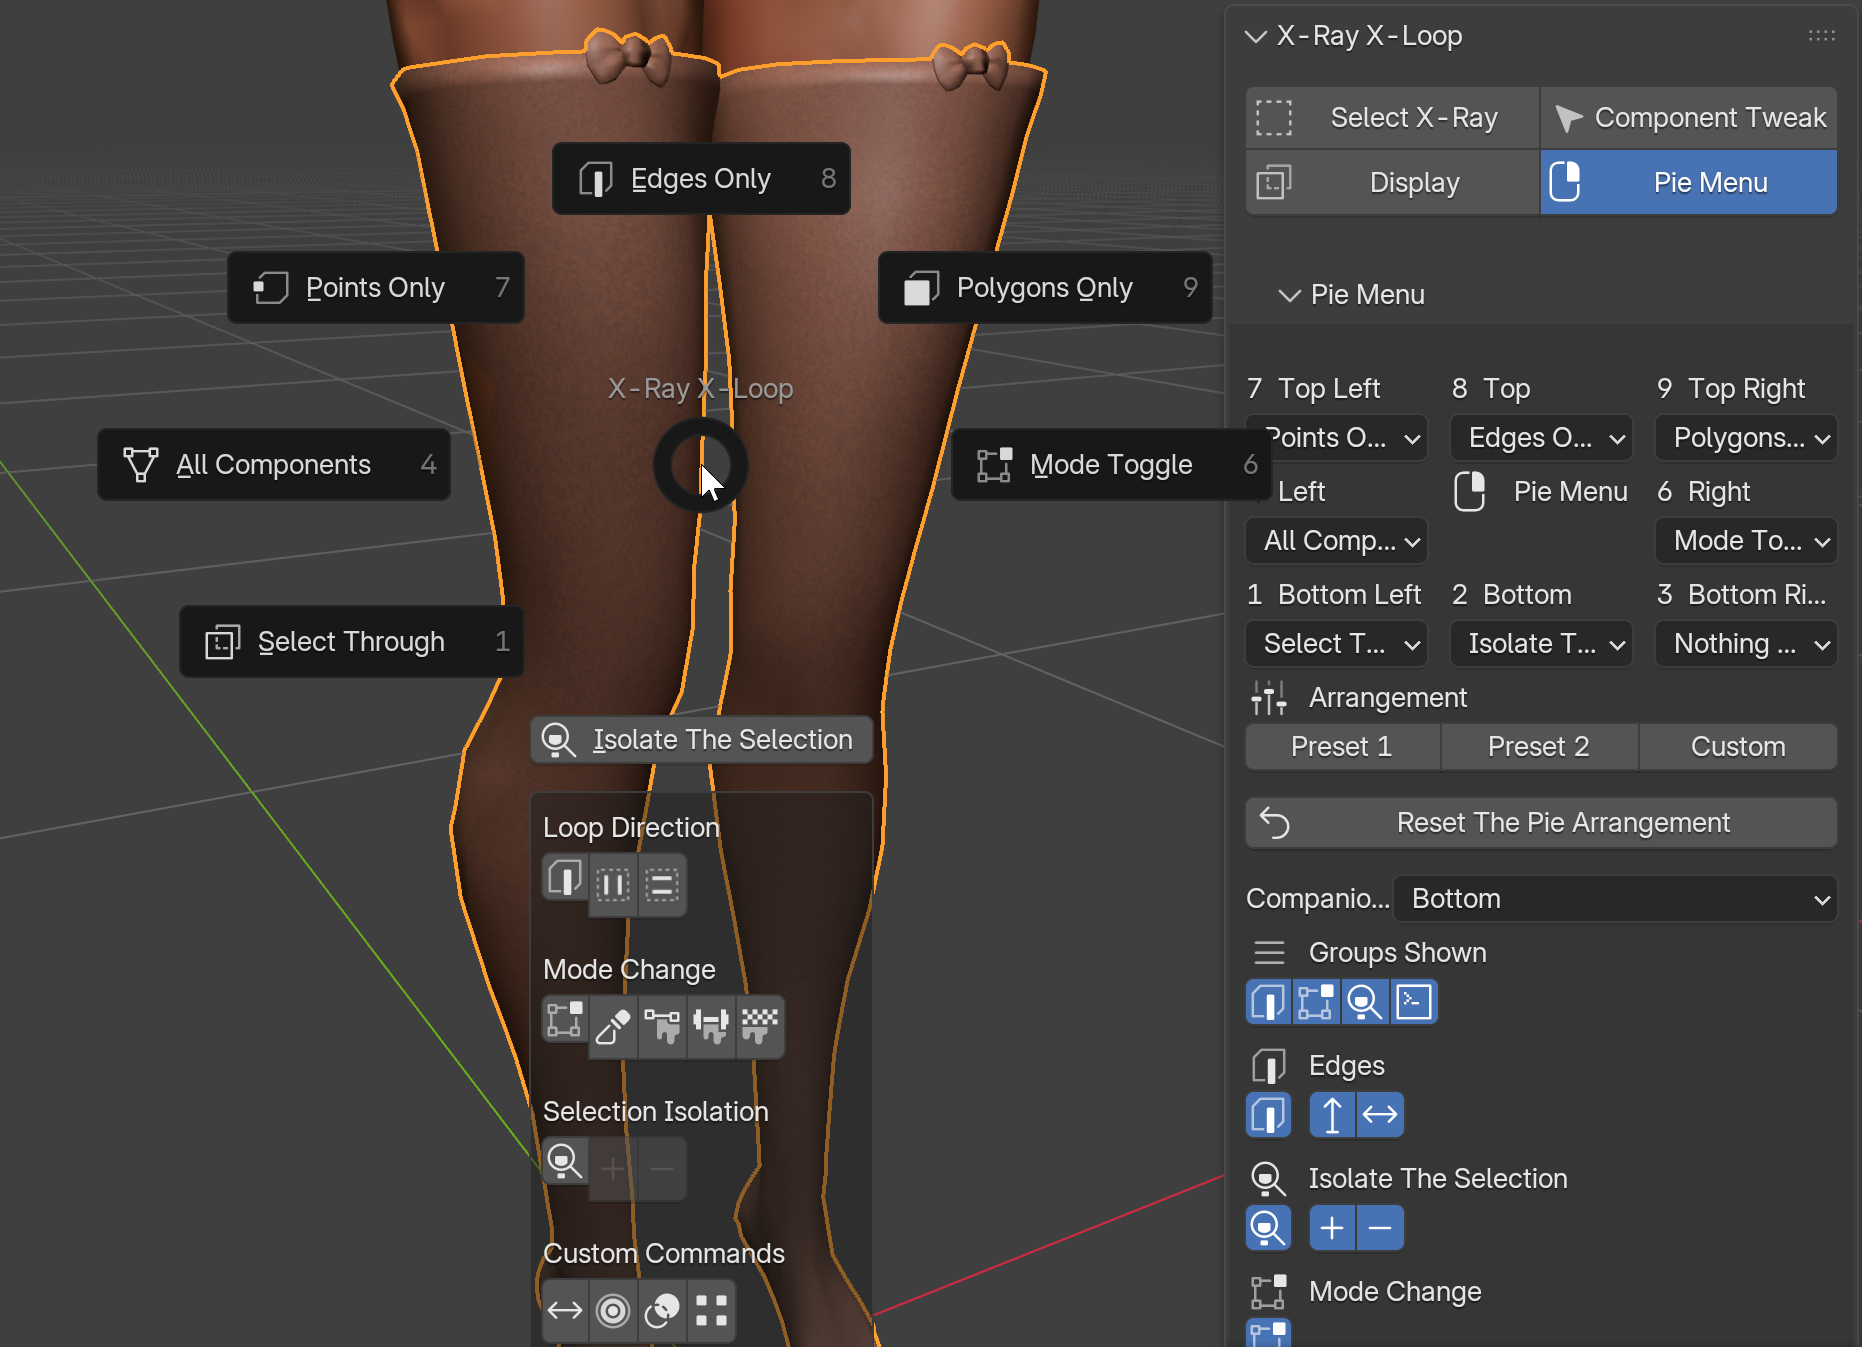
An eight-direction pie menu with layout presets and editable assignments.
Hold the pie button, flick toward a direction, and release. The default is Shift + right mouse; Industry Standard uses right mouse, and Blender uses Alt + right mouse.
Default layout
  7 Points Only       8 Edges Only       9 Polygons Only
  4 All Components            6 Mode Toggle
  1 Select Through     2 Isolate + panel  3 Nothing Here
Preferences and the sidebar Pie Menu tab show the eight choices in the same 3×3 layout. Reset Pie Arrangement restores the arrangement and companion-icon visibility without touching shortcuts or custom commands.
Companion icons
The default bottom slice carries a companion panel. It does not remove that slice’s own command: the command is nearer the center and the icons are farther out. The panel can show loop directions, object-type mode icons, isolate add/remove actions, and custom commands. You can hide a whole group, its subject command, or individual icons. Set Companion Panel to Nothing Here for eight plain slices.
Mode toggles
A mode entry enters the chosen mode; pressing it while already there returns to Object Mode. Mesh objects expose Sculpt, Vertex Paint, Weight Paint, and Texture Paint; armatures expose Pose; curves expose Curves Sculpt; Grease Pencil exposes Draw, Sculpt, Weight, and Vertex.
Custom commands
Each of four slots accepts one line of Python as typed in Blender’s console. Empty commands are hidden. Empty Button Text derives a name from the tool, operator, or assignment. Button Icon accepts Blender icon names such as MOD_BEVEL. The default icons are ARROW_LEFTRIGHT, PROP_ON, OVERLAY, and SNAP_VERTEX, in slots 1 through 4.
Commands run in the 3D View that opened the pie. A failed command reports a warning and console detail without stopping Blender.
Isolate The Selection
This is similar to Blender Local View. By default it leaves the view where it is and keeps lights and light probes visible. Companion actions can add or remove objects while isolation is active. Keep The Lights While Isolated and Isolating Moves The View change those choices.
The Pie Resets The Tool Settings is off by default. Off preserves through-selection, direction, angle, and thinning values when a pie entry changes component kind. On resets those Select X-Ray values like a keyboard component shortcut.
Settings reference
The active header/sidebar values describe the current tool. Add-on Preferences provide the defaults for new operations.
Selection Tools
Setting
Purpose
Range / default
Default Axis / Default Shape
Starting direction and region shape.
Whole Region / Box.
Angle Tolerance
Allowed lean from a screen axis.
1–45 degrees; default 35.
Skip Loops / Start From
Thin directional region results.
0–10000; defaults 0 / 0.
Selection Mode
Action when no modifier is held: Set / Extend / Subtract / Difference / Intersect.
Set.
Preview While Dragging
Show the projected selection before release.
On.
Highlight Under The Cursor
Show the next click target.
On.
Clicking Switches The Select Mode
Follow the clicked kind in Edit Mesh.
On.
N-gon Loop Select / Loop Turn Limit
Continue click loops through poles and N-gons.
On; 5–89 degrees, default 60.
Loop Select Defaults
Stops, angles, width, and click-loop thinning.
See the Component Tweak tables.
Component Tweak movement
Setting
Purpose
Default
Drag To Move Components
Enable left-drag movement.
On
Middle-Drag To Scale Components
Enable middle-drag scaling.
On
Scale Button
Button and optional Shift / Ctrl / Alt combination for scale drag.
Middle mouse; no modifier
Slide Modifier
Modifier for edge-rail movement.
Shift + Ctrl
Snapping
Shares Blender’s magnet and snap elements. Ctrl temporarily inverts snapping.
Scene settings
Manipulator
No Handles, Move, Rotate, or Scale.
No Handles
Keep The Texture Still
Preserve UV placement after Edit Mesh transforms.
Off
Display
Setting
Purpose
Default
See Through
Include far-side candidates.
On
X-Ray While Dragging
Show transparency during a gesture.
On
Actually Show The Far Side
Show or hide that transparency.
On
Turn Masking On For Me
Enable the mask used by the current paint mode.
On
Draw The Selection
Draw committed paint-mode selections as lines.
On
Show The Header When A Command Runs
Show the header in the command’s 3D View.
On
Group The Tools In One Toolbar Button
Put the two tools under one long-press button.
Off
Shortcuts
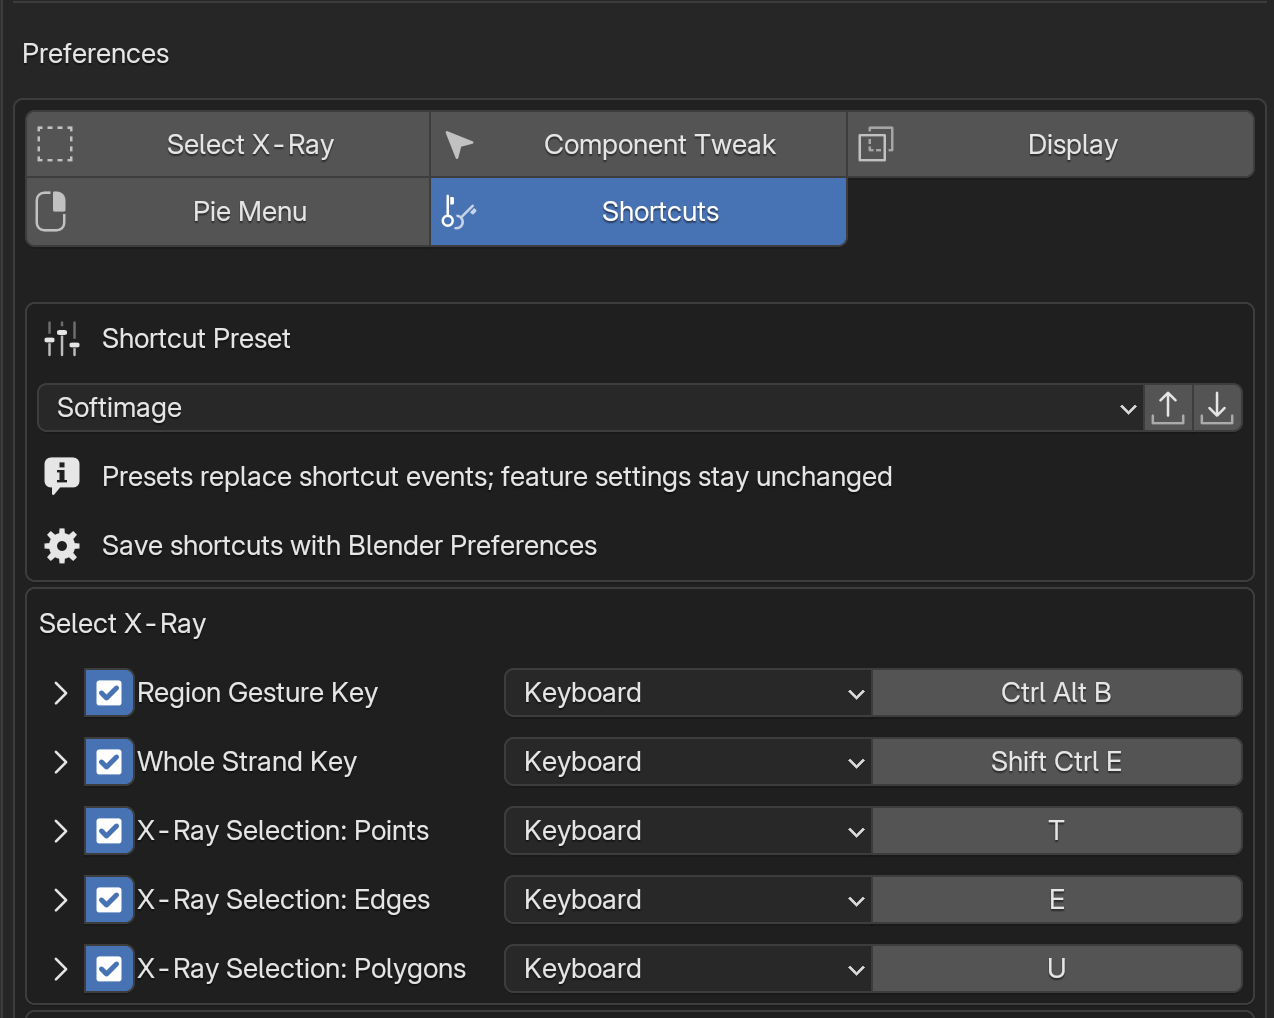
Shortcuts tab: Softimage, Industry Standard, and Blender presets, JSON import/export, and feature shortcut rows.
Preset
Main arrangement
Softimage
T / E / U for point / edge / polygon regions and M for Component Tweak.
Industry Standard
1 / 2 / 3 for point / edge / polygon and F8 for all components.
Blender
1 / 2 / 3 / 4 for point / edge / polygon / all components.
Unassigned
Set every binding to NONE and return the keys to Blender.
Custom
Your edited arrangement, ready for JSON export.
Open Preferences > Add-ons > X-Ray X-Loop > Shortcuts and choose a Shortcut Preset. Presets replace shortcut events while keeping feature settings. The Softimage preset maps T / E / U to point / edge / polygon X-Ray selection and M to Component Tweak. This supports familiar Softimage-style selection controls, rather than replacing all of Blender with Softimage.
Save Blender Preferences to keep shortcut edits. Use Export / Import for portable JSON files. Clear a shortcut row’s checkbox to disable that binding. Legacy automatic JSON saving is no longer the persistence method.
Individual keys and modifiers
The Shortcuts tab groups editable Blender keymap rows by feature. Expand a row for its event and modifiers; the preset selector applies a whole arrangement. Modifier choices are None, Shift, Ctrl, Alt, Shift + Ctrl, Shift + Alt, Ctrl + Alt, and Shift + Ctrl + Alt.
Function
Softimage default
Meaning
Select X-Ray
Ctrl + Alt + B
B is the region gesture; Ctrl + Alt is its modifier.
Whole Strands
Ctrl + Shift + E
Edit Mesh only; E is the strand key.
X-Ray selection / Component Tweak
T / E / U / M
T / E / U enter point / edge / polygon X-Ray selection; M enters Component Tweak.
See Through while held
Ctrl + Alt + X
Show transparency while the key is held, in any 3D View mode.
Selection modes
Set / Shift / Shift + Alt / Ctrl / Ctrl + Alt
Set with no modifier, then Extend, Subtract, Difference, and Intersect. Each binding is editable.
Path / Edge Ring
Shift + Ctrl / Ctrl
Click path / double-click ring. Path and Slide may share a combination because one is a click and the other is a drag.
Slide
Shift + Ctrl
Move along a connected edge.
Scale Button
Middle mouse
No modifier. Choose left, middle, or right mouse and optionally Shift / Ctrl / Alt.
By default, a component key also activates Component Tweak. From Object Mode it goes to Edit Mode; from Edit Mesh, Weight Paint, Vertex Paint, or Texture Paint it stays in the current mode. Each source mode can choose Stay Here, Go To Edit Mode, Go To Weight Paint, or Go To Vertex Paint.
Troubleshooting
Symptom
Check first
No tab or tool
Move over a 3D View, press N, and open X-Ray X-Loop. Confirm the add-on is enabled in Preferences > Add-ons.
No selection
Check the active tool, current view, layer toggles, selection mode, direction, and Skip Loops.
Far side is missing
Turn on See Through; turn on X-Ray While Dragging if you want to see the far side during the gesture.
Brush ignores the selection
Weight / Vertex Paint needs the vertex mask; Texture Paint needs the face mask. Enable automatic masking or the Blender mask button.
Paint surface cannot be picked
With Mirror, Subdivision, Multires, or Array, the base mesh cage is the writable target, not every evaluated surface vertex.
Q: Parts still stick out after adjusting parameters
A: A section whose clothing and body topologies do not match cannot be fitted automatically by changing a parameter. First bring the vertex, edge, and face flow closer together, then use a paint mode to fine-tune the mask. A small amount of protrusion can remain, so finish with manual vertex adjustment when needed.
Circle size
Select Circle and open its header popover, or use the wheel while dragging. The range is 4–500 px.
Return right click to Blender
Turn off Use The Pie Menu in the Pie Menu tab.
Updated pie layout is not visible
Saved Blender preferences override new defaults. Use Reset Pie Arrangement.
Deep concave click is hard
Component Tweak resolves a cursor neighborhood around the hit face. For deep concave areas, change the view or use Select X-Ray region selection.
Shortcut conflict
Review the shortcut settings in the relevant feature group and check whether cvELD XSI Dojo is also enabled.
Finishing note
Disclaimer: This add-on helps select meshes, create masks, and move components. It does not automatically conform clothing to a body, simulate cloth, or replace Shrinkwrap. Topology, modifiers, thickness, and curved surfaces can leave small protrusions; paint-mode fine-tuning and manual vertex adjustment may be needed.
Bug reports
Include the full Blender version and OS, GPU / VRAM / display backend, mode, settings, reproduction steps, warnings, and a minimal .blend when possible.
Changelog
1.0.6 — 2026-10-09
Quad View selection uses the clicked region and its view; the gesture outline stays in that region.
Circle Difference and Intersect apply once to the complete stroke, including repeated passes over the same elements.
Intersect clicks clear nonmatching selection across edited meshes; clicking empty space clears the selection.
1.0.5 — 2026-10-02
Combined the 1.0.4 shortcut and Object Mode activation fixes with removal of generic settings backup and restore. Ordinary presets and Blender Preferences saving remain available.
1.0.4 — 2026-10-01
Fixed shortcut preset application after changing the input device.
Added an initially unassigned Object Mode: Activate Select X-Ray command.
1.0.3
Made Loop Shaping easier to find with a wide native menu button containing its icon and name.
1.0.2 — 2026-09-29
Fixed the undersized Loop Shaping header icon introduced in 1.0.1.
1.0.1 — 2026-09-29
Replaced the custom header overlay with native Blender icon rendering to fix misplaced or oversized artwork.