An add-on specialized in drawing precise ink lines in real time over Blender's 3D screen. This guide covers installation, basic use, line types, output, and troubleshooting.
cvELD_QuickINK · Version 1.0.0 · Blender 4.5.0+ · Author: Land-Y
cvELD Quick INK is specialized in drawing precise ink lines in real time. By checking the lines while modeling, you can adjust the shape before line-art problems accumulate, reducing rework and letting the model and its line art develop together.
Getting started
Ten Suzanne comparisons illustrate the main features, with enlarged details and relevant controls. Click any figure to open it at full size. All examples are actual Blender 5.2.1 captures; the captured UI is Japanese and the annotations are bilingual.
Line settings, layer toggles, target assignments, and applied use-case settings are stored with the scene in the .blend file.
JSON Save / Load is useful for moving a look between working files.
Draw handlers and GPU caches are runtime state. When a file is opened, the handler state is synchronised with the saved On/Off values.
Save the working .blend and JSON settings before a major settings change or add-on update.
Install, update and uninstall
Requirements
Blender 4.5.0 or later. The add-on metadata also declares 4.5.0 as the minimum.
Verified in a real session: Blender 5.2.1 / OpenGL.
No extra software is required.
Supported computers
Requirement
Details
Verified environment
Blender 5.2.1 / OpenGL / NVIDIA GeForce RTX 5090.
Required GPU capability
An OpenGL environment where Blender's GPU API provides compute shaders and image load/store. RT cores, CUDA, and Tensor cores are not used.
RTX purchase guideline
Desktop NVIDIA GeForce RTX 2060 (6 GB) class or newer. This is an estimate based on OpenGL 4.6 and the required shader capabilities; the RTX 2060 itself has not been tested.
GPUs other than RTX
AMD / Intel GPUs that provide the same OpenGL capabilities may also work, but only the RTX 5090 has been tested in this repository.
Having a GPU alone is not enough to determine compatibility. The add-on calculates lines with a GPU overlay and compute shaders, so it requires an OpenGL environment that provides the required GPU capabilities. Display speed also depends on GPU performance and VRAM when scenes or viewport resolutions become large.
RTX 2060 is used as the purchase lower-bound guideline because NVIDIA's official specifications list OpenGL 4.6 support for that GPU, which is consistent with the OpenGL shader capabilities used by this implementation. This is an API-based estimate, not a tested compatibility guarantee.
Open the panel
After installation, start Blender and move the mouse over a 3D View.
Press N to open the sidebar and select the Quick INK tab.
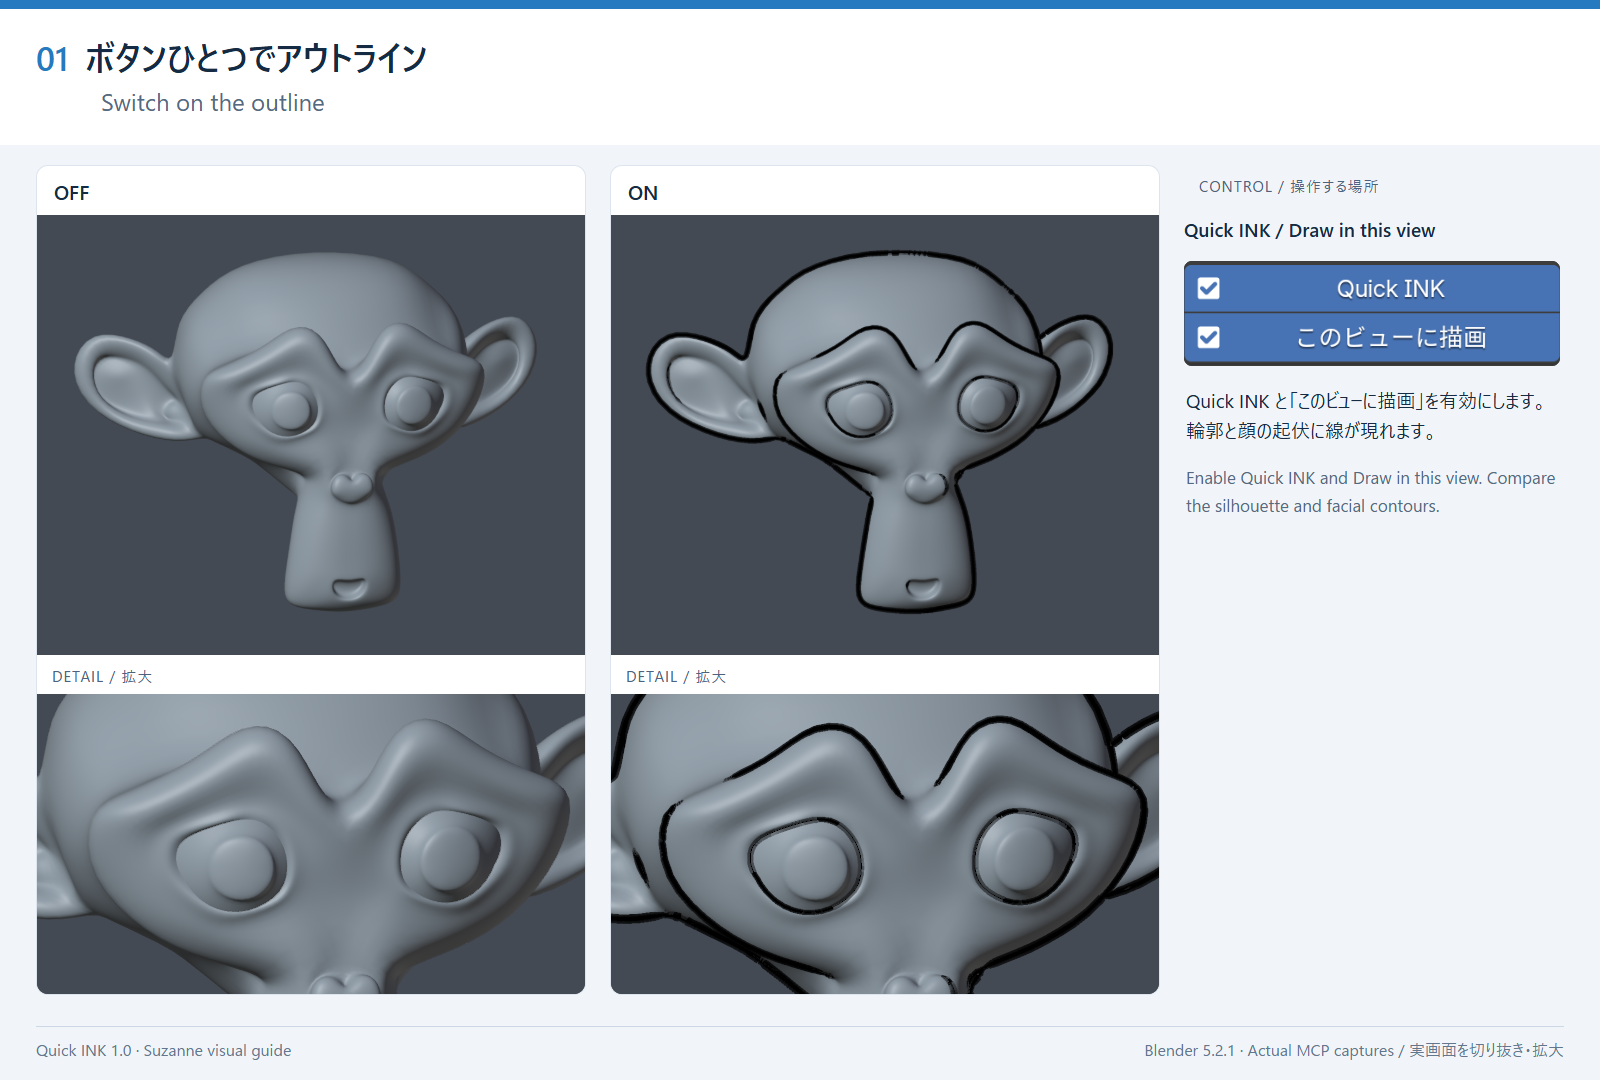
Turn on Quick INK and Draw in this view to display lines in that view.
01 · Switch on the outline — Enable Quick INK and Draw in this view. Compare the silhouette and facial contours. Click to open at full size
Installation
Prepare the cvELD_INK ZIP supplied with the add-on.
In Blender, open Edit > Preferences > Add-ons > Install from Disk and select the ZIP without extracting it.
Search for and enable cvELD_QuickINK.
In a 3D View (the 3D screen), press N and confirm that the Quick INK tab is available.
Update
Save the working .blend and JSON settings.
Install the new ZIP from the same Install from Disk dialog.
Disable and re-enable the add-on; restart Blender when the update is substantial.
Uninstall
Disable cvELD_QuickINK in Preferences.
Use the add-on removal action in the Add-ons screen.
The distribution ZIP and project source folder are not removed automatically.
User guide
Basic workflow
In a 3D View (the 3D screen), press N and open Quick INK.
Turn on Quick INK. To draw in another 3D View, enable Draw in this view there too.
Choose one use-case preset in Simple mode (the easy view).
Adjust width, color, density, taper, and other controls.
Switch to Advanced Mode when you need detailed control.
Quick INK can be shown or hidden separately in up to four 3D screens. The display settings at the top right also have a switch for the current screen.
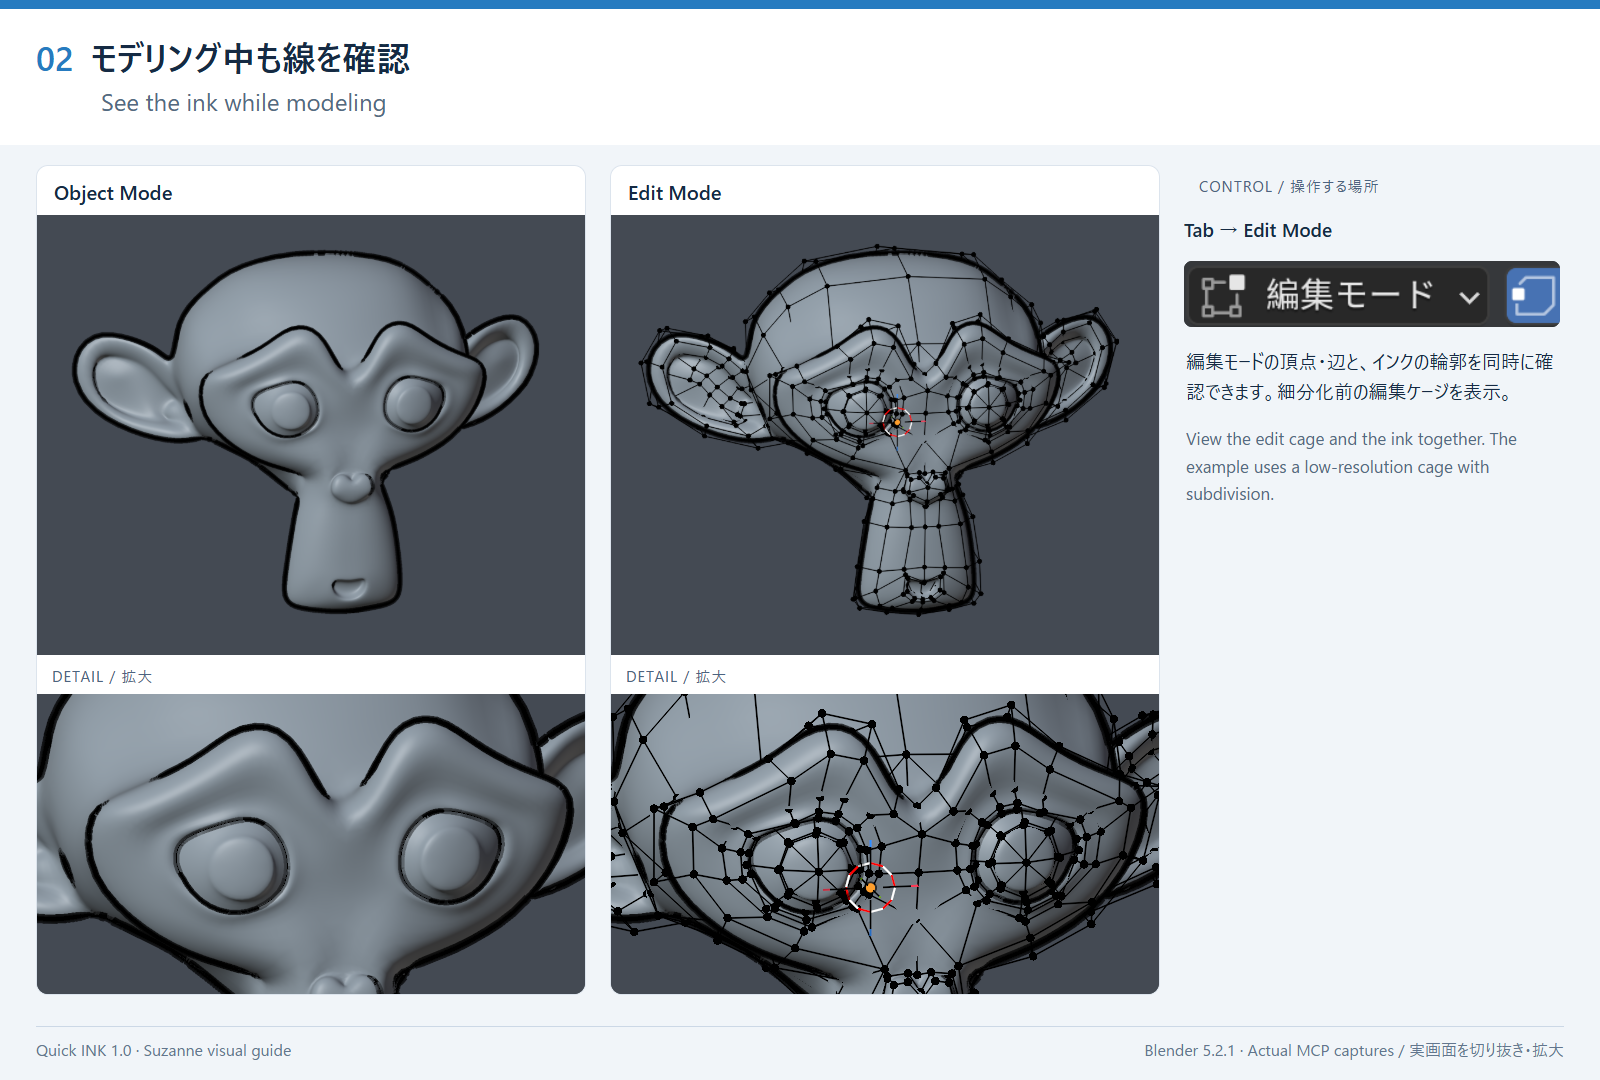
02 · See the ink while modeling — View the edit cage and the ink together. The example uses a low-resolution cage with subdivision. Click to open at full size
Simple / Advanced
Display
Use it for
Simple
Choose common settings with a short workflow. Start here.
Advanced
Change lines, targets, output, and other details. Use it after you are familiar with Simple.
Advanced properties
Press Advanced Mode in Quick INK to control the line look and targets in detail. Most changes appear on screen right away. Change one item, check the result, and then change the next one.
Lines controls how lines are made, Object controls one object, Output saves images, and Other contains checks and baking tools. Settings for one line layer do not change the other layers.
Lines: INK basics
Property
What it changes and when to use it
Quality
How finely lines are sampled. Higher is cleaner but slower. Lower it only when the scene is too heavy.
Base Width
The scene-wide base width in pixels. Start here when all lines should be thicker or thinner.
Line Size
Absolute keeps the chosen pixel width. Relative scales it with the screen resolution around 1080p.
Direction
Choose Both / Inner / Outer to place silhouette lines inside, outside, or on both sides. Interior lines are not affected.
Min Width
Stops very thin lines from becoming too faint. 0 disables the floor.
Tip Fade
Uses opacity instead of width when a line tip becomes thinner. Use a smaller value to keep tips solid.
Outline Floor
Minimum outline width for objects marked Keep Outline or Silhouette Only. 0 leaves it at the base width.
Outline Density Floor
Minimum darkness for those protected outlines. 0 disables it.
Color / Opacity
Scene-wide line color and opacity. Per-type colors can override these in Line Details > Line Look.
Suggestive Contours
Finds view-dependent shape changes such as cheeks or cloth folds that are not silhouettes or creases.
Threshold
How easily Suggestive Contours appear. Higher gives fewer lines; lower also catches gentle curves.
Ridges
Adds raised areas as well as valleys. It shows more shape but creates more lines.
Sharp Crease
Creates lines from the real angle between faces. Useful when a crease flickers or becomes dotted.
Min Angle
Smallest face angle treated as a crease. Lower values catch gentle bevels but may add lines to curved surfaces.
Shade Match
Keeps only creases that also match a shading change. Higher values reduce false lines on smooth faces.
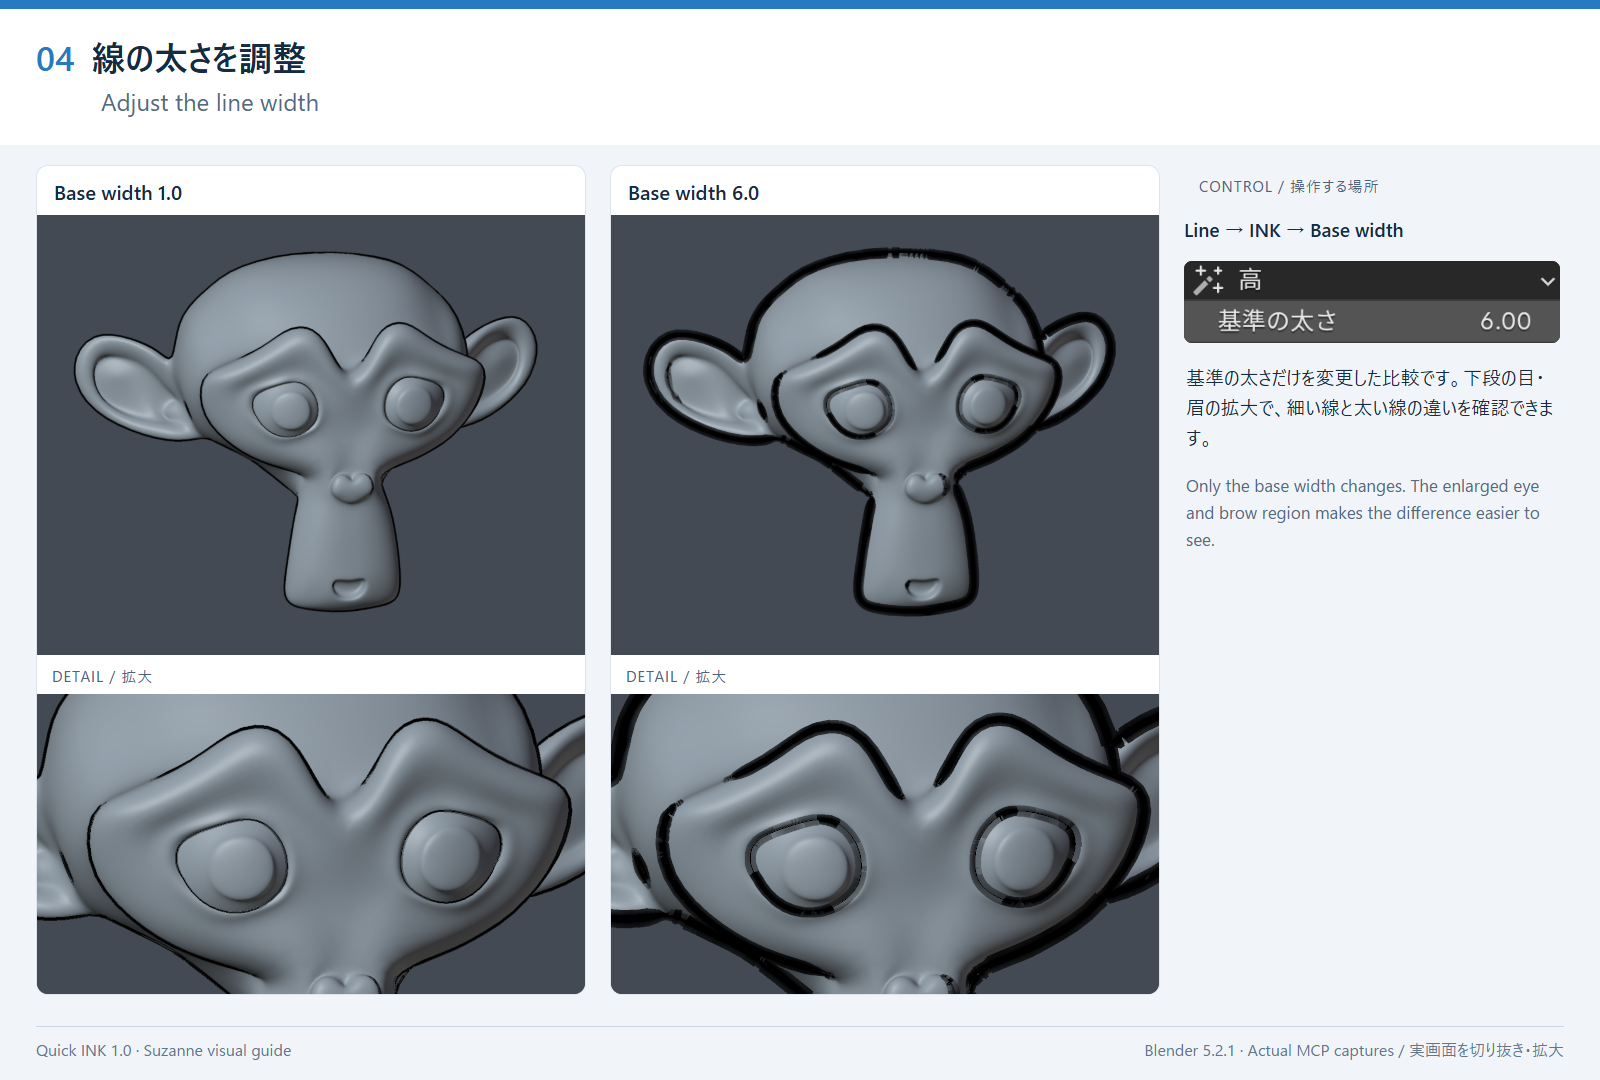
04 · Adjust the line width — Only the base width changes. The enlarged eye and brow region makes the difference easier to see. Click to open at full size
Automatic width and rhythm
Auto Line Weight makes line ends, corners, and junctions thinner for a hand-drawn look. It affects the INK layer only.
Property
What it changes and when to use it
Strength
Overall strength of the automatic width change. 0 gives no effect.
Belly Reach
Distance from an end before the line returns to the base width. Larger values make a longer taper.
Tip Scale
Width at a line end. Values near 0 make a sharp tip.
Belly Amount
How much the middle of a stroke is thickened. 0 only makes the ends thinner.
Belly Curve
Shape of the taper. Higher values keep the thin part longer.
Break Angle
Splits a stroke at folds sharper than this angle. Too high can make lines into short pieces.
Cut at Junctions
Splits lines where they cross, so the end-and-junction width changes are clearer.
Thicken Overlaps
Thickens lines where objects overlap. Self-overlaps such as hair strands are included.
Outline Definition
Defines an outline as the edge against the background only, or also edges between objects.
Thicken Outline
Thickens the character's outer silhouette. This is the main control for silhouette emphasis.
Detail Line Trim
Adjusts object/material boundary lines. Use it to quiet interior detail while emphasizing the silhouette.
Rhythm
Adds a slow width variation along long lines. Use it when strokes look too uniform.
Rhythm Length
Length of one variation cycle. Smaller is finer; larger is slower.
Rhythm Anchor
Anchors the variation to the object or the screen. Object anchoring keeps the pattern steadier when the camera moves.
Rhythm Seed
Pattern number for the variation. The same number gives the same pattern.
Line Details: line appearance
Property
What it changes and when to use it
Per-Line-Type Style
Gives silhouettes, intersections, boundaries, and creases their own colors and widths.
Outline / Intersection / Boundary / Crease
Color and width for each line type. Turn on Intersection Lines before adjusting its row.
Line Transparency / Peel Bias
Uses painted A (transparency) values to show lines behind a face. It has no effect on faces with no A paint.
Stretch / Angle
Stretches the brush tip into an ellipse and rotates it. 0 keeps a round tip.
Backfaces
Choose Follow Viewport / Always Cull / Always Keep. Always Keep helps with thin or open meshes.
Organic Edges
Adds hand-drawn wobble, paper-like roughness, and faint bleed. Return the sliders to 0 for the original look.
Wobble / Rough Edge / Dry Brush
Controls line-position wobble, rough borders, and dry-brush breaks.
Texture Scale
Size of the hand-drawn pattern. Smaller values make finer marks.
Ink Bleed / Bleed Radius
Spreads faint ink outside a line. Radius controls how far it spreads.
Anchor to Object
Controls whether the pattern sticks to the object (near 1) or the screen (near 0).
Distance Reduction
Fades far-away lines to stop distant objects becoming solid black. It starts after Near and reaches Size at Far / Alpha at Far at Far.
Far Distance Taper
Automatically thins lines on objects that are small on screen. Use it in wide shots where lines clump together.
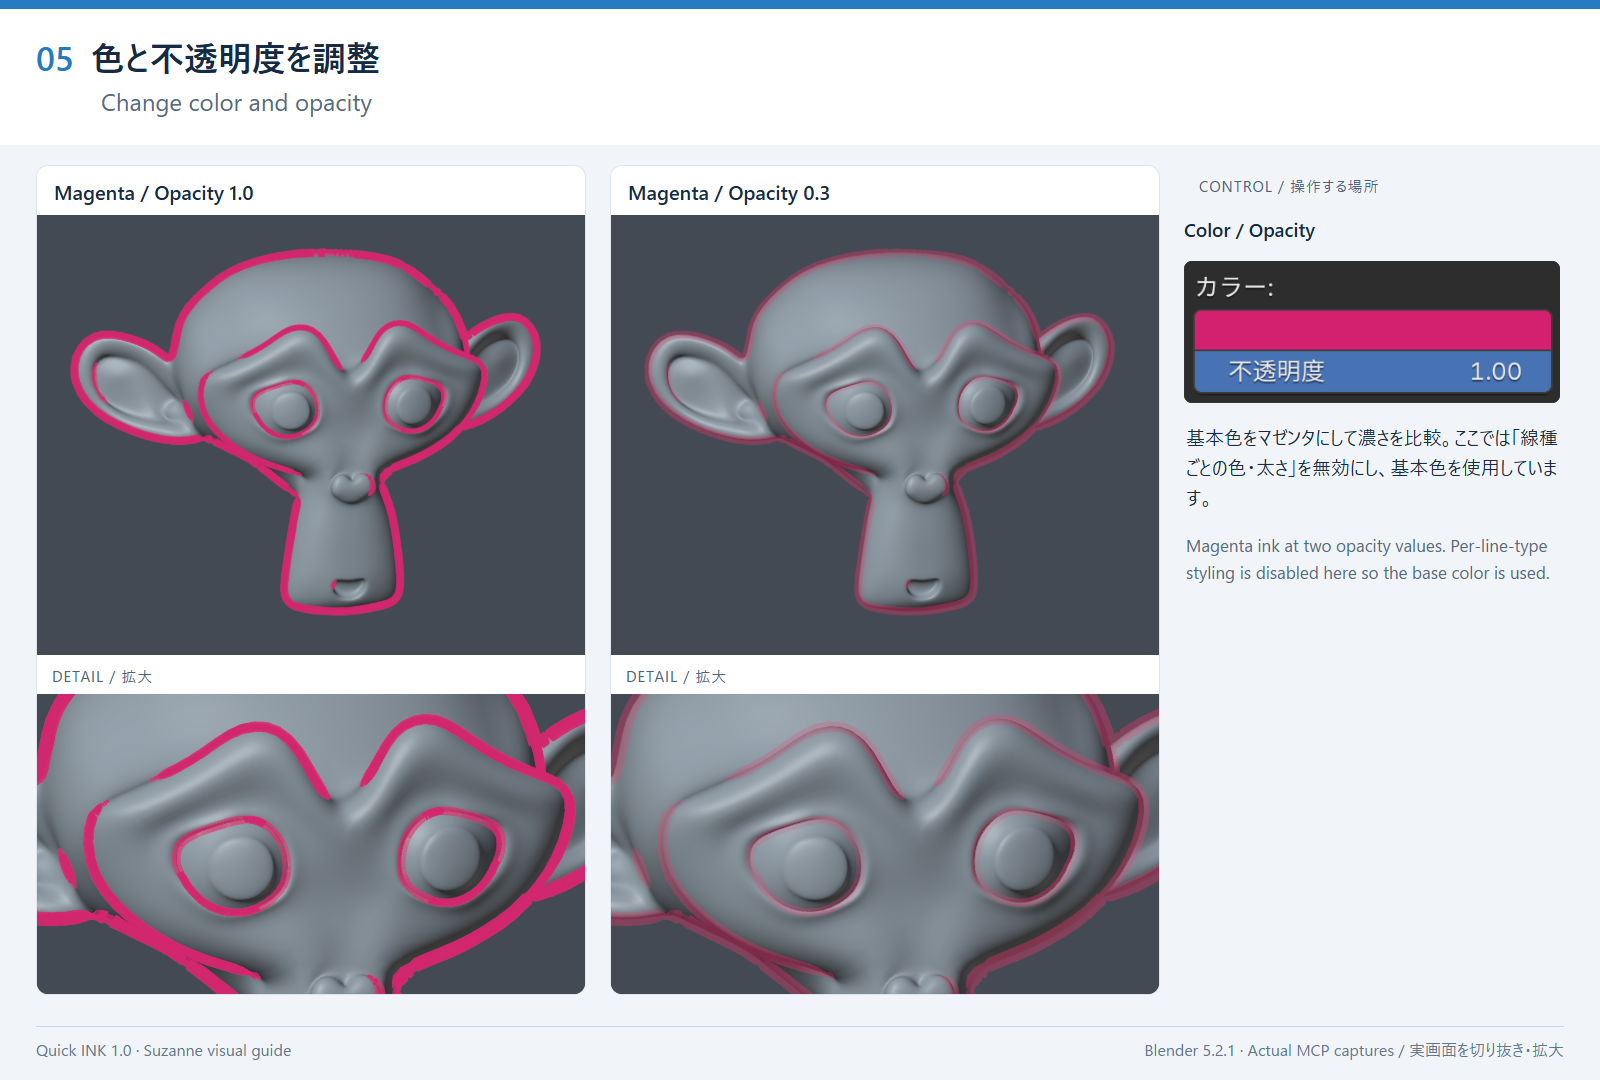
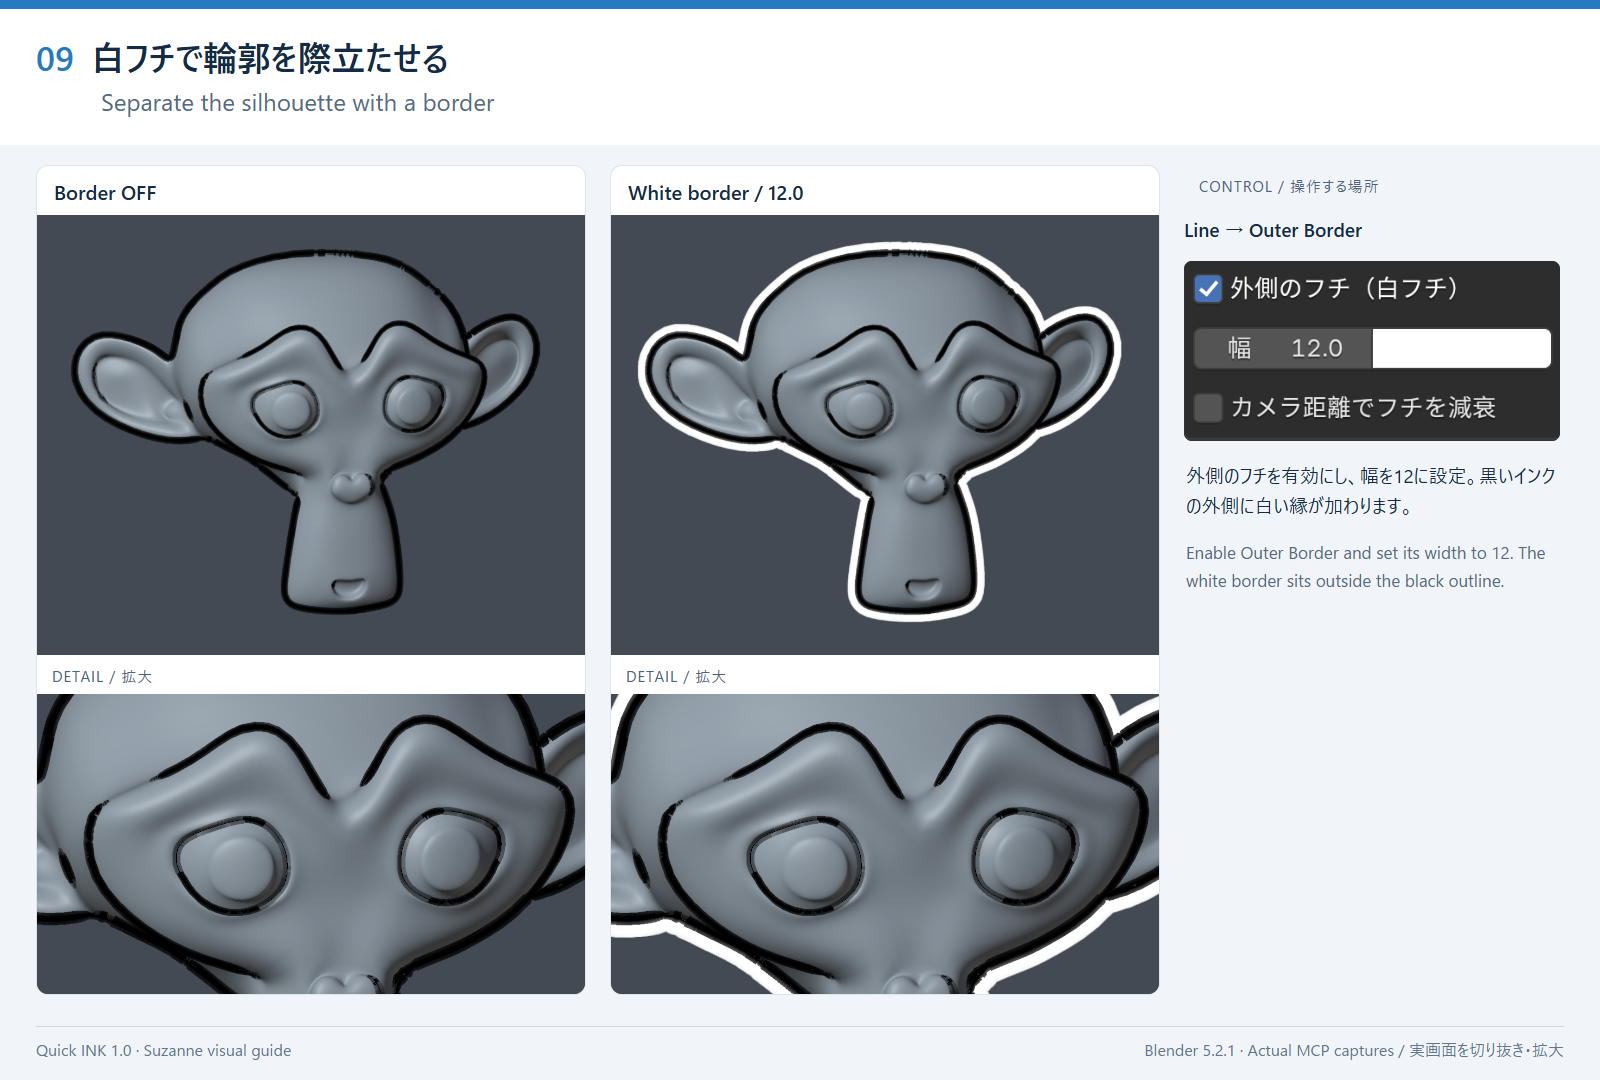
05 · Change color and opacity — Magenta ink at two opacity values. Per-line-type styling is disabled here so the base color is used. Click to open at full size09 · Separate the silhouette with a border — Enable Outer Border and set its width to 12. The white border sits outside the black outline. Click to open at full size
Line Details: joining and detection
Property
What it changes and when to use it
Line Continuity
Bridges gaps where a line became dots. Choose Auto / Always On / Off.
Passes
Number of gap-filling passes. Increase it for longer breaks, but avoid joining unrelated lines.
Gap Closing
Fills tiny gaps at the ends of thick lines. Turn it off when thin-line shape must be preserved exactly.
Remove Speckles / Min Length
Removes tiny dots and spikes that are not real lines. Higher length removes finer fragments too.
Depth Bias
Sensitivity to depth changes. Lower it when shallow bevels become dotted.
Crease Angle
Sensitivity to face-direction changes. Lower it to find gentler folds.
Object / Material Borders
Uses object boundaries and material boundaries as line sources.
Normal Angle / Min / Max
Limits lines to surfaces facing the camera within the chosen range.
Too Many Lines: Suppress Specks
Reduces isolated short lines that look like dots or spikes.
Anti Blackout
Stops distant objects becoming black from too many lines. It has little effect up close.
Declutter / Density Target / Strength
Fades only fine crease lines in crowded areas. Positions stay the same; darkness is reduced.
Scope & Cost: Collection
Limits line processing to one collection.
Culling / Min Screen Size
Skips objects outside the view or too small to see. This can make heavy backgrounds faster.
Rebuild All During Playback
Rebuilds every object on every playback frame. Use only when lines lag; turn it off if playback becomes heavy.
Fold Boost: It defaults to 0 and ranges from 0 to 4. Adds the real fold angle to the line detector instead of lowering its threshold. Use it when modelled folds such as pleats break up into dashes. Raise it only after the lines are thick enough — on thin lines it adds more dashes instead. Around 1.0 works well; above 2.0 it backfires.
Extra settings on the layer tabs
Layer or property
What it changes and when to use it
Inverted Hull: Width / Color / Opacity
Width, color, and opacity of the outline made by slightly inflating the object. It is less likely to flicker when the camera moves.
Depth Offset
Moves the inflated back face farther away. Adjust it only when the outline flickers.
Use Vertex Color Width
Reuses vertex-color R for the inverted-hull width. Off gives a uniform width.
ID Boundary: Width / Color / Opacity
Width, color, and opacity for object/material boundaries. It does not draw creases inside one object.
Uses Blender edge marks as lines. UV Seam is normally a texturing mark, so turn it on only when you need it.
Curve / Grease Pencil
Includes curve objects and Grease Pencil strokes.
Edge Appearance: Width / Color / Opacity / Depth Offset
Look of edge and stroke lines. Adjust Depth Offset only when lines are missing.
Vector: Auto Update
Rebuilds vector lines when the camera, objects, or frame changes. If off, press Rebuild.
Sample Spacing / Time Limit / Curve Limit
Sampling gap, time allowed for one rebuild, and curve-count limit. Finer settings are cleaner but slower.
Use Render Resolution
Calculates vector lines at the camera output size instead of the current 3D screen size.
Line Source
Chooses silhouettes, creases, material boundaries, open edges, ID boundaries, and other line sources.
Vector Appearance
Sets separate colors and widths for Outline, Boundary, and Creases.
Cryptomatte Composite: Line Width
Thickens lines added after rendering. 0 keeps the original width.
Include Material Boundaries
Includes material changes inside one object in the post-render lines.
Lines Only (White)
Shows only the lines on white. Use it when placing the line art over another background.
Fade Lines Out of Focus / Fade Distance
Fades lines as they move away from the camera focus. Lines are not blurred; they disappear by distance.
Disable Depth of Field
Turns off camera depth of field while Cryptomatte is applied, preventing sharp lines over a blurred base.
Split Angle: It defaults to 20° and ranges from 0° to 180°. Only treats normal splits sharper than this as an edge. Setting it too low picks up the edited normals of smooth models (anime-style characters, for example) and scatters short lines over the face and hair.
Object: per-object properties
Property
What it changes and when to use it
Selected Only
Shows lines only on selected objects. Use it to focus on one object.
No Ink
Removes this object from line processing. Lines behind it remain normal.
Transparent
Ignores this object completely, so lines behind it can show through.
Silhouette Only
Keeps the outside outline and removes lines inside the object.
Keep Outline
Keeps the outside outline above the minimum width and darkness even when interior lines are removed.
Thickness: Relative / Absolute
Relative adds to the scene base width. Absolute uses a width for this object only. The effective width is shown below.
Offset / Thickness
Relative mode edits the difference from the base width; Absolute mode edits the object width.
Taper / Origin / Range / Curve
Thins hair or grass from root to tip. Origin is the start, Range is the distance, and Curve controls the shape.
Apply to Multi-Selection
Applies width and taper settings to all selected objects together.
Material: Width Multiplier / Use Custom Color
Changes the width or color for the active material. A material color has priority over a per-line-type color.
Make Only This Object Easier to Draw
Makes crease, depth, and view-dependent lines easier to find on this object only. 1.0 is the normal value; raise it slightly for dotted lines.
Always Update
Rebuilds this object every playback frame. Use it only when its lines lag behind.
Vertex Color Ink Control
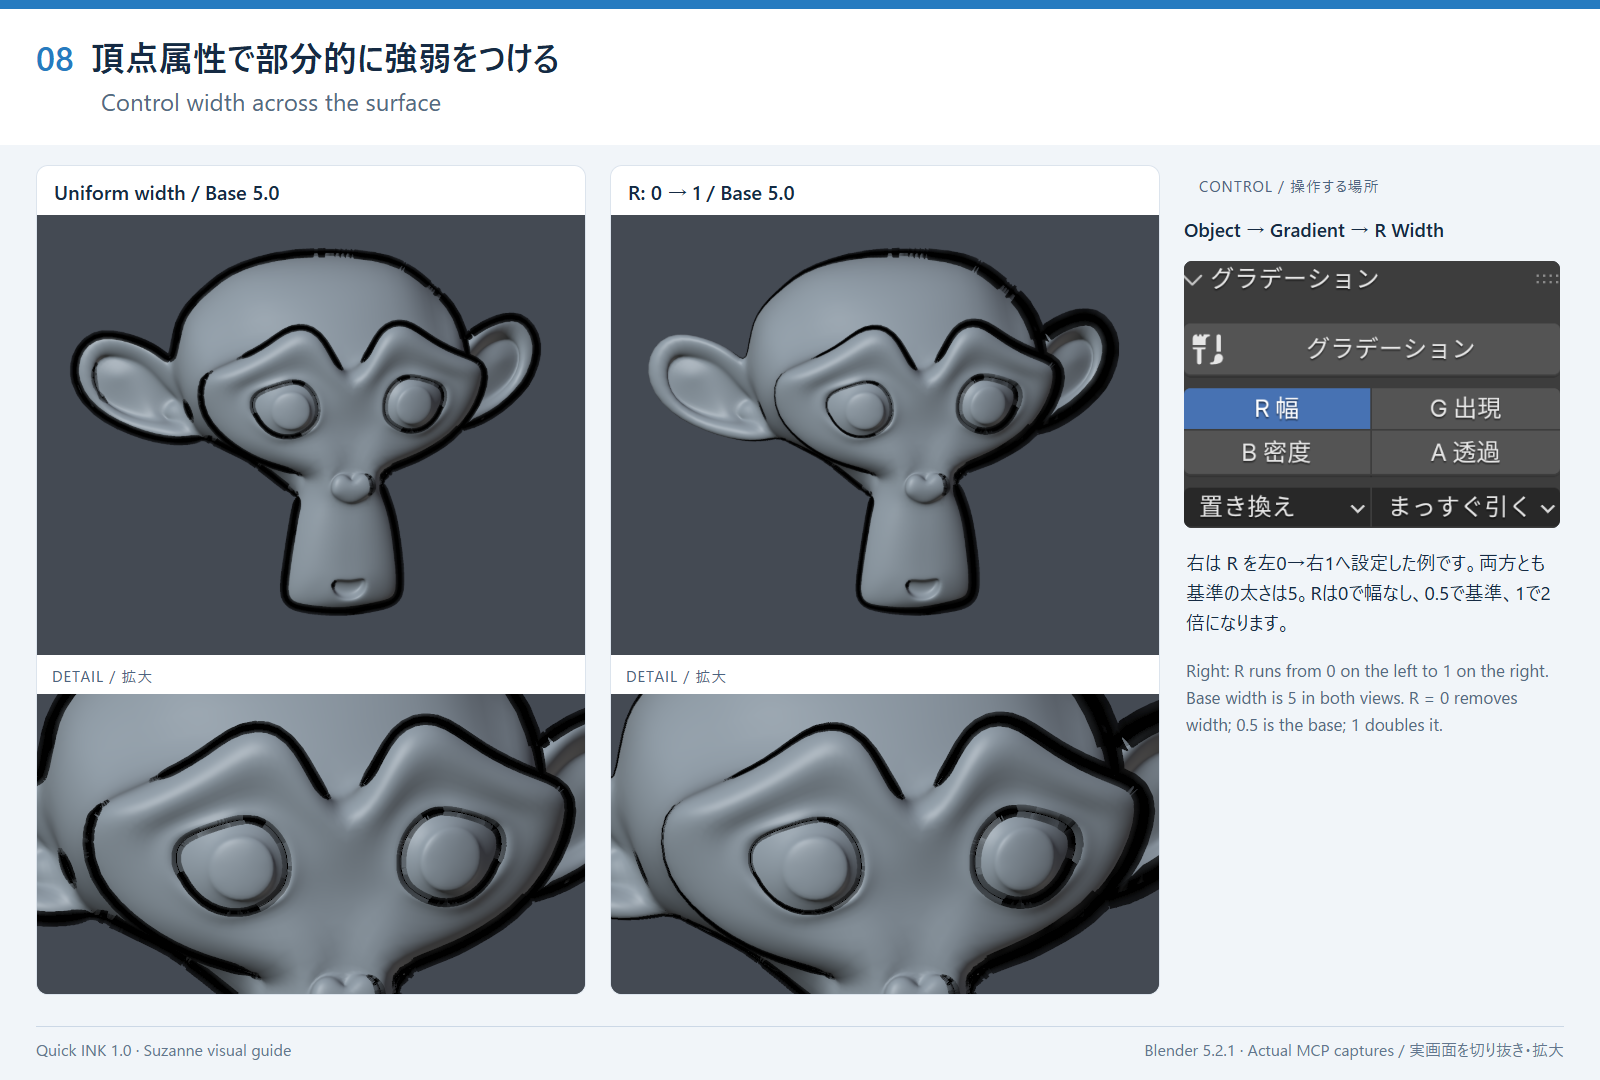
Uses the mesh color attribute cvELD_INK for local width, presence, darkness, and transparency. R is width, G is presence, B is darkness, and A controls lines showing through the face.
Auto Ink: Auto-Tune From Shape
Measures the shape and chooses curvature and edge settings automatically. Leave it on when unsure.
Curvature / Contrast
Strength for thickening recessed areas, and how strongly only deep recesses are selected.
Thin Narrow Areas / Thinness Influence / Contrast
Thins hair tips and other narrow parts. Higher influence can make thin parts disappear.
SDF Samples
Number of samples used to measure thinness. More is smoother but slower.
AO / Invert AO / AO Samples / AO Distance
Bakes line visibility for recessed areas. Invert AO makes shadowed areas less likely to show lines.
Edge Intent / Intent Influence
Uses Blender edge marks such as Sharp, Crease, and UV Seam to make lines easier to find.
Blur Width / Blur Falloff
Controls how far an edge mark spreads and how quickly it becomes weaker.
Also Consider Dihedral Angle / Angle Threshold
Finds sharp folds even without a mark. The angle value is used when Auto-Tune is off.
Root-to-Tip Gradient / Start Position / Falloff Curve
Fades lines from the root to the tip of hair or feathers. Start is where fading begins; Falloff is the fade shape.
Also Apply To Thickness
Applies the root-to-tip change to width as well as darkness.
Overwrite Manual Painting
Allows Auto Ink to replace hand-painted vertex colors. Leave it off unless you intend to replace them.
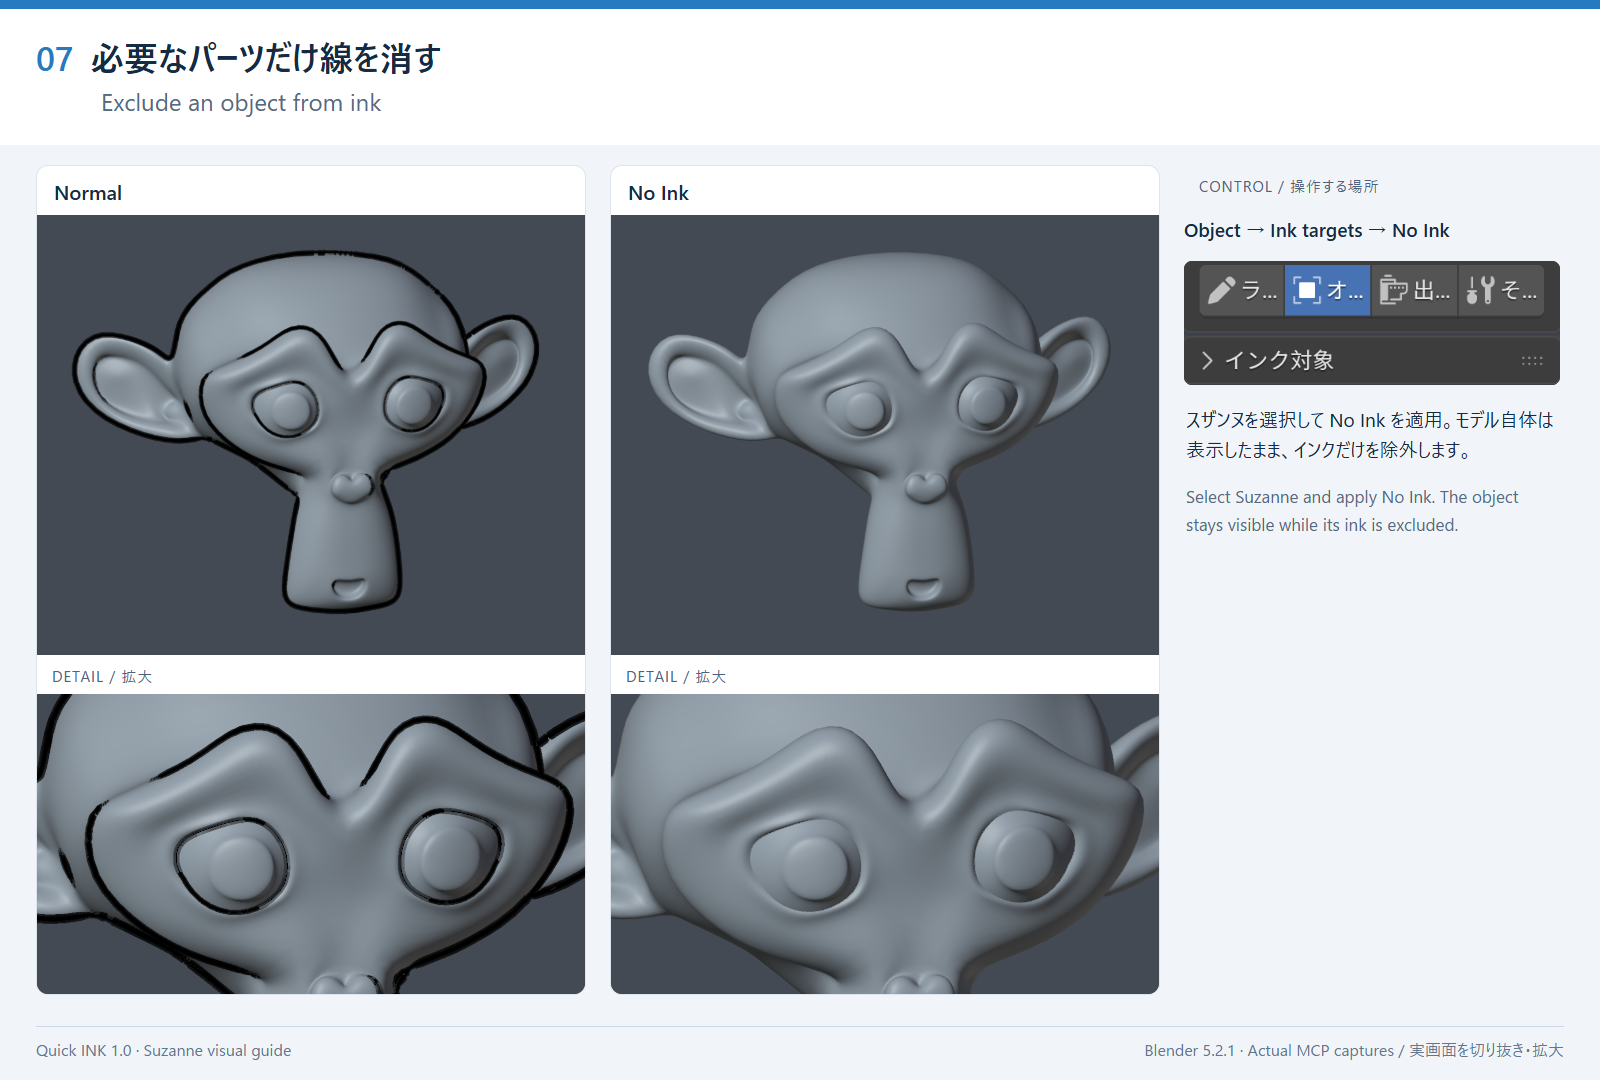
07 · Exclude an object from ink — Select Suzanne and apply No Ink. The object stays visible while its ink is excluded. Click to open at full size
Output / Other: saving and checking
Property
What it changes and when to use it
Camera / Export Directory
Chooses the camera and folder for saved images. A blank camera uses the scene camera.
Lines Only / Composite on Background
Exports a transparent line-only PNG and a PNG composited over the background.
Vector (SVG)
Saves Vector-layer lines as SVG. The Vector layer must be on.
Background
Render uses an EEVEE / Cycles background. Viewport Style is a fast background similar to the 3D screen.
File Name / SVG File Name
Names the files. The number of # characters sets the frame-number digits.
Scale
Changes output size by a multiplier. 2.0 makes both width and height twice as large.
Use Scene Range / Start / End / Step
Sets the animation frame range and interval. Normally the scene range is used.
Output Mode
Exports one image with all line sets merged, or one image for each line set.
Scene Check
Finds places where lines may break or flicker. All scans the scene; Selected scans only selected objects. The mesh is not changed.
Bake: Curvature / AO / Vertex Group
Writes curvature, occlusion, or vertex-group values into vertex colors. Use Ctrl+Z to undo.
Flood Fill
Writes one assignment to the selected part in Edit Mode.
Debug View / Pipeline Status
Shows intermediate line data and whether settings are taking effect. Normally leave these unchanged.
If the list feels large, start with Base Width, Color, and Opacity. Then try one Auto Line Weight or Line Details property at a time. To undo an experiment, return the changed value to its default or reopen a saved .blend.
Use-case presets
Use-case presets decide what you are trying to make: hand-drawn, animation, suggestive contours, or vector. Shift-click can stack compatible use cases.
The visual presets Clean Lineart, Character Art, and Background / Mecha set line width, taper, and texture together. Each can be adjusted after it is applied.
Clean Lineart gives even, confident lines with a light taper for finished artwork; Character Art gives a strong taper and heavy outlines for characters; Background / Mecha gives thin, even lines with no taper for backgrounds, mechanical parts, and diagrams.
Start with one use case, one layer, and one width control. This makes it clear which change affected the picture.
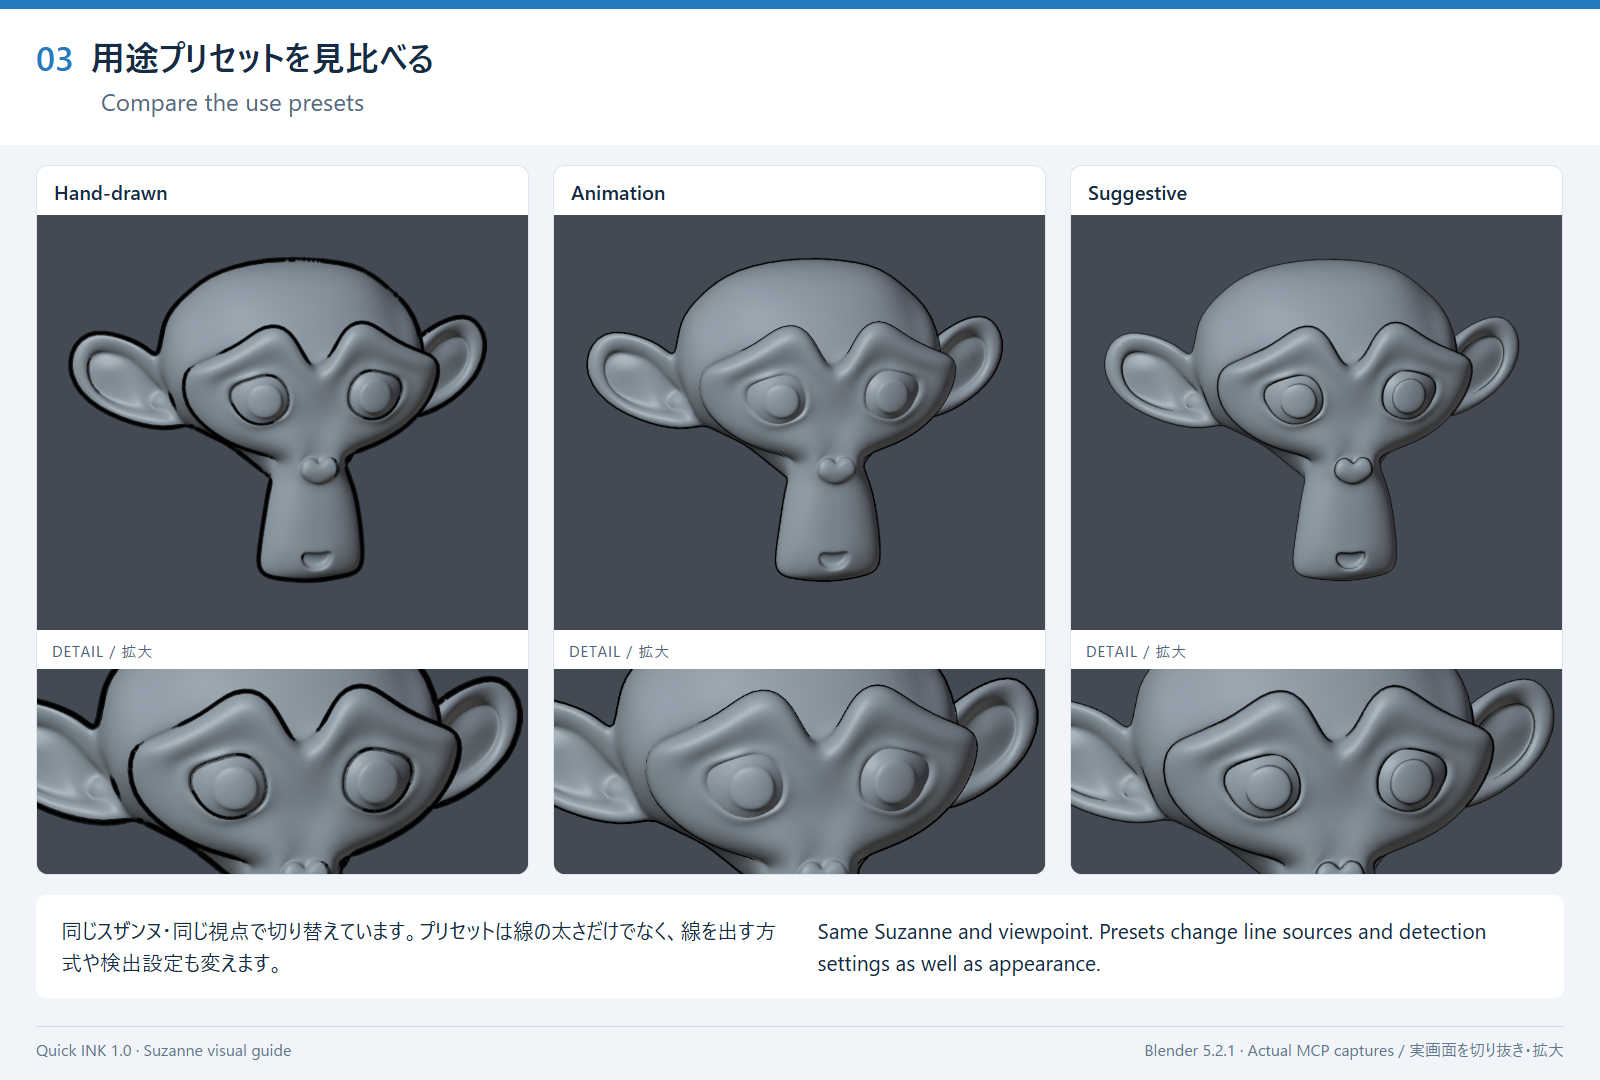
03 · Compare the use presets — Same Suzanne and viewpoint. Presets change line sources and detection settings as well as appearance. Click to open at full size
Line sources and targets
Five layers
Layer
Purpose
Hand-drawn Ink
GPU-generated anime-style ink from depth, normal, ID, and related changes. Adjust silhouettes, creases, intersections, and boundaries.
Inverted Hull
Draws an outline from an inflated back face. Useful when camera movement causes flicker.
ID Boundary
Draws object and material boundaries. It is not the layer for creases inside one object.
Extracts curves from the mesh and draws visible segments on a CPU path. Auto Update follows camera, object, and frame changes; the lines can be exported to SVG.
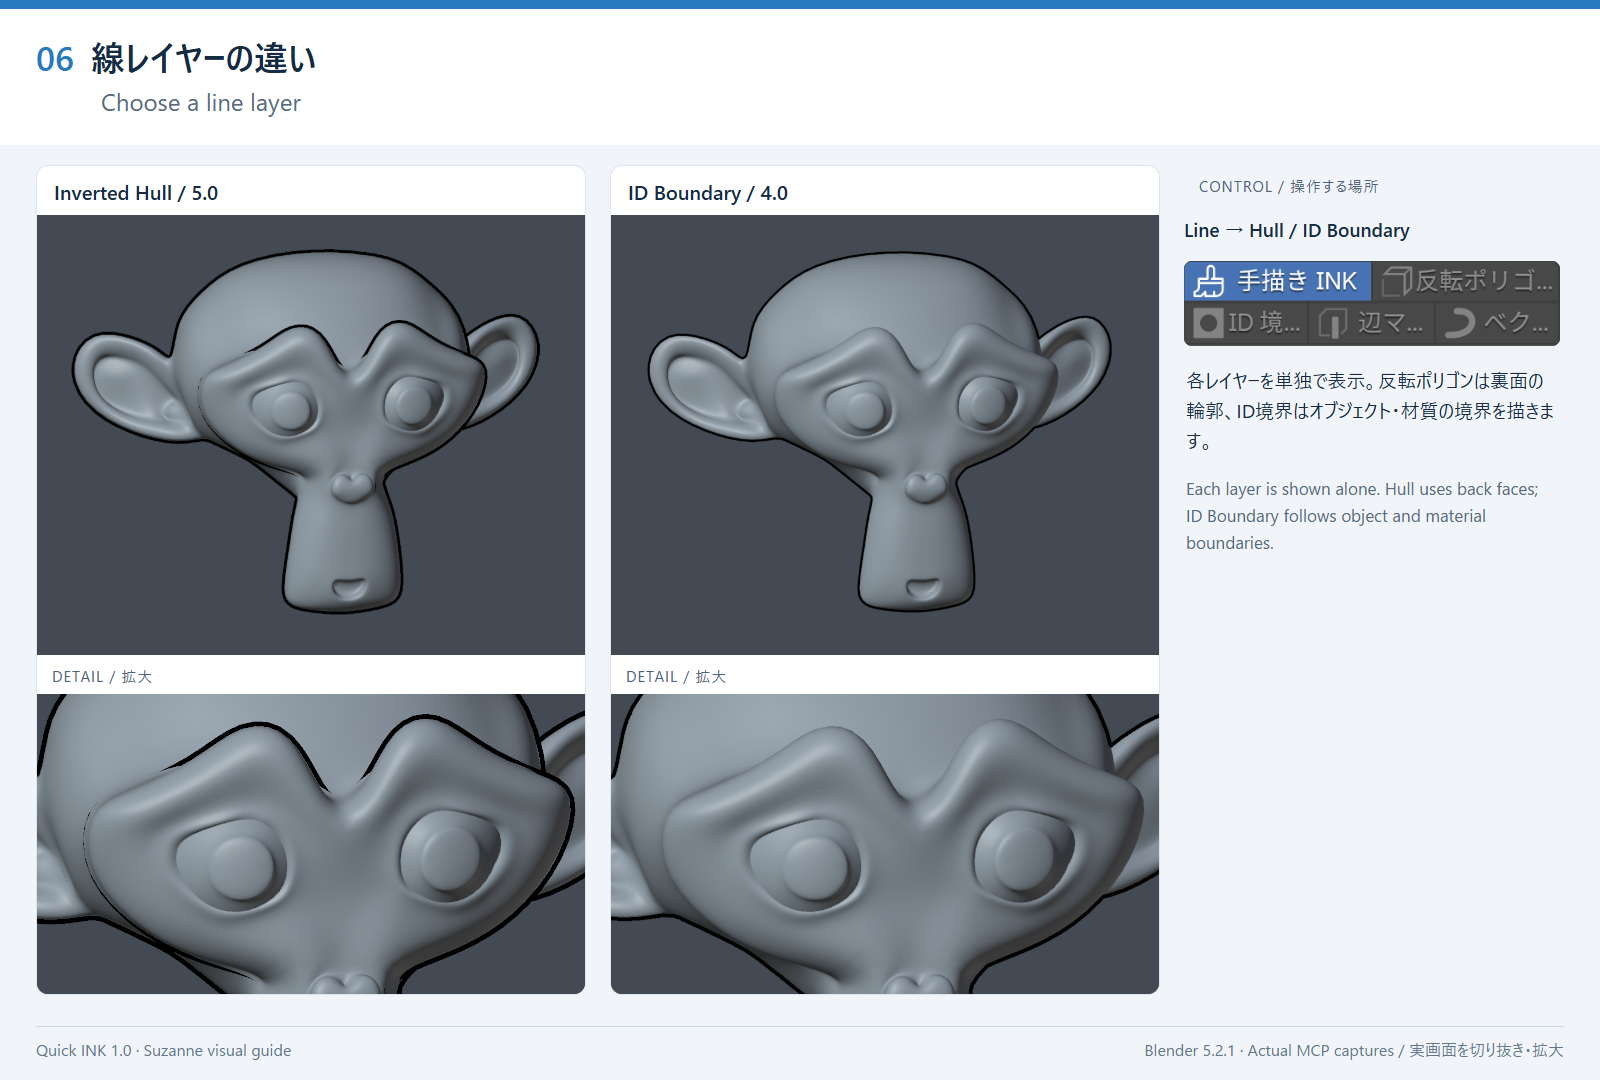
06 · Choose a line layer — Each layer is shown alone. Hull uses back faces; ID Boundary follows object and material boundaries. Click to open at full size
Vertex attributes and targets
A mesh color attribute named cvELD_INK can carry per-vertex line parameters.
Channel
Meaning
R
Width. 0 removes width, 0.5 is the base, and 1.0 is twice the base.
G
Reveal. How readily a line appears; 0.5 is neutral.
B
Density. Line darkness or amount.
A
Line transparency. How much of a line behind the face is allowed through; 0 is normal and 1 is fully transparent to that line.
Per-face line style is stored in cvELD_INK_STYLE. The Object screen provides No Ink, Transparent, Silhouette Only, and Keep Outline per-object controls.
08 · Control width across the surface — Right: R runs from 0 on the left to 1 on the right. Base width is 5 in both views. R = 0 removes width; 0.5 is the base; 1 doubles it. Click to open at full size
Render line-art and output
Cryptomatte composite
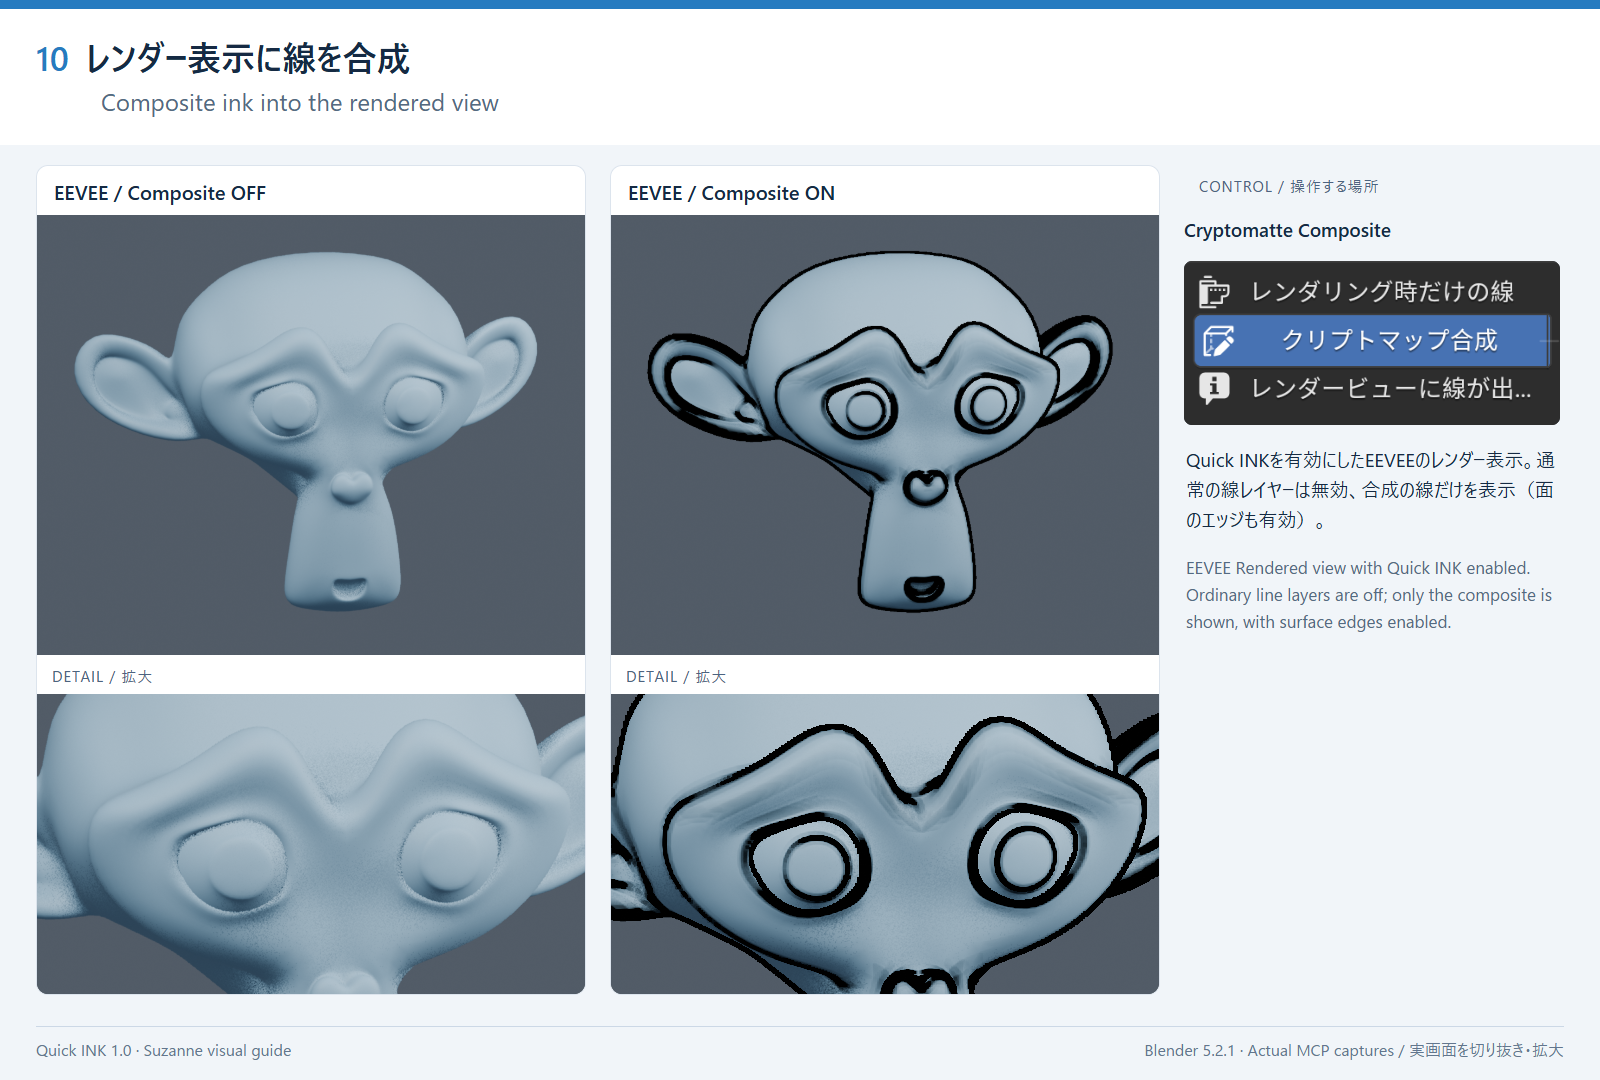
Choose EEVEE and set the 3D View (the 3D screen) to Rendered.
Keep the main Quick INK switch enabled, then press Cryptomatte Composite. It inserts object-boundary line-art while preserving your existing compositor output.
Use Flat View to hide the background and inspect only the lines. Depending on the UI language, it may be shown as Flat Display / Lines Only.
Press the same button again to restore the inserted nodes, render passes, and view state.
EEVEE can show the result live in Rendered View. Cycles can composite the final render, but its viewport passes are empty. Semi-transparent or blended materials are not represented in Cryptomatte. Because the render-line path is separate, lines may remain sharp while the base is affected by Depth of Field.
10 · Composite ink into the rendered view — EEVEE Rendered view with Quick INK enabled. Ordinary line layers are off; only the composite is shown, with surface edges enabled. Click to open at full size
PNG / SVG output
PNG can export Lines Only (Transparent) and Composite on Background separately.
The background can come from an EEVEE / Cycles render or a fast viewport-style output.
SVG exports Vector-layer lines only, sharing the output folder and frame numbering with PNG.
The default destination is renders/ one level above a saved .blend. Unsaved files fall back to cvELD_INK/ in the home directory.
Choose a camera, output scale, scene or custom frame range, and optional per-line-set output. A run of # characters sets the frame digits.
Automation, checks and settings
Auto Ink and Bake
Auto Ink creates cvELD_INK on the selected meshes and bakes shape-driven width, reveal, and density values in one operation.
Bake Curvature to Width writes concavity to R (Width); Bake AO to Reveal writes occlusion to G (Reveal).
Bake Vertex Group writes vertex-group weights to a chosen channel. Channels edited by hand are kept from being silently overwritten by the next Auto Ink run.
Scene Check inspects mesh, attribute, material, and target conditions that can cause line artifacts.
Debug exposes G-buffer, attribute, edge-seed, Auto Line Weight feature, and VRAM state views.
Bake Creases to Reveal: Uses a minimum angle (default 30°), full-open angle (default 90°), and strength (default 1.0) to bake fold sharpness into the reveal channel (G) of the INK vertex colour, so folds are more likely to draw a line. It does not fix dashed lines — it adds more of them. To fix dashes, use Fold Boost on the Lines tab instead.
Settings and shortcuts
Advanced Mode contains Lines, Object, Output, and Other screens. Tune width, color, opacity, distance reduction, taper, brush, gradients, quality, and VRAM Budget by purpose.
Use Save / Load for JSON settings. Open Auto Ink settings with Ctrl+Shift+F9; bare F9 remains Blender's standard shortcut. Long operations can be stopped with Cancel or Esc.
Troubleshooting
Missing lines or panel
Symptom
Check
Quick INK is not in the list
Confirm that the add-on is enabled in Preferences > Add-ons. Move the mouse over the 3D screen, press N, and look for the Quick INK tab.
No lines appear
Confirm Quick INK is On, Draw in this view is On for the current view, at least one layer is On, and Selected Only is not excluding the object.
Too many or too-heavy lines
Check the line source, density, quality, distance reduction, target assignments, and material overrides.
Vertex color edits have no effect
Confirm the attribute is cvELD_INK and the intended R/G/B/A channel is being edited. Line style uses cvELD_INK_STYLE.
Cryptomatte lines are missing
Confirm EEVEE, Rendered shading, and the Cryptomatte Composite state. Cycles viewport passes are empty.
Output or processing stops
If Vector rebuilding is slow, turn off Auto Update and build on demand.
If PNG / SVG is missing, check the camera, export items, destination, and frame range.
For GPU pauses or quality reductions, check VRAM Budget and Other > Debug, and confirm that Blender's GPU backend is OpenGL.
After an update, save the working file and restart Blender so old modules are not left in memory.
Bug reports
Include the following information, and do not attach private production data or personal information:
Full Blender version and GPU backend (OpenGL)
OS, GPU, VRAM, and add-on version
Active layers, settings, and reproduction steps
Warnings or error messages and, when possible, a minimal .blend